
As promised this will be the last post on the new calculation features available in Microsoft CRM Version 2015, released November, 2014. This functionality will help facilitate your solution development. Where once you had to depend on a developer writing code, using this functionality will allow you to configure your system quickly following your company’s business processes.
Since this is the first inclusion of this type of functionality, I believe Microsoft will continue to improve and add to these features in subsequent releases.
If you would like to catch up to the first two parts of this series.
- Part 1 of series you can do so at this location. (Focuses on Basics of Calculated fields)
- Part 2 of series you can do so at this location. (Focuses on the String Functions)
Today I will continue to work on the original Financial Manager scenarios, including new complex calculations and the use of the date functionality calculations.
Scenario: This is a continuation from the previous blog posts starting from the Roll-up functionality, therefore, if you need to review please feel free to do so).
Requirement 1: Our financial manager has now been asked to provide the calculated % of the holding for each account information record’s estimated value based on the total of the asset holdings for each of their customers.
Overview: Please go back to my post on roll-up fields for my methodology for calculating the total asset holdings for our clients. This is very important since this total will be the denominator to determine the % of each individual client’s holdings. At this location
Since we have this roll-up total available to us, we will only be required to focus on the account information record in order to provide the % of its asset value to the sum total of all assets.
Execution: First step is to create a new attribute at the account information level to hold the Accounts Percentage based on the Total Assets.
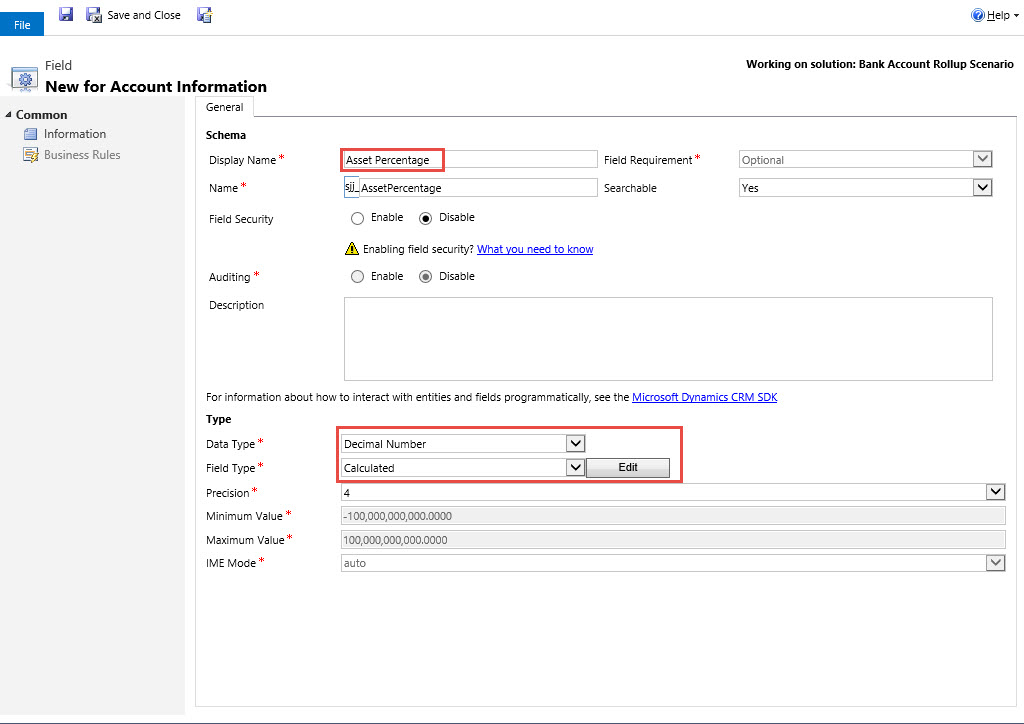
Click on the edit button, As you can see I am using the Estimated Value attribute as the nominator and the Total Asset Rollup field at the contact parent level as the denominator. So the formula is as follows AccountInformation.sjj_estimatedvalue / Contact.sjj_networth.

Note if you are going to use a parent attribute in the calculation you have to use the relationship attribute used for the lookup into the parent hence sjj_clientaccountID Followed by a period. From that point Microsoft Intellisense will allow you to choose from all attributes at the parent level. Hence sjj_networth.
Click on the check mark on the bottom right of the Action section to save the formula.

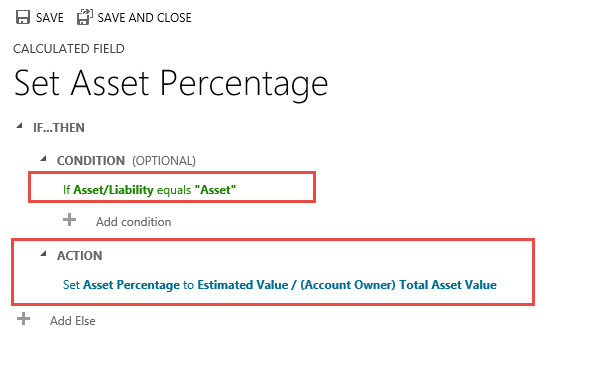
Our next step is to create a condition where the calculation will only render if the Account Information record is defined as an “Asset” Record.
Save and Close the Calculated field formula
Place the Asset Percentage Attribute on the Account Information Form
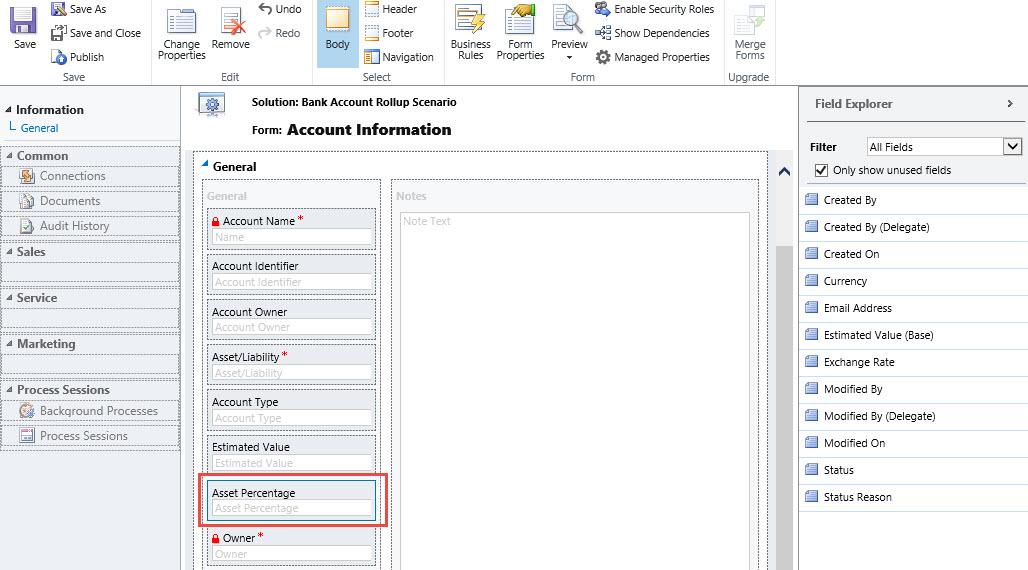
Save the form and publish the changes
Start off by opening an account information record where the asset/liability = “Liability”
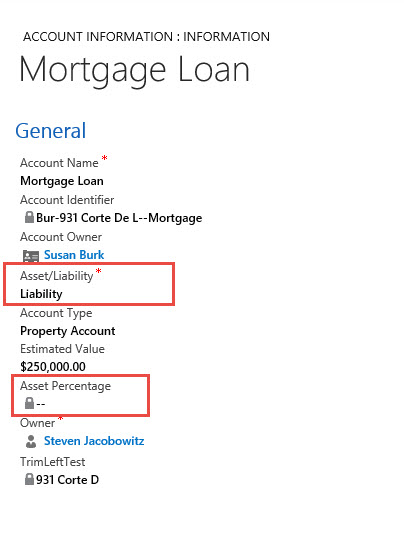
View above the Asset Percentage is left blank.
Now open an Account Information record where the Asset/Liability = “Asset”

Notice the Asset Percentage has been automatically Calculated.
Note: Remember as long as you correctly identify the related parent lookup attribute and follow it with a period Intellisense will automatically render all attributes at the parent level for use in calculation functions.
New Functionality Scenario: Our Financial Firms are now going to sell Certificates of Deposits and track them in the Account Information entity.
Requirement: Our financial manager has now been asked to provide an attribute to track Maturity in Months as well as the date of maturity for the CD purchased.
Execution: First step is to create a new attribute capture the CD Months to Maturity. Note: Our typical terms are between 0 – 60 months term duration.

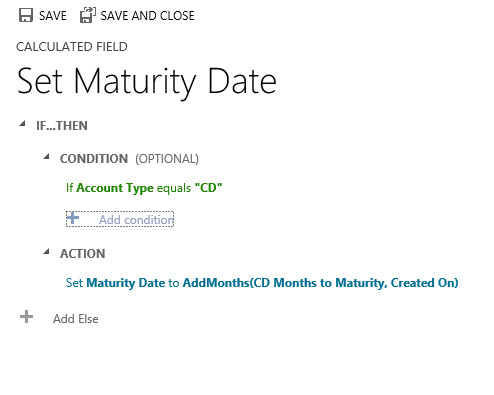
Our next step would be to create a calculated attribute that will track the Maturity Date.

Notice we are defining the data type as Date and Time and the Field type is calculated.
Click on the edit option to render the formula definition window.

Formula Information: Notice in the formula above we are creating an initial calculation option that will AddMonths, (We are using the Maturity in Months attribute as the plug. We are going to increment the Createon date, (Our assumption is the CD will be tracked starting on the date the record is created).
Our next step is to create the condition on when we want the calculation to instantiate, i.e., if the Account Type = “CD”

Click on the Check on lower right of condition, your formula should resemble the picture below.
Save and Close
Place the two new attributes on the Account Information form, Save and Publish.

Save and publish your work
Bonus Functionality: Our Financial Manager wants to provide additional benefits to the Account Information form, therefore if the Account Type = CD the Months to Maturity Attribute should be defined as business Required, in addition, he feels the only time the Months to Maturity Attribute should be viewable on the form is if the Asset Type = CD.
He will execute these requirements by creating a business rule.
Go to Entity Account Information, Click on Business Rules and click on New.
Our first step is to identify the condition, Account Type = “CD”
Our next step is to create an action that will change the CD Months to Maturity to Business Required status

Now let’s focus on the Hiding of the Months to Maturity Attribute by defining an Else If condition.

Notice we defined that if Account Type <> “CD”
Hide the CD Month to Maturity Attribute

Save and Close this rule then publish all changes.
Notice when you open up an account information record that has an account type <> “CD” the Months to Maturity is not rendered on the form.
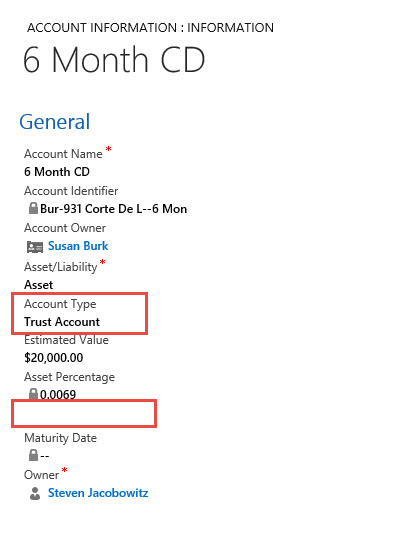
Conversely when you open an account information record that has the account type – “CD” the Months to Maturity is on the form and business required.

Charting Information: As a result of this information and the calculated fields our financial manager can now look at a client and view all their holdings including the percentage of each holding to the total assets in one location.

There are a few additional considerations you should take note of when using calculated fields: (Reprinted from the TechNet Document on Calculated Fields)
Calculated fields considerations:
You should be aware of certain conditions and limitations when working with calculated fields:
- Saved queries, charts, and visualizations can have a maximum of 10 unique calculated fields.
- The calculated field values are not displayed in the CRM Outlook Offline mode in the tile views or on entity main forms.
- A maximum number of chained calculated fields is 5.
- A calculated field can’t refer to itself or have cyclic chains.
- If you change one of the condition operators in a multiple condition clause, all of the condition operators will update to that condition. For example, in the clause IF (x > 50) OR (y ==10) OR (z < 5), if you change the OR operator to the AND operator, then all OR operators in the clause will become AND operators.
- You can access parental fields via the Lookup field to the parent entity, such as <LookupFieldName>.<FieldName>. This is not possible with multi-entity Lookup fields like Customer which can be Account or Contact. However, some entities have individual Lookup fields for a specific entity, such as ParentAccountid.<FieldName> or ParentContactid.<FieldName>.
- Sorting is disabled on:
- A calculated field that contains a field from a parent record.
- A calculated field that contains a logical field (for example, address field).
- A calculated field that contains another calculated field.
- Calculated fields can span two entities only.
- A calculated field can contain a field from another entity (spanning two entities – current entity and parent record).
- A calculated field can’t contain a calculated field from another entity that also contains another field from a different entity (spanning three entities): (Current Entity) Calculated Field <- (Parent Record) Calculated Field 1 <- (Parent Record) Calculated Field 2.
- You can’t trigger workflows or plugins on calculated fields.
- You can’t change an existing simple field to a calculated field. If your current application is using JavaScript or plug-ins to calculate a field, you would not be able to use the calculated fields feature without creating a new field.
This post will conclude this series on calculated fields. My understanding has been enhanced by articulating the feature set and using real world scenarios to illustrate the power of this new CRM capability. Next week I am going to start to tackle the timer control and the changes now available in Microsoft CRM 2015.
I would love to hear about your experiences using this new functionality, please feel free to contact me with comments to these posts.
As always,

