
Ok I wanted to do something novel in this entry and decided to use the control in CRM 2015 in my next scenario. More on the control first.
History:
The timer control was first introduced to Microsoft CRM 2013 during the days of Leo release, June, 2014. This control helped me win a very important deal with my last employer because we came into a customer service scenario with a way to view SLA’s on a CRM Record.
Timer Control Highlights:
The timer control functionality is to count down, (decrement) prior to an SLA Threshold then it count up, (increment) after it passes that same threshold. It give you a great visual on the case record. Actually it can be deployed on any entity form, (as I will demonstrate later), the trick is deploy it when the scenario presents itself.
Traditionally you would add the timer control to the case form to help customer service representatives gauge the amount of time they have to complete a task – typically associated with a service level agreement.
Typically when you configure the control on the form there are several data sources the user can identify such as failure time field, success condition, failure condition, warning condition, cancel condition and pause condition.
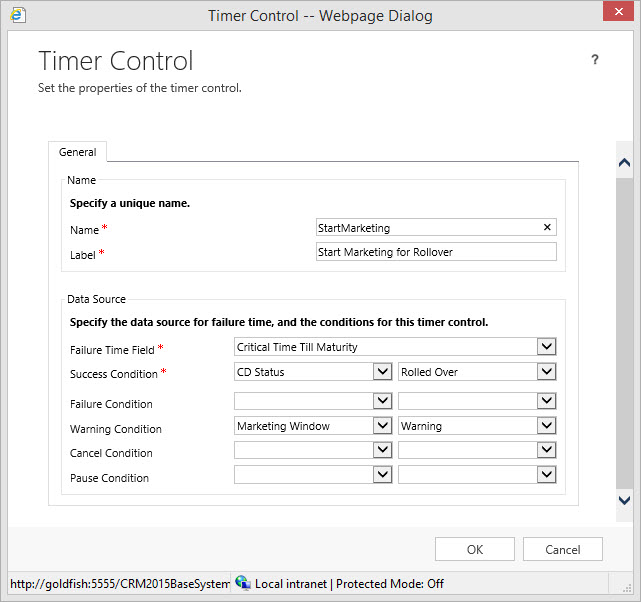
The only attributes required are the Name, Label, Failure Time Field, and the Success Condition. All remaining attributes can be ignored. Deciding to ignore an attribute condition could impact the display on the control as we will later observe.
If all attributes are identified with conditions your expectations would be as follows, (see above picture):
If the task is completed within the time remaining, the control shows the word Succeeded.
If the task isn’t complete within the time remaining, the control shows the word Expired.
As the timer counts down, the color changes to yellow as the time remaining nears non-compliance. If the time remaining expires, the timer shows the word Expired.
Then the timer color changes to red and the timer starts counting up to show the elapsed time since the task should have been completed. This behavior is optional. (Note this condition will only occur if you DO NOT define the Failure condition on the control when configuring.)
If a condition causes the milestone to be canceled, the control shows the word Canceled. This behavior is optional. (Note this condition will only occur if you DO NOT define the Cancel condition on the control when configuring.)
You can cancel the timer count if you configure the Cancel Condition.
You can pause the timer count if you configure the Pause Condition.
Note: If either of the required fields in the Timer Control dialog box do not have a value in the record, the control shows the words Not Set.
Requirements to configure the Timer Control:
You must be a system admin or system customizer
For every timer control you will have to use two additional attributes:
An attribute defined as the type Time/Date, used for Failure Time Field on the control. This will instantiate the time remaining on the control “countdown”
An Option Set or a 2 Option Attribute for use for the definition of the Conditions on the Timer Control.

To access the timer control open up a form in the configuration window. Navigate to the Insert Tab and click on the Tab Control Icon.

Now it is a matter of identifying the time attribute you want to use for the Failure Time Field and your Condition(s) attributes. It is really that simple.
Let’s look at a real world scenario and create a solution using the Timer Control.
Scenario:
Our Financial Firm is very pleased with the work done so far with the Account Information Entity. Our client financial managers are able to view their client’s and the accounts they currently hold with our institution.
Sales is requesting the client account managers get more proactive with their client base. There is a push currently to renew CD’s because we are offering a new program for early rollover commitments that would be an attractive, safe, and high yield investment alternative. We are currently tracking CD’s in our Account Information entity. In addition, our Sales manager has determined that there is a window of opportunity to renew a greater percentage of CD’s if the Client Financial Managers are talking to their clients between 30 to 45 days prior to CD maturity.
Our business analyst has been asked to look into methodology of including this functionality into our CRM System with the following requirements:
- 45 Days prior to maturity notifications to identified Client Financial Manager that a client’s CD is coming due for renewal.
- By Email
- A Timer set to Warning for the 15 Day Window and subsequently changed to critical after the 15 day threshold has been crossed.
- 30 days prior to renewal of the CD a timer is set to warning, indicating there is 1 month remaining until CD maturity.
- At the Maturity date an indication that the threshold has passed
- If the client does rollover the CD, there is an indication on the record that there was success.
- If the client redeems or moves their funds, there will be an indication on the record that there was failure to renew.
Execution:
Let’s open the Account Information entity to a CD to assess where we are in the process.

If you remember back to my second post on calculated fields we used the date functions to calculate the maturity date. Review Here
We actually can use this Maturity Date to define our Failure Time Field threshold on a Timer Control that we will call Time Till Maturity; meeting the requirement identified in # 3 above.
We also can use the CD Status Option Set to define the remaining conditions on the control we wish to configure.
Let’s start working.
Open your solution and go to the form editor of our account information form and client on the insert tab followed by clicking on the timer control icon.

Start off by identifying the Controls:
- Name
- Label
- Failure Time Field
View the options on the Failure Time, MSCRM Timer Control will only allow the user to include a Time/Date Attribute in this field. As we stated previously the maturity date would be the ideal attribute to use for this threshold

Your Timer Control should appear as follows:

Now we can define our conditions
Notice when we click on the combo box we are exposing all option set and 2 option attributes.
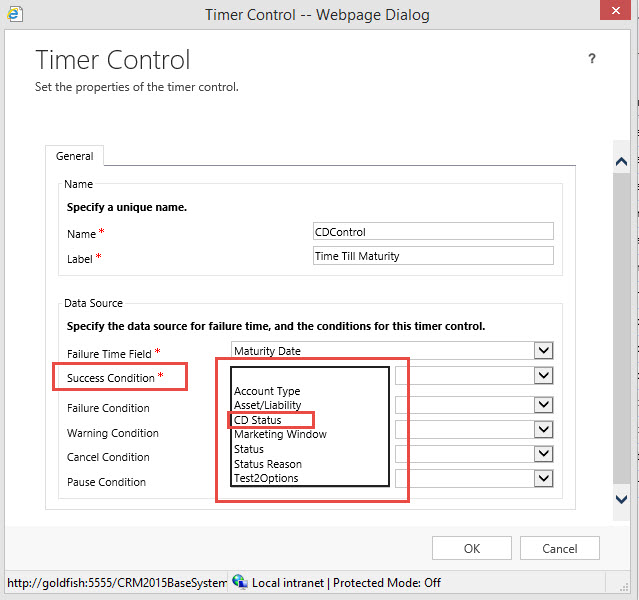
As we discussed we will deploy the CD Status as the attribute and “Rolled Over” as the value in the success criteria.

We can carry on with the same methodology for the rest of the Conditions.
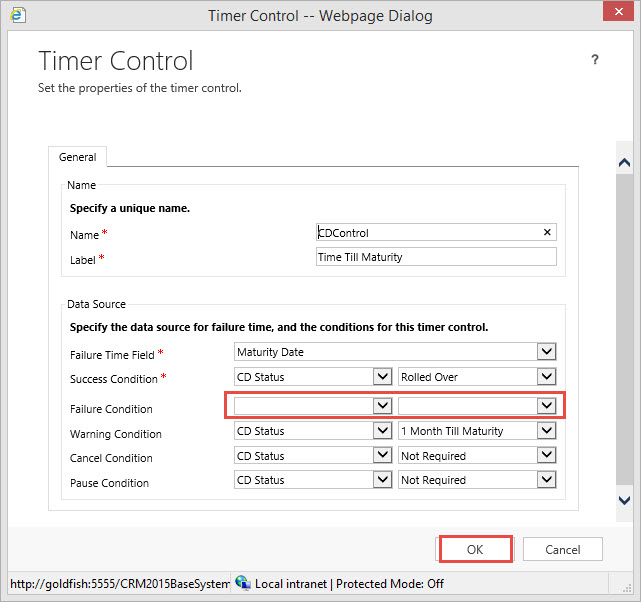
Notice I am leaving the failure condition empty, because I want the timer to turn read after it passes the threshold and start incrementing. If I used a value in this attribute, one it passes the threshold the timer would change to “Expired”
The warning condition is set to the CD Status Value = “1 Month till Maturity” At this point the Timer Control Clock will change from Black to Yellow. We will need workflow to update the CD Status accordingly based on 30 Days before the Maturity Date. At the same time we will send an alert email to the Client Financial Manager regarding the warning status on this particular CD’s Status.
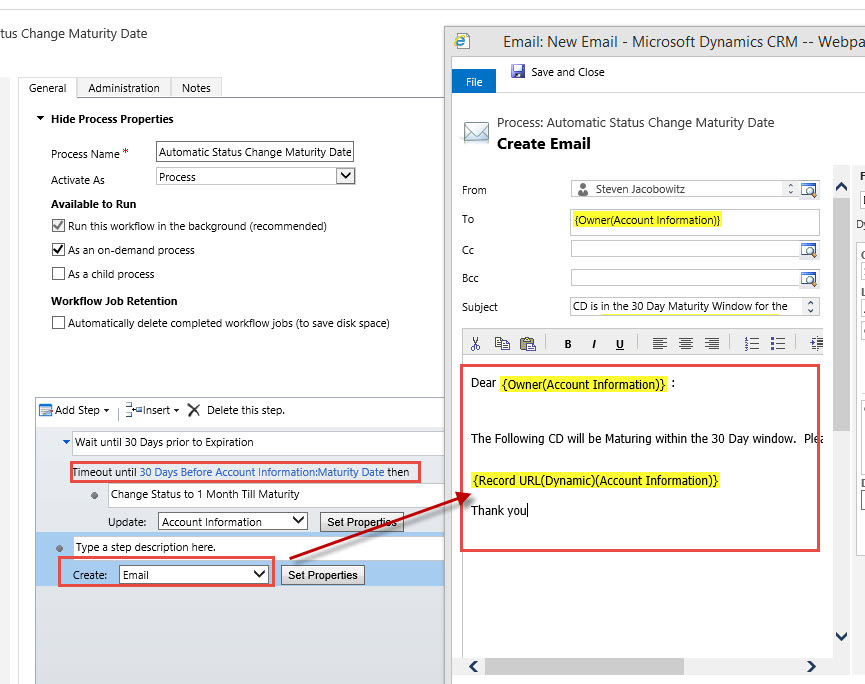
The next step is to click OK Button on the Timer Control. The control will automatically be placed on the form. You can drag it to the appropriate position on the form.

Click Save, Publish and Close.
Let’s view some of the results thus far.
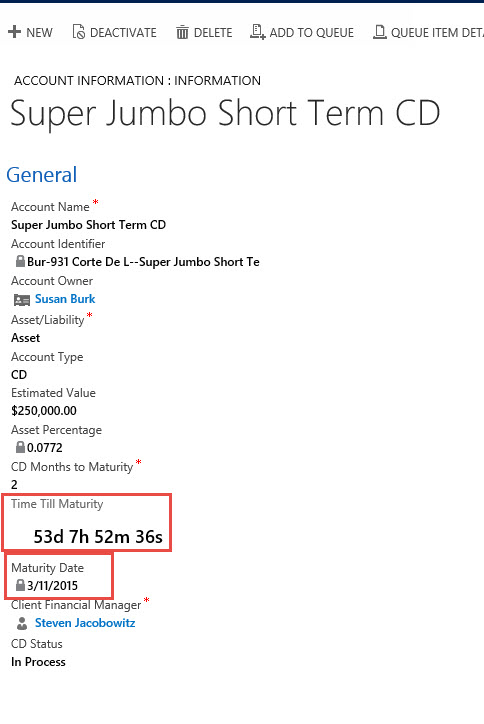
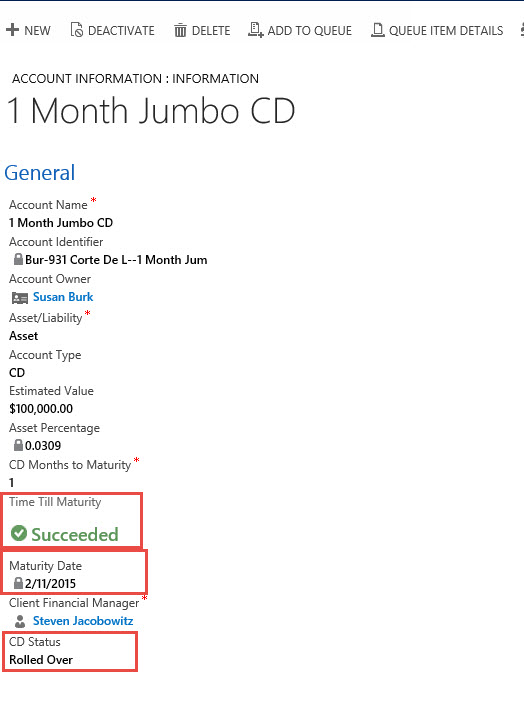
Notice we are outside of the 30 Day period and we are displaying the timer in black.
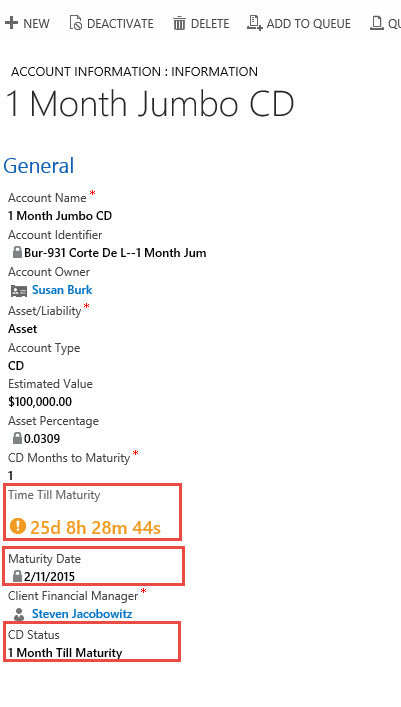
When we are less than 30 days till maturity we have changed the CD Status from “In Process” to “1 Month Till Maturity” and the time turns orange.
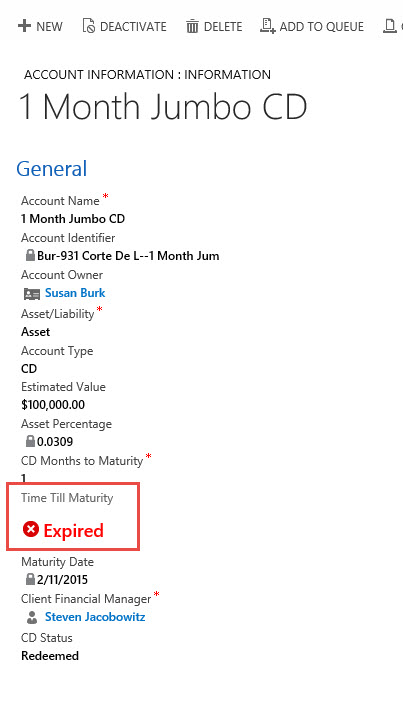
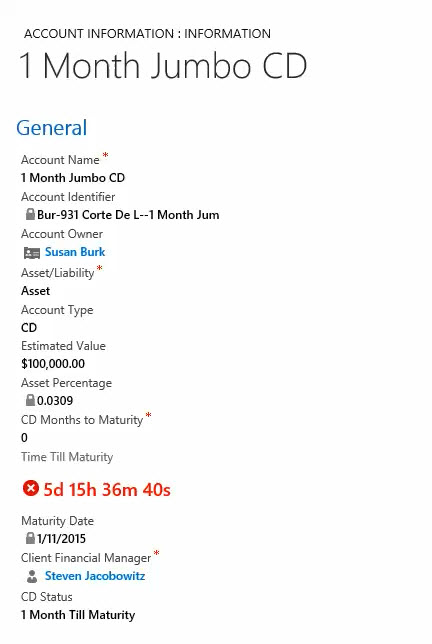
When we pass the maturity threshold our timer turns red and starts incrementing.
If the client rolls over the CD notice our Timer Control displays “Succeeded”
Let’s bring up our requirements to view exactly where we are.
- 45 Days prior to maturity notifications to identified Client Financial Manager that a client’s CD is coming due for renewal.
- By Email
- A Timer set to Warning for the 15 Day Window and subsequently changed to critical after the 15 day threshold has been crossed.
30 days prior to renewal of the CD a timer is set to warning, indicating there is 1 month remaining until CD maturity.At the Maturity date an indication that the threshold has passedIf the client does rollover the CD, there is an indication on the record that there was success.- If the client redeems or moves their funds, there will be an indication on the record that there was failure to renew.
Notice we haven’t not addressed Requirement 1 or Requirement 5. Requirement 1 we are going to use the same methodology process as above. For Requirement 5 we are going to have to take a different approach.
I will cover both of these requirements in my next post next week. In the meantime I did want to point out a few challenges you will have with the deployment of this control.
A few deficiencies with this control:
- You can’t instantiate workflow from the timer control, there are other methods for meeting this objective which I will demonstrate in the scenario below.
- You cannot add the timer control on a view, therefore, you can only view it in real time when you open up record which tends to be a bit cumbersome if handling hundreds of records.
Why don’t you try to tackle one of the two open requirements during the week and get back to me with potential solutions? Also I would love to hear about your experiences using this new functionality, please feel free to contact me with comments to these posts.
As always,


Pingback: Microsoft CRM 2015 New Feature – Everything You Wanted to Know About the Timer Control in CRM 2015 – Part 2 | C/xRM Ramblings