
Welcome back to Part 2 of this topic The Timer Control.
For those who were using this control since the spring release I would like to point out the differences in CRM 2015.
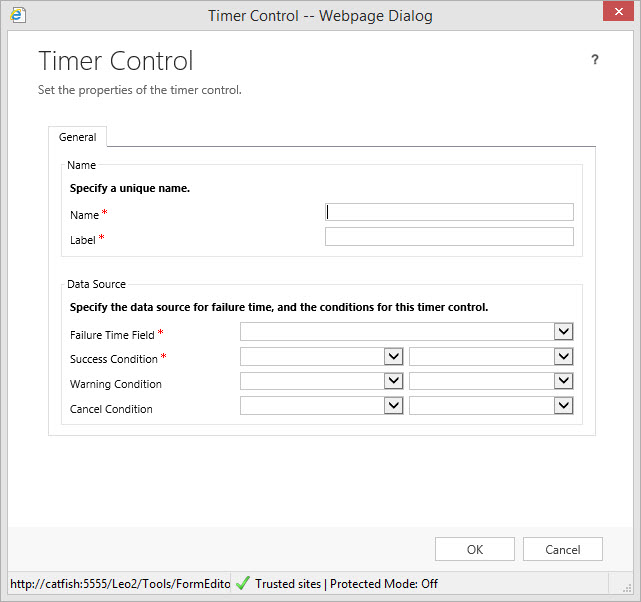
Version 2013 Control
Version 2015 Control
There are two new additional conditions available in the CRM 2015 Version of the Control:
- The Failure Condition – this option will Display as expired on the Timer Control if the Failure Condition is met.
- The Pause Condition – this option further improves the case management capabilities by allowing agents to pause and resume the SLA’s on the Timer Control for which the record was on-hold or waiting on client’s response to ensure SLA’s are met. The Pause Condition’s criteria must be met in order for the Timer to pause. In the case the condition is met, the Timer Control will display a Pause status on the face of the form.
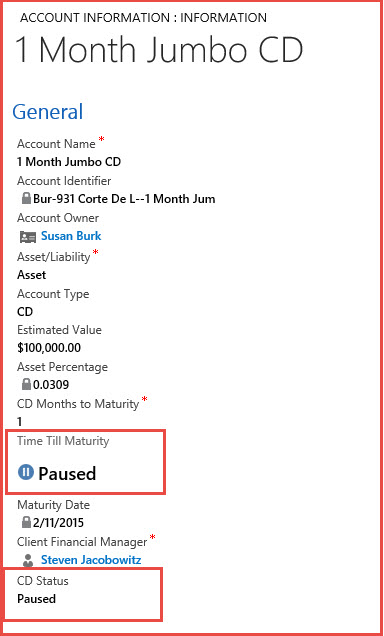
Paused View of the Timer Control
Scenario Continued:
The last post we defined a scenario for the timer control. Let’s continue on till completion.
Scenario Revisited: Our Financial Firm is very pleased with the work done so far with the Account Information Entity. Our client financial managers are able to view their client’s and the accounts they currently hold with our institution.
Sales is requesting the client account managers get more proactive with their client base. There is a push currently to renew CD’s because we are offering a new program for early rollover commitments that would be an attractive, safe, and high yield investment alternative. We are currently tracking CD’s in our Account Information entity. In addition, our Sales manager has determined that there is a window of opportunity to renew a greater percentage of CD’s if the Client Financial Managers are talking to their clients between 30 to 45 days prior to CD maturity.
Requirements:
- 45 Days prior to maturity notifications to identified Client Financial Manager that a client’s CD is coming due for renewal.
- By Email
- A Timer set to Warning for the 15 Day Window and subsequently changed to critical after the 15 day threshold has been crossed.
30 days prior to renewal of the CD a timer is set to warning, indicating there is 1 month remaining until CD maturity. Completed Part 1At the Maturity date an indication that the threshold has passed Completed Part 1If the client does rollover the CD, there is an indication on the record that there was success. Completed Part 1- If the client redeems or moves their funds, there will be an indication on the record that there was failure to renew.
Execution:
Requirement 5 is handled by defining the Timer Control’s failure condition.
- First we will add a new Option in CD Status to Redeemed.
- We will then add this option to the Timer Control’s failure condition.
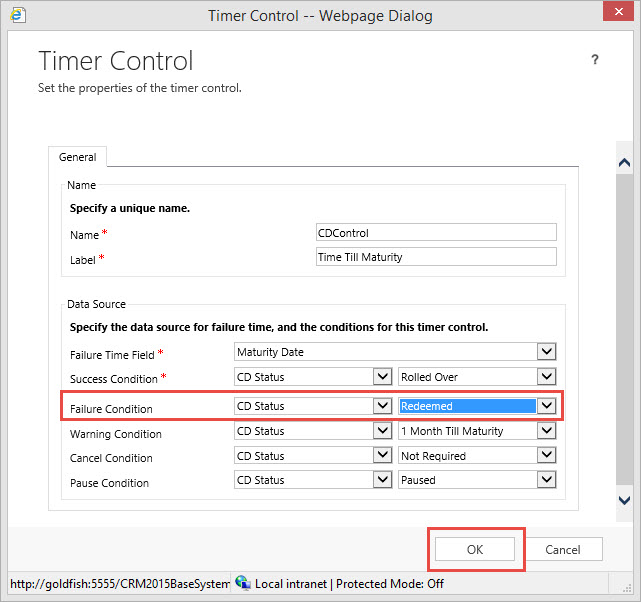
Click OK, then Save and Publish
Note: When the CD passes the maturity date threshold the timer will turn red and start incrementing. If the CD is set to “Redeemed”, the Time Till Maturity Timer will display Expired.

Requirement 1 methodology:
It appears we are going to be required to add another timer to this form to account for the 15 Day Marketing Window.
We are looking to accomplish the following actions:
- We require the timer to display black until Maturity Date <= 45 Days (Prior to SLA threshold)
- We require the timer to go into Warning Condition between 45 Days and >=30 Days till maturity (Critical Time to Market the Rollover)
- We require the timer to cross the marketing threshold when Critical Time to Market is < 30 Days or at the Failure Time Field Interval.
As mentioned in Part 1, for every timer control at least two additional attributes are required. A time/date attribute to define the Failure Time Field and at least one option set or two option attributes to define the subsequent conditions.
We defined the Critical Time to Maturity to be between 45 days and 30 days till maturity, therefore we would like the timer to display Black until this timeframe and change to yellow during this timeframe.
Let’s create two attributes:
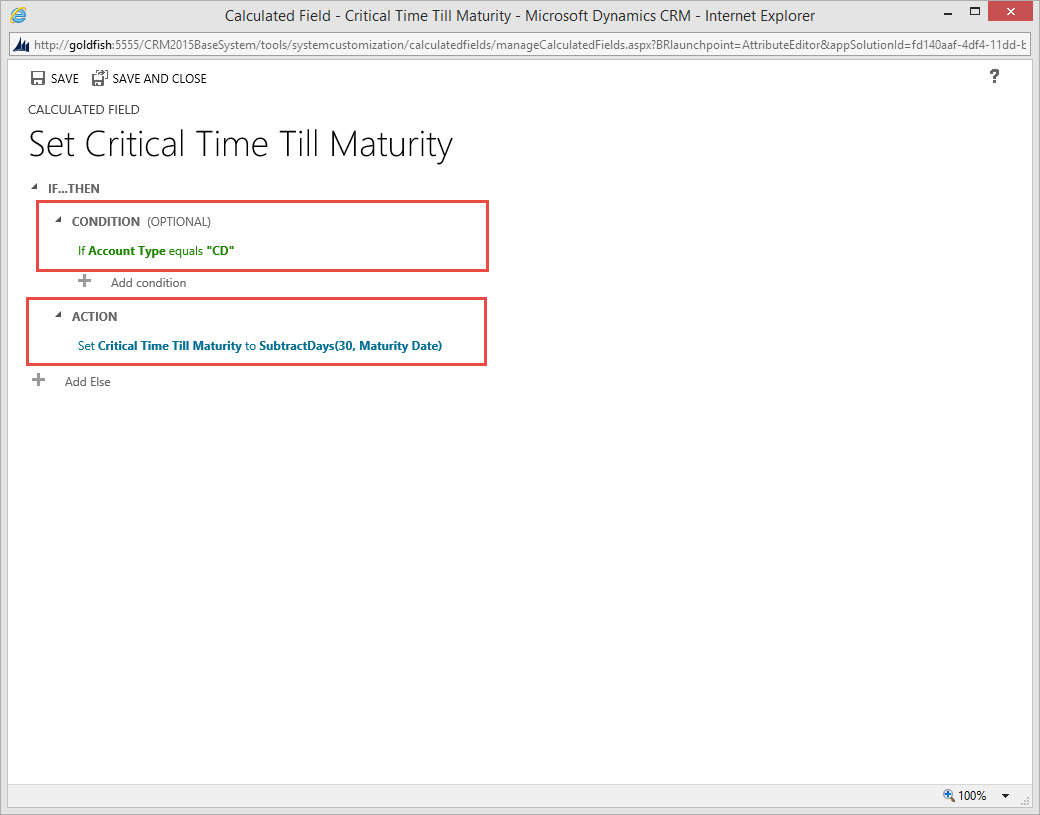
Critical Time Till Maturity as a Time/Date field and lets use the calculate option to 30 Days prior to Maturity. In effect we are setting up this failure to occur on the last day of the 15 Day Window. Your formula would be as follows:
SubtractDays(30, sjj_maturitydate) We are using the maturity date as the base and setting the failure at Day 30 of the Critical Time Till Maturity. This will address #3 above.
We will also create an Option Set attribute called Marketing Window with three entities Open, Warning and In Process

Now let’s create our Timer Control “Marketing For Rollover”
- Go to our solution
- Open the Account Information form
- Click on the Insert Tab
- Click on the Timer Control Option
- Enter in the Name
- Enter in the Label
- Our Failure Time Field will be defined as the “Critical Time Till Maturity” Time / Date attribute.
- For our Success Condition, we will use the Attribute CD Status Defined in Part 1 with the value of “Rolled Over”
- For our Failure Condition we will use the CD Status Defined with the value “Redeemed”
- For our Warning Condition we will use the Marketing Window Option Set with the value Set to “Warning”.
- For our Pause Condition we will use the Option Set Marketing Window with the value Set to “Open”
- We will not define the Cancel Condition

13. Click OK
14. Place the Timer Control on the Form

15. Click on Save and Publish
Our last step is to create a Process to change the Conditions on the Timer Control to meet the criteria for Requirement 1

- Our Workflow will start as soon as a new Account Information Record where Account Type = “CD” is created.
- We are setting Marketing Window Attribute = “In Process”.
- We then time out the Workflow until the Critical Time till Maturity is 1 Month and 15 Days Prior to the Maturity Date.
- At that point we will change the Marketing Window Attribute = “Warning” which will change the Timer Controls Count Down Clock to Yellow, implying we are in the 15 day critical period.
- At this point we will send an email notification to the Client Financial Manager regarding the critical period to contact Client and provide financial counseling.
- The workflow at this point completes as successful.
- When we pass the Date on the Critical Time Maturity the Timer Control’s Failure Time Attribute will activate changing the Timer Control’s indicator to Red and subsequently start incrementing.
Below is the view of our Timer Control’s display when we have less than 30 Days to maturity on a client’s CD.

Although somewhat sophomoric, this is another example of understanding a client’s business process and thinking outside the box using all the features available in Microsoft CRM to create a configured solution, and without the use of code. My intentions were to demonstrate that the timer control is useful in situations other than the case form.
I have included below a few items you should consider when configuring the Timer Control, which will assist in your Internal Governance.
Helpful Tips:
- The attributes you are using for status changes, always determine whether they should be configured as Read Only. That will prevent users of the system overriding the parameters identified within the conditions on the Timer Control, (the one exception would be the pause option)
- Use workflow whenever possible to automatically change the status attributes, affecting the Timer Control’s conditions.
- If you drive the Pause Option off an Option Set or a 2 Option Set, create an alert email workflow to the agents manager alerting them to this status change so SLA items will not fall through the cracks.
This concludes my Timer Control series. I am trying to determine the subject of the next post so you will be surprised next week.
Why don’t you try to include the Timer Control on one of your potential solutions?
Also I would love to hear about your experiences using this new functionality, please feel free to contact me with comments to these posts.
As always,


Hi Steve, I have created 2 timers on my case form. 1st timer is Start/Stop (where Stop is on Pause), but problem is after its Paused you dont see the total time elapsed. So thats why I created the 2nd timer. How can I make it so when I Pause the 1st timer (and it shows Paused), the 2nd timer stops also and shows the total time elapsed. I thought of using the Business Rule, but I don’t see how that can work. Any advice you can share would be HUGELY appreciated!