
A few weeks ago, I was attending a demo with one of my colleagues @Amy Caine. As she was demoing, she presented the account record with an option set that contained images as the set members. I was totally amazed with this trick.
Amy being a great teacher taught me her trick. I want to thank her for this knowledge and the support to share this knowledge with my readers.
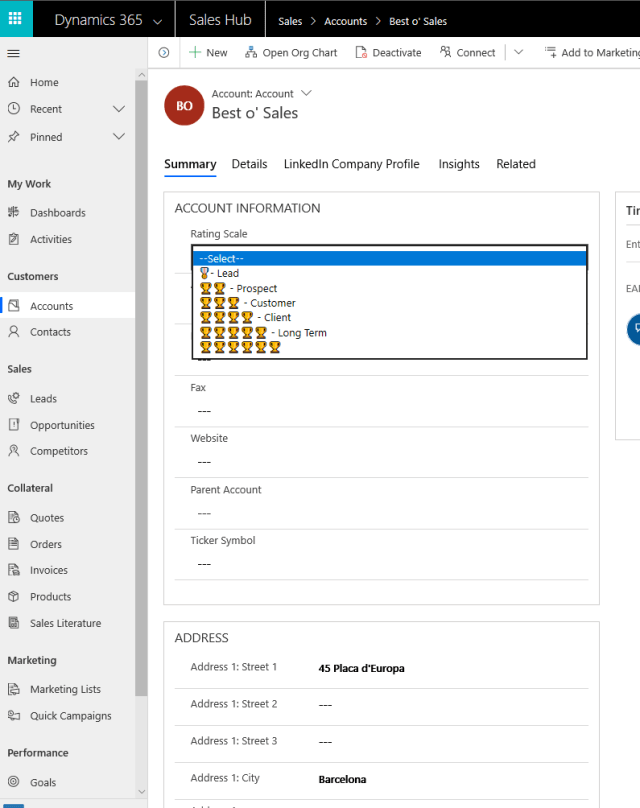
Below is an example of how your dynamics will look after you create the visual option set.

Prerequisites you must have a laptop that can go into tablet mode.
Scenario
One of my clients would like to have the ability to rate each of their clients using a visual indicator on each of their account forms.
Ok let’s get started.
1. Go to Settings -> Solutions -> Open your configuration solution. **
2. Select the entity you wish to modify.
3. Expand the entity and go to fields
4. Click on + sign, (new field)
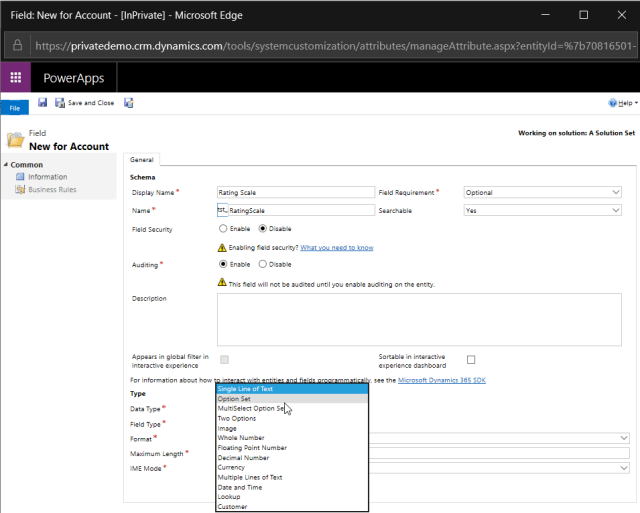
5. This will open the new field dialogue box.
6. Name the field.
7. Select Option Set on the bottom
Note: You now have the option of selecting whether you would like to use a local option set or create a global option set. *Note: I usually will create a global option set at this point because I then can have the option of using this configured global set with additional fields on different entities. Therefore, I am going to use the global option in this example, although, you can follow the rest of the solution as outlined below on a local option set for this field.
Let’s continue:
8. Click on the yes radio option Use Existing Option Set option
9. Click on the new button

10. This will open the global option set dialogue box

11. Create a Display Name
12. An External Type Name
13. Click on the + under the word Options, (at this point I will click on the + sign for as many members that will appear in the option set).
14. At this point you should be viewing something similar to the picture below.
15. Save the Global Option set.

Adding visuals to the Global Option Set
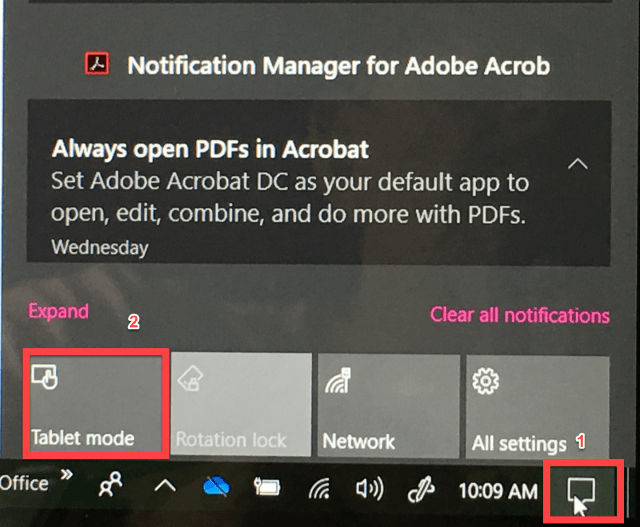
16. On the far-right hand side of your device click on the new notifications’ icon. (1)
17. Put your device in Tablet Mode (2)
18. At this point make sure you have your global option set open
19. At the bottom right of your toolbar click on the keyboard Icon

20. You should now be presented with a screen like this one below.

21. Click on the first item on your list (named Item)
22. On the right-hand side remove the Item designation from the Label (Right)
23. Now click on the emoji icon (there are hundreds of emojis to select from)
24. Your screen should look like this.
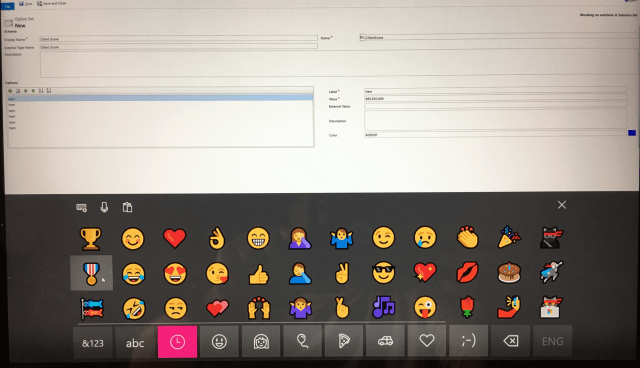
25. Click on the emoji you want to work with.
26. The image will fill in the first label
27. Move to the next label and highlight the word Item
28. Click on the emoji again, (I usually rate at 4-5 levels), therefore, I would click on the emoji twice to create two images.
29. Continue to repeat this action until you have changed all test labels to images.
A few notes (tips):
a. You can only use one image per option set, therefore, choose the one you would like to use for all options.
b. You can add text after the images if you wish to do so.
c. All members of the option sets are searchable using Advanced Find.
d. Sometimes you will lose focus on the keyboard. All you do is click on the keyboard icon on the right tool bar. (see above)
Finishing up
30. Save the Global Option Set
31. Make sure you see the Global Option Set identified within the field option set.

32. Save and Close the Field Option Set
33. Go to Forms on the Entity
34. Choose the main Form you would like to add this field to
35. Add the fields using the drag and drop option
36. Save and Close the form
37. Publish all (Not just the form)
38. Open the Sales Hub Solution
39. Your records should look like below.

40. Click into the option set, to view your choices
41. Select your option
42. Save the record
43. Below is what you should view.

It is just that simple!
Again, I want to thank Amy Caine from Microsoft for the idea and the assistance in creating this blog.
I am looking for more topics, please contact me @ stevenj@precisioncrmsolutions.com with your ideas.
Until next time.
Be Cheerful,

