Good Day All –
Brian Dewulf is one of the members on my team at Avtex. I read the blog he published below, and I am embarrassed to admit I didn’t know this editor even existed until I completely read his helpful tips. I did learn several additional tips from the blog, therefore, I decided to share it to all of my readers also.
I hope this helps you as much as it did me.
Have a great day,

Dynamics 365 – New Feature Update Ability to View Documents from SharePoint
By Brian Dewulf
A new feature in the Dynamics 365 2019 Release Wave 2 is the ability to display the related SharePoint documents (when using the native Dynamics SharePoint integration) on the main form. Previously these documents could only be accessed via the related items menu.
Adding this new functionality is straightforward, although, you are required to implement the functionality in the correct place.
NOTE: This feature cannot be activated using the current forms editor.
Installing in the historic form’s editor will cause issues with the implementation of this feature.
The image below shows the properties of the subgrid using the new SharePoint functionality. This is confusing as the Entity listed in the Data Source section does not reference SharePoint. In addition, the Entity drop down is locked for changes.
This occurs because the SharePoint display feature is not accessible from the old form’s editor.
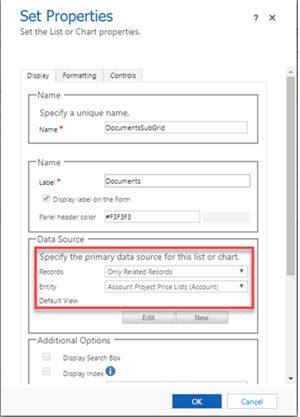
Figure 1 Data Source is Disabled
Note: This modification will work only if you have already enabled the SharePoint integration for the selected entity.
The solution is to use the new form editor. There are a couple of ways to access this new editor.
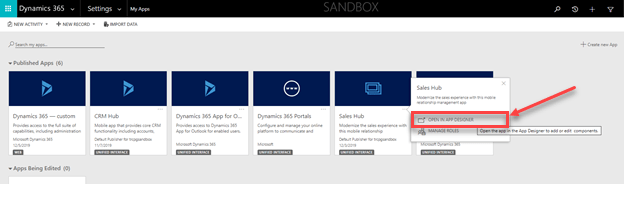
One access point is to navigate to Settings, My Apps, click the ellipsis on the desired app, and select Open in App Designer.
The second method is to navigate to the PowerApps Maker Portal: https://make.powerapps.com/ .
Click on Apps tab and access from the list of apps.
Click the ellipsis next to the app you wish to edit and select Edit. This will also open the App Designer.

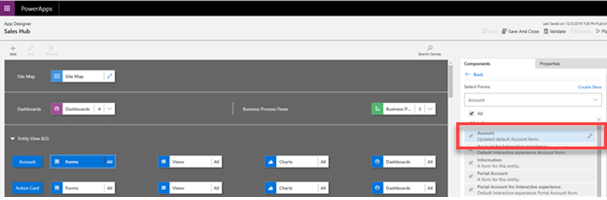
From the app designer, navigate to the entity you wish edit, and click on forms. From the list of forms on the right side of the page, hover over the form you wish to edit and click the pencil icon (edit form).
This action will open the new form editor.
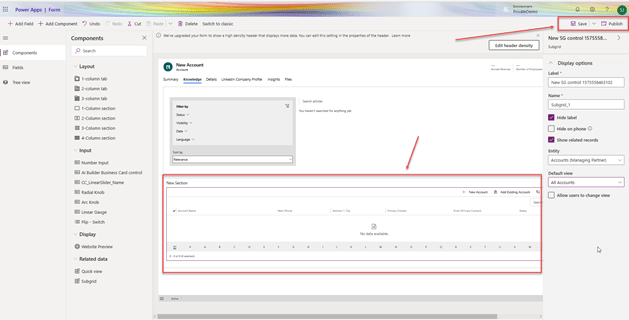
From this form editor, add a new tab or section (or select an existing section) where you wish to add the document subgrid. Click Add Component and choose Subgrid. In the Entity drop down select Documents. In the Default view drop down select All SharePoint Document.
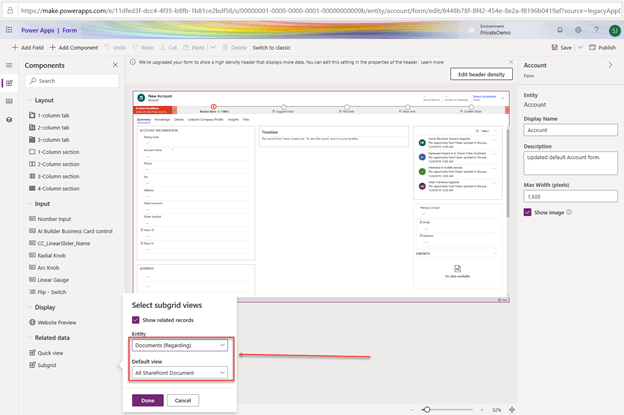
Notice the Documents (Regarding) and All SharePoint Documents are selected in the Sub-grid view. Select the Done button.
Your form should appear as below.
Note: the save and publish options are located on the top right of the screen. You will need to Save and Publish this Form.
Close this form. Return to the App Designer, click on Validate and then Publish. You have just completed the modification.
Check one of your current account records. As demonstrated below you have added a document Subgrid to your form. You can now add documents to your Document Subgrid.

I hope this has been helpful and look for more content on new features soon.