Spring Release is Live on Microsoft On Line

Good Day To All –

I just set up a new Microsoft On Line demo site this morning.  I was very happy to see the new components for the Spring release 2015 are live.  The fact is without much fanfare the new functionality was released Mid May.  I have just been tardy getting this blog post completed.

It will not be very hard to find the first major improvement to the application, there is new menu orientation.  You will view this feature as soon as you open the application.

SRA_Pic2

There is a new home icon to the right of Microsoft Dynamics CRM.  When you click on this icon the first level to the new color coded module level is exposed.

SRA_Pic1

Notice to the left of the create + icon there is an additional new click saving feature.  The clock icon renders all previously viewed records.  Click on the icon.  Notice you will not only see Recent Records but also Recent last Views of sections for ease of access.

SRA_Pic3

When you click on one of the Module Tiles instead of moving to the next set of tiles you actually render a dropdown with all the items available to the module readily available to you.  No more scrolling right.

SRA_Pic4

This feature will surely save time and memory cycles especially for people who have a hard time with remembering where they have to go from one minute to the next.  Everything is right in front of you with this new orientation, which makes the entire application more usable.

Another new feature you will notice when opening records. I will demonstrate with an open Case record.  Notice to the right of the Case name the same home orientation icon click it.

SRA_Pic8

As you can see there is quick access to all the sections available on the record.  You can click on one of the section headers and navigate directly to the section you need to work with.

SRA_Pic9

Now you have a quick way to navigate to additional sections on the records with 1 click.

SRA_Pic10

There are plenty additional new features to be found throughout the application.  I will focus on some of the better ones in my next few posts.  In the meantime I would love to hear any suggestions on items you would like me to concentrate on.  You can reach me here.

My best,

CAL-Part1-18

Posted in CRM 2015 New Features | Tagged | Leave a comment

Microsoft Training and User Adoption Kit

Good afternoon all –

Sorry for my delay between this and my previous post.  I have been very busy with client work over the past 6 weeks and I haven’t been focused.  Today is my first attempt to get into the habit of posting blogs again.

I was setting up an organization yesterday on line for demo purposes and notice one of the Microsoft E-books released for Version 2015 Spring release.  As I was browsing around I noticed there was a website with a number of E-books available for 2015 and 2013.   They are free of charge, mostly PowerPoint decks, and they are even editable so you can configure personalized training if need be.

I am posting this link today just in case you want to learn something new about Microsoft CRM and as I was unaware this site even existed.

Link to the Microsoft User Adoption and Training Kits

I hope this helps everyone as I am sure it is going to assist me in the future.

My best,

CAL-Part1-18

Posted in Uncategorized | Leave a comment

What’s on the Menu for Microsoft CRM 2015 Spring Release

Hello!

I am going to take the lazy way out this week. I was poking around the help files on line and noticed Microsoft has already started articulating the new features due out on the spring release for Microsoft Dynamics CRM 2015. Microsoft is on a frenetic pace of adding additional value to CRM. The features below is from the documentation I discovered on their help site.

Please note: This topic is prerelease documentation and is subject to change.

The release is called Microsoft Dynamics CRM Online 2015 Update 1. That’s right folks, Microsoft continues to make the shift to their SAAS model by releasing to online only. They will catch up the on premise version of CRM 2015 during their next submission.

1. Improved Navigation and user interface options: Increase adoption with improved user experience, including new UI themes and faster navigation to records.

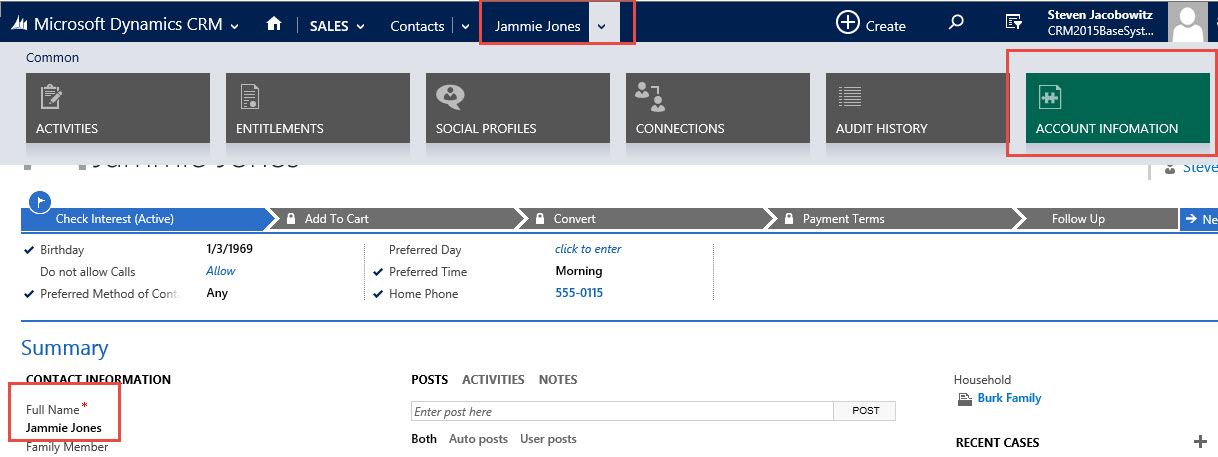
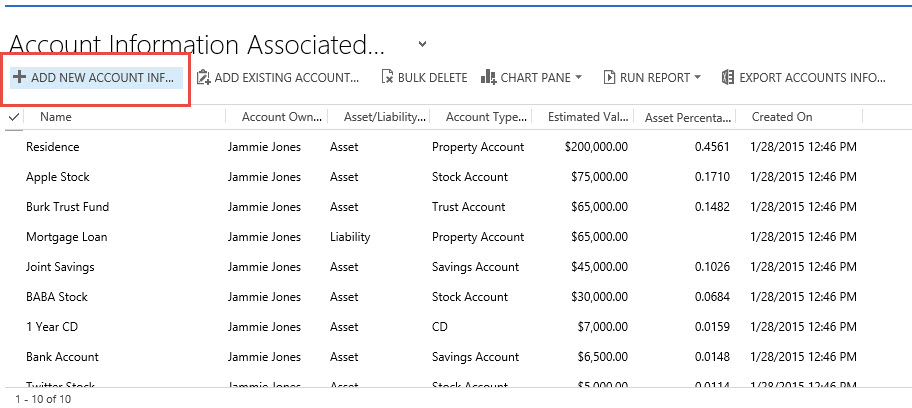
With the new navigation bar, it’s easier and faster to find the information you need. When you choose the Main Menu from the navigation bar, you can access your work areas, records, or other items with less scrolling and fewer clicks than before.

MenuBar

Take a short video tour (less than one minute) of the new navigation
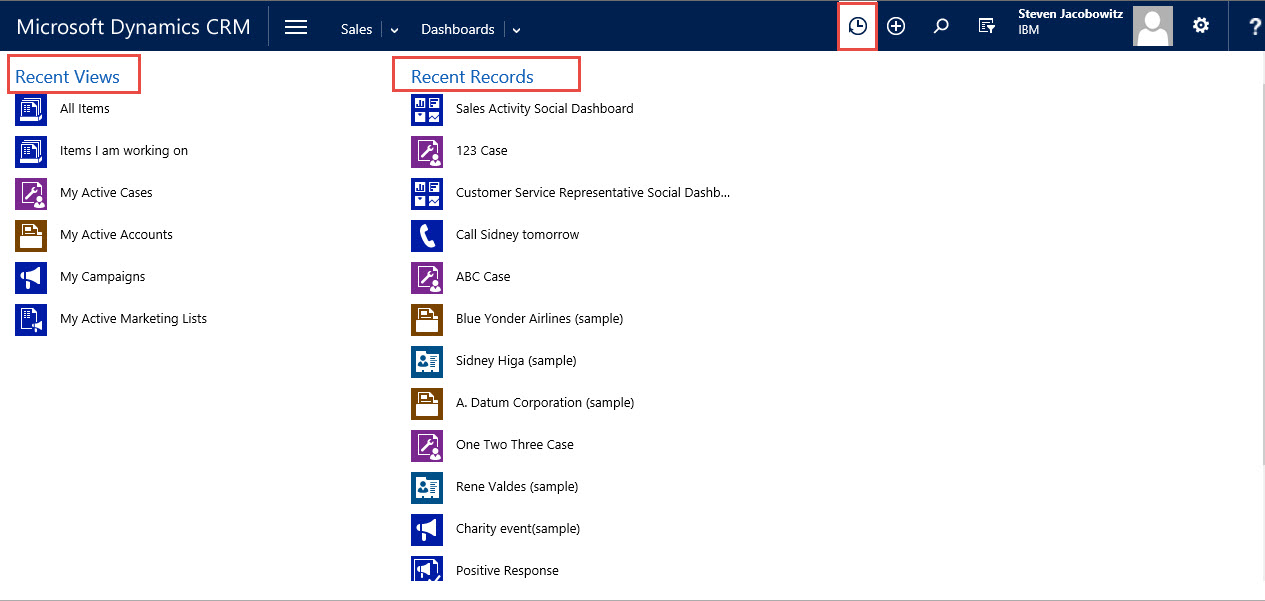
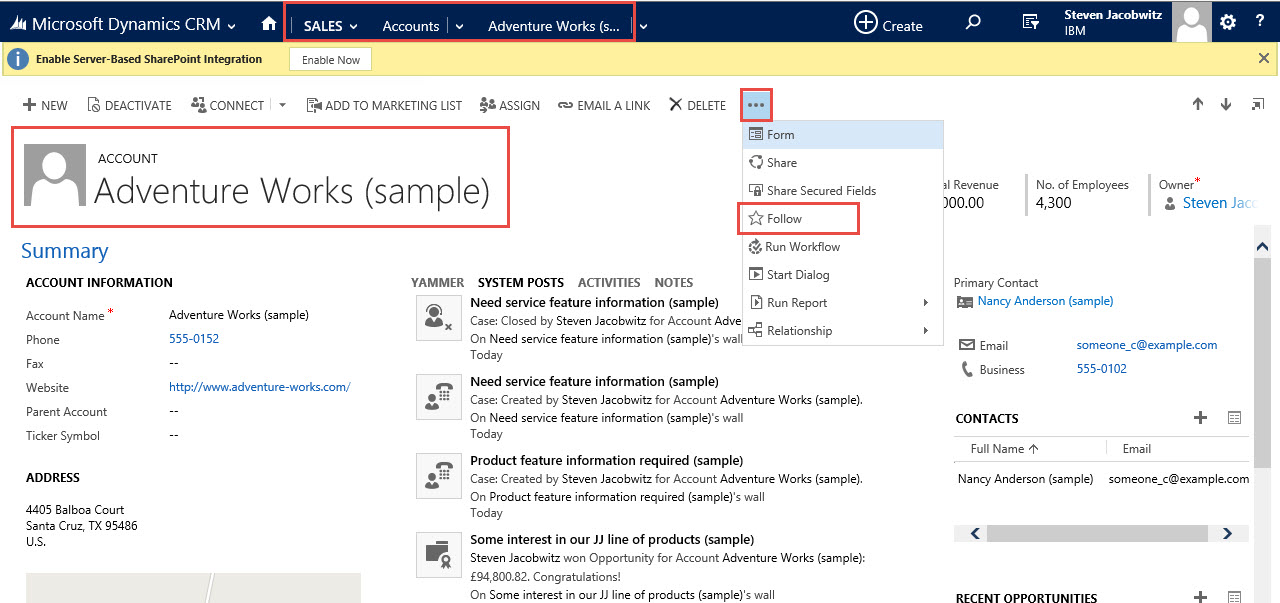
Use the Recently Viewed Items RecientlyViewedButton button on the new navigation bar to get back to your most recently viewed and pinned items. With this global tool, you can access recently viewed records, views, and even dashboards. Pin the items you use all the time to move them to the top of the list.

Pic_3WN

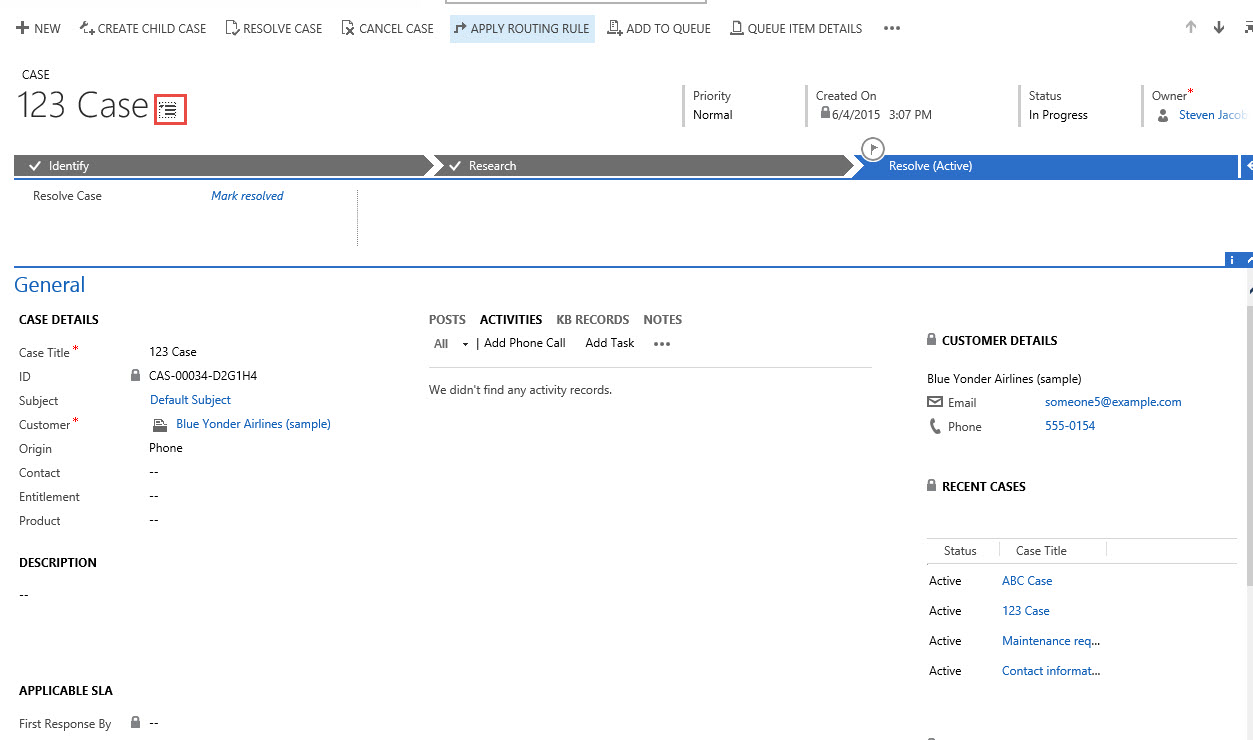
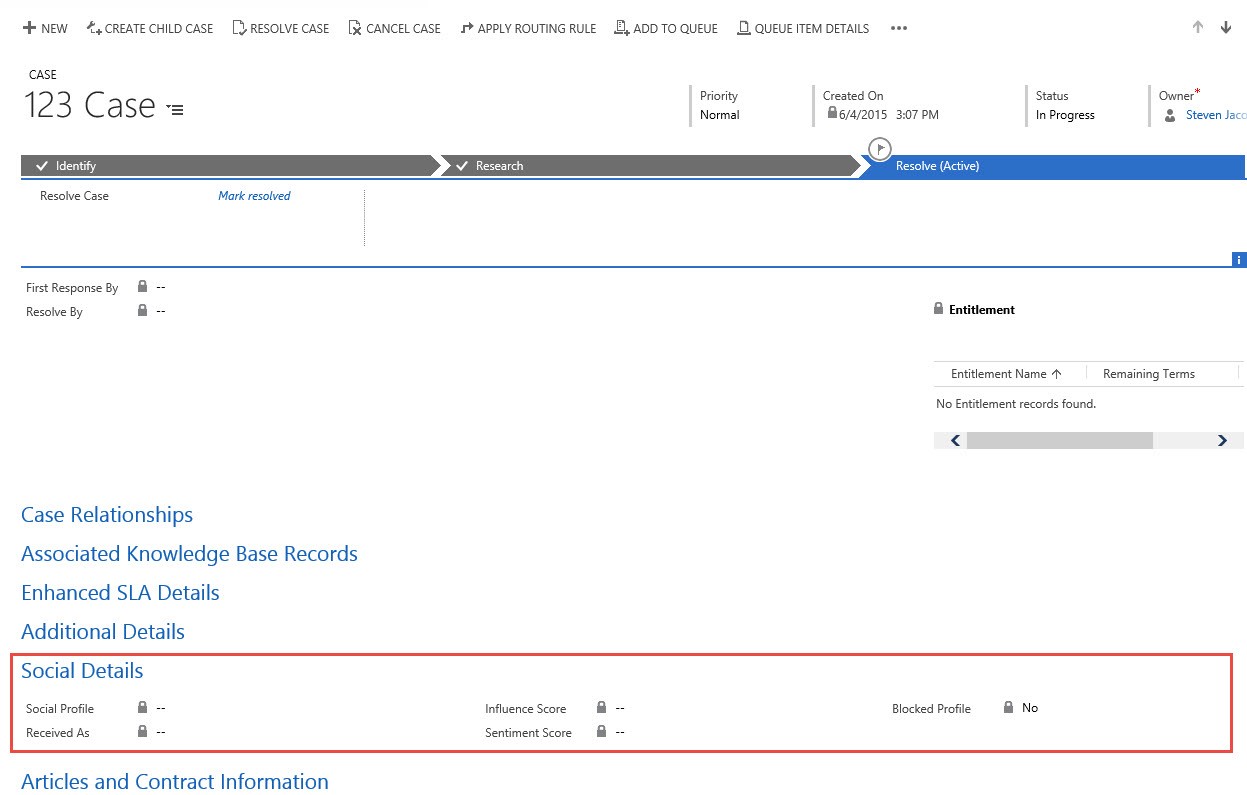
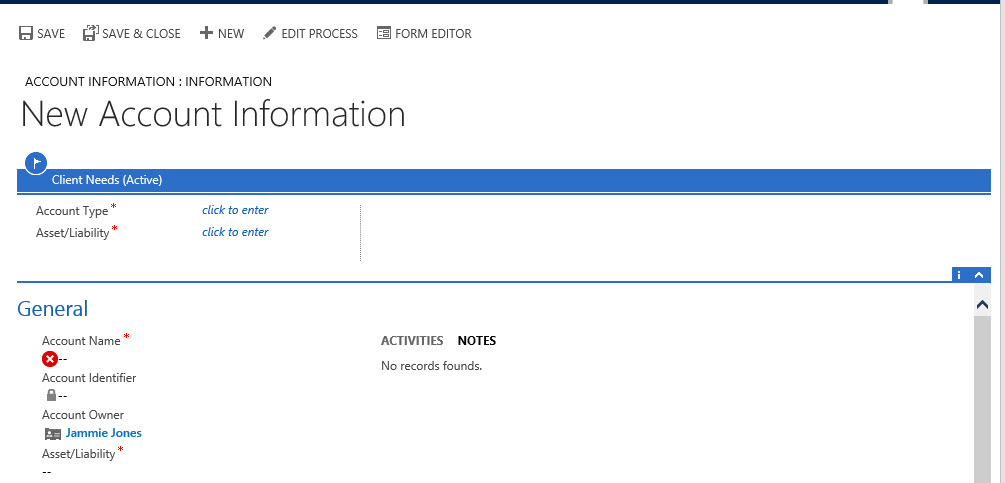
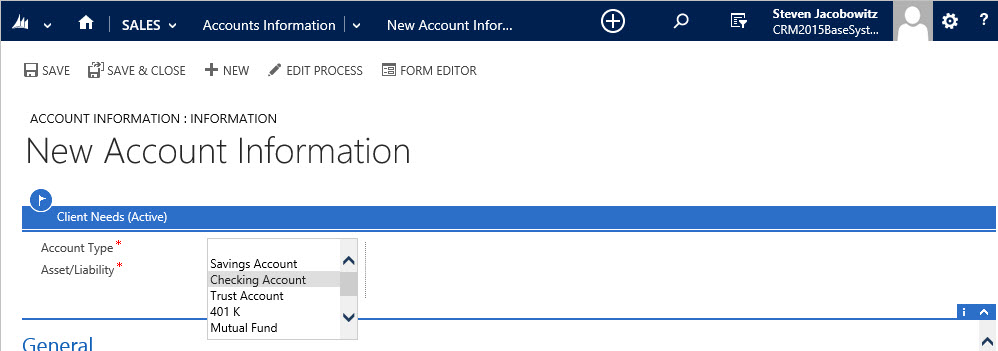
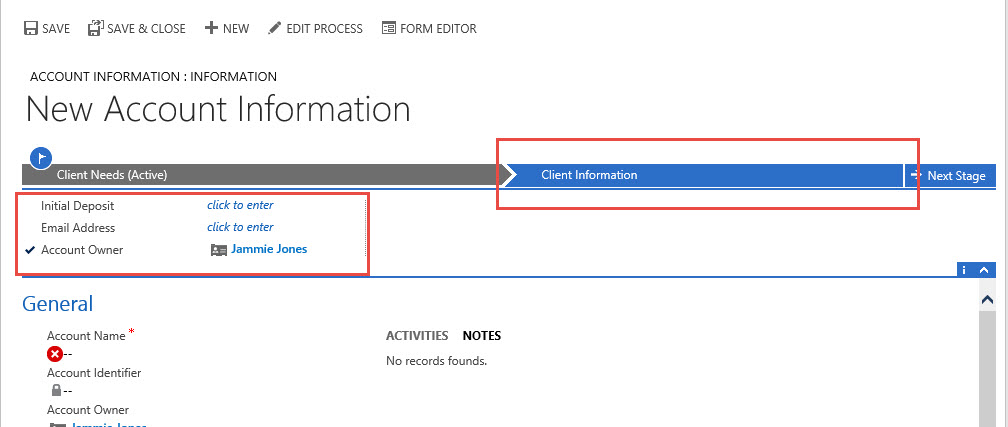
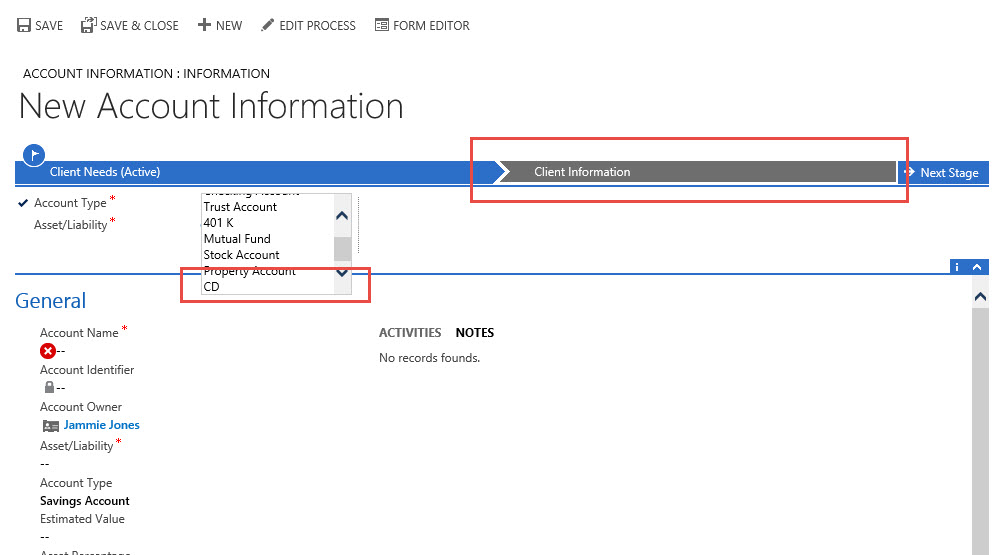
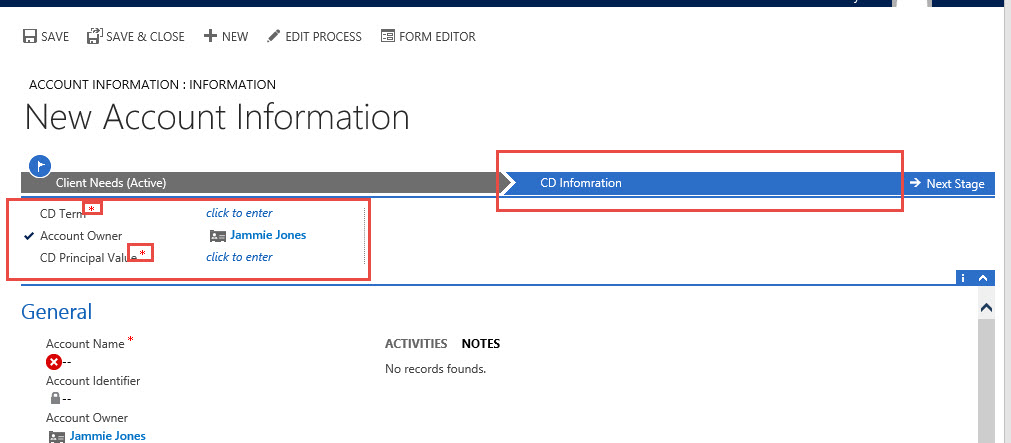
If you’re working in a complex form with lots of fields, the new form navigation drop-down list makes it easy to get to just the data you need. Choose the drop-down list next to the form title, and then select the section of the form you want to go to.

Pic_4WN

2. Add a logo or change the color scheme using themes

Create a uniform look and feel across all your applications with themes. For example, add a company logo or change default colors for entities or links. Preview your custom theme, and then publish it for the whole team when you’re ready. No code required!

Pic_5WN

Watch a short video (2:45) about themes

More information: TechNet: What’s new for administrators and customizers

3.  Immersive Excel experience: Now you can use Microsoft Excel Online to do quick analysis right from CRM Online. To help increase productivity, Microsoft is providing the ability for salespeople to conduct analysis in Excel, directly within Microsoft Dynamics CRM. This eliminates the time and effort required to switch between applications in the middle of completing a business process. Salespeople can now view sales data in familiar Excel spreadsheets, perform what-if analysis, and upload the changes, all while maintaining the work context.

Pic_6WN

4. Excel export completely redesigned. With a single click, you can export to Excel anywhere, including the desktop version of Excel (2007 and later), Excel Online, and other Excel clients.Microsoft redesigned exporting to Excel from the bottom up to provide for a much smoother experience. With a single click in the web client or in CRM for Outlook, you can export your data as an Excel document, which can be opened anywhere, including the desktop version of Excel (2007 and later), Excel Online, and other Excel clients. When you export, all formatting is preserved, so you can do your calculations in Excel, and then reimport the data to CRM. You can export up to 100,000 records at a time (previous limit was 10,000).

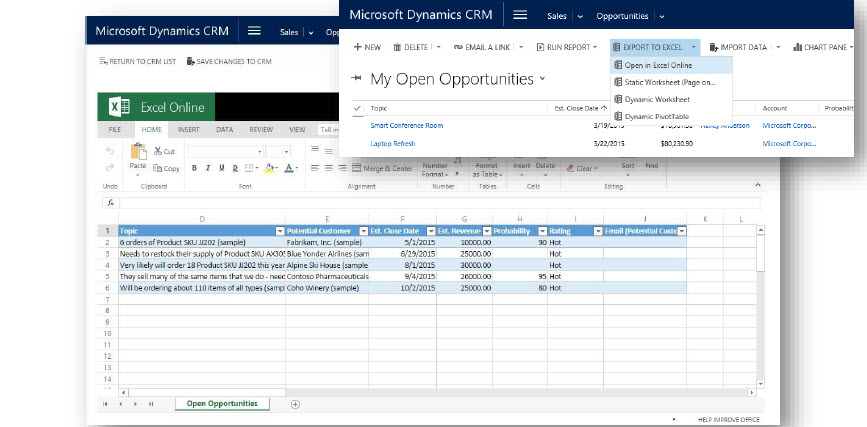
Do quick analysis with Excel Online, right from CRM Online

With this release you will now be able to use Microsoft Excel Online to do quick analysis, right from CRM Online. For example, if you’re a sales manager, you might want to analyze the opportunities your team owns and review Key Points of Interest (KPIs) to see how you can assist your team members. If you’re a sales rep, you can open your opportunities in Excel and do what-if analysis for different incentive scenarios.

Pic_7WN

Note

You must have an Office 365 subscription to edit Excel documents in Excel Online.

5. Embedded OneNote: Capture photos, take voice notes, do free-form drawings, and more. Everything is automatically linked with the record in CRM Online.

Take advantage of all that Microsoft OneNote has to offer, directly from CRM Online. For example, when you’re on the go at a customer site, take notes on your Microsoft Surface or other mobile device while you’re viewing opportunity details. Everything is automatically linked with the opportunity record in CRM Online.

OneNote integration will benefit salespeople since they will be able to share information more easily with OneNote embedded inside Microsoft Dynamics CRM. They can create and view notes containing text, photos, voice, spreadsheets, and free-form drawings, all within the context of the account, opportunity, or any other CRM record they are working on.

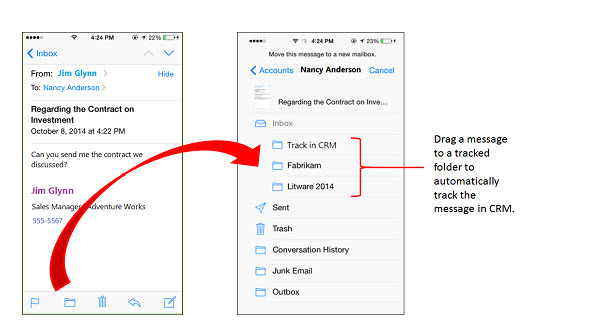
6. Track email by folder: Folder tracking provides a new and intuitive way to track incoming email activities on any device that supports Exchange. Now you can track your email directly from virtually any device.Microsoft Dynamics CRM Online 2015 Update 1 provides a new and intuitive way to track incoming Exchange email activities. You can set up a tracking folder—use any Exchange folder in your Inbox—and then drag an incoming email message to that folder to track it. You can associate a tracked folder with a specific record, such as an account or opportunity, so whenever you move a message to that folder, it’s automatically linked to that specific record. Tracked folders work with Exchange Inbox rules, which makes it even easier to manage and track incoming email. For example, you could set up an Exchange Inbox rule that automatically routes email from a Contoso contact to a tracked Contoso folder, linked to a specific opportunity. Tracked folders work on any device that supports Exchange, so you can track email directly from virtually any device.

Pic_8WN

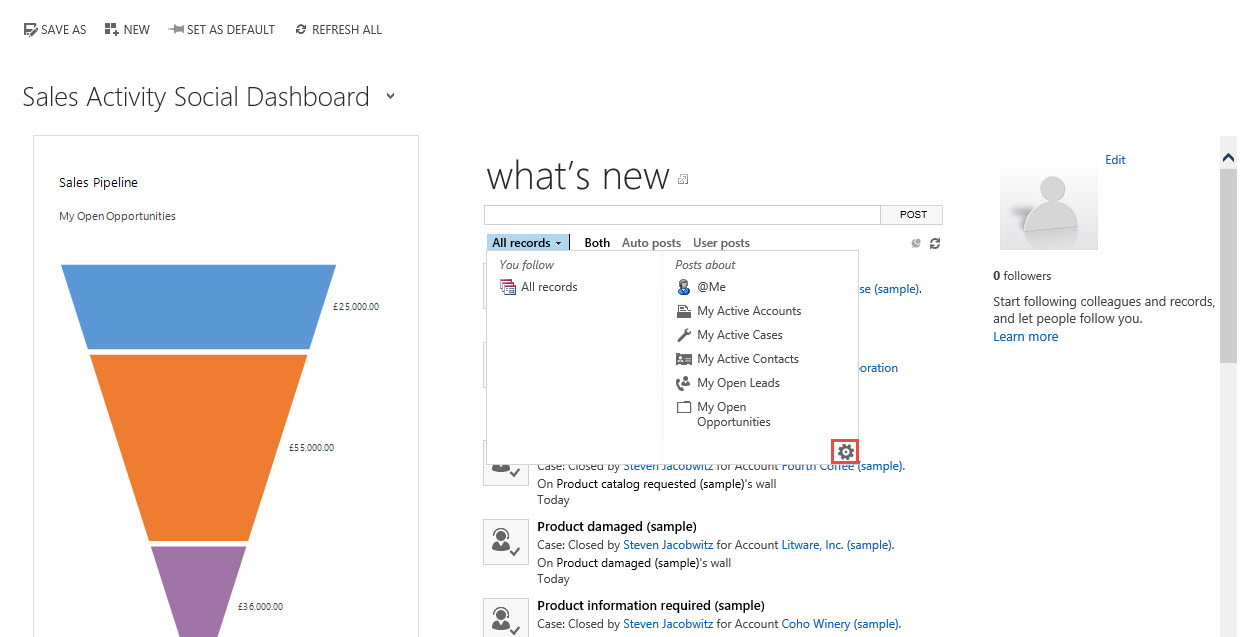
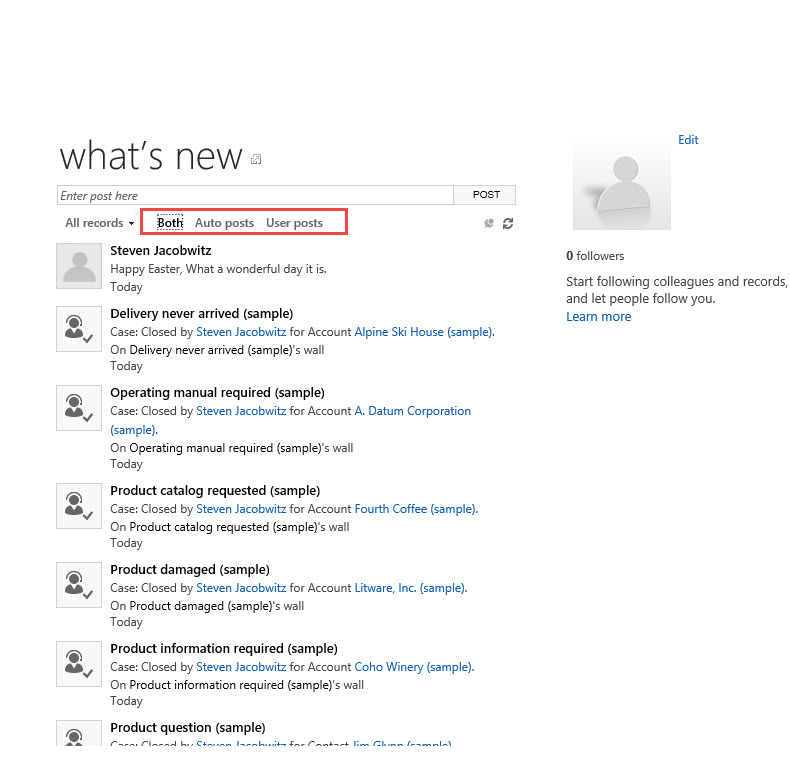
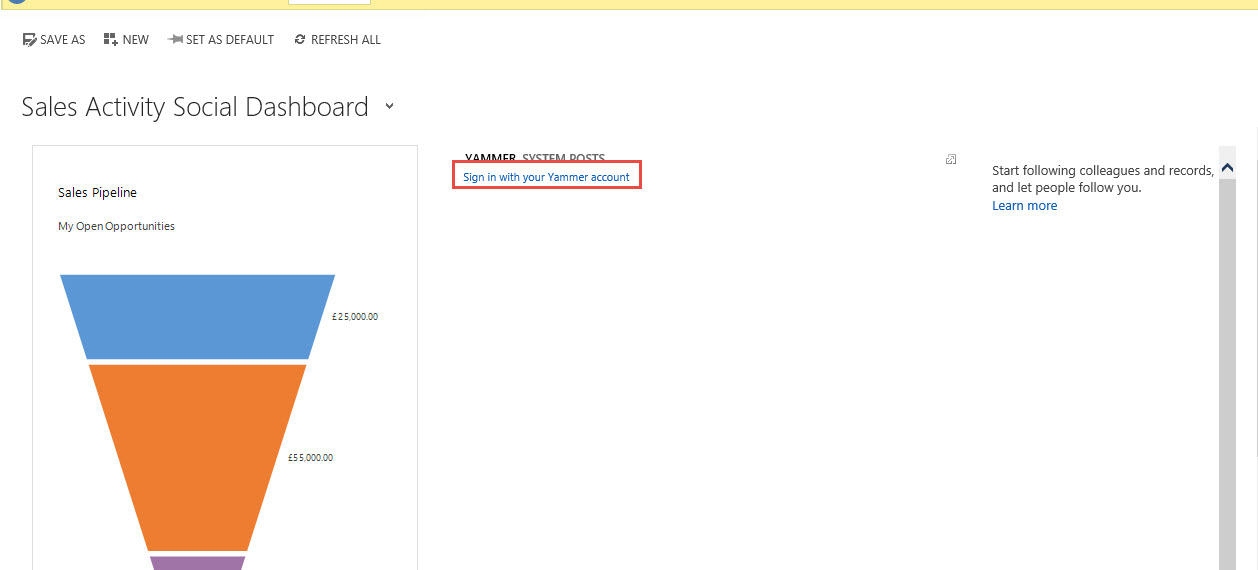
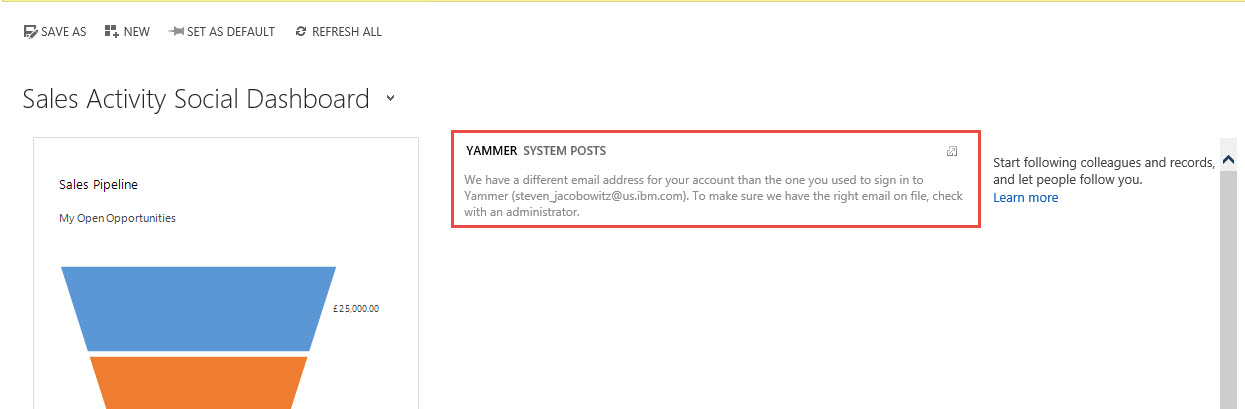
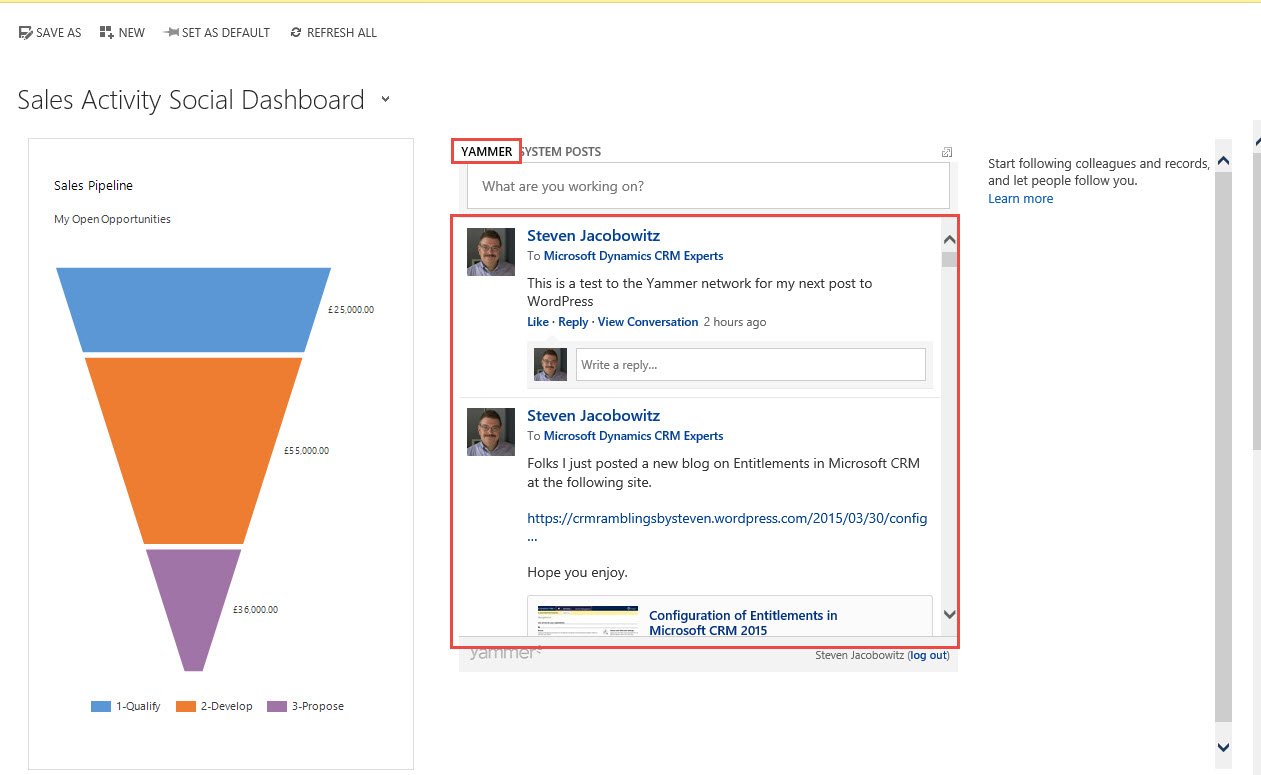
7. Social sales: Define rules for creating or updating CRM records from incoming activities. For example, you can now generate leads or opportunities from social posts.

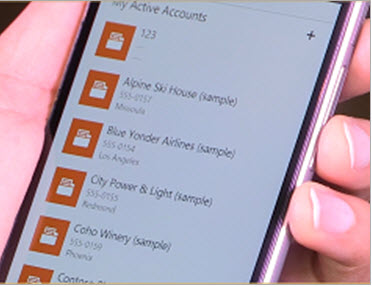
8. Mobile sales: With the new CRM for Phones app, enjoy the same great mobile experience on your phone as you do on your tablet. Nurture your leads and opportunities through the sales process with the new intuitive interface.

The CRM for phones app now provides the same process-driven experience as CRM for tablets. Nurture your leads and opportunities through the sales process with the new intuitive interface. If you have a Windows Phone, use Cortana voice commands to access your CRM data hands-free. More information: CRM for tablets and phones

Pic_9WN

9. Integrated Parature knowledge base: Empower agents with knowledge base integrated into daily service interactions, including the ability to both search and receive automated suggestions.

Your customer service agents, can take advantage of rich Parature knowledge base (KB) capabilities to reduce issue handling time, directly from CRM Online. For example, while you’re working on a case record, you can:

  • View system-suggested KB articles
  • Search for relevant KB articles
  • Read the content of KB articles inline, including embedded images or videos
  • Send KB article links to customers

Pic_10WN

Note:

You must have a Parature subscription in order to take advantage of this feature.

10. Mobile Case Management The Dynamics CRM application for tablets and phone will now support the CRM Case functionality enabling agents to manage their cases on the go.

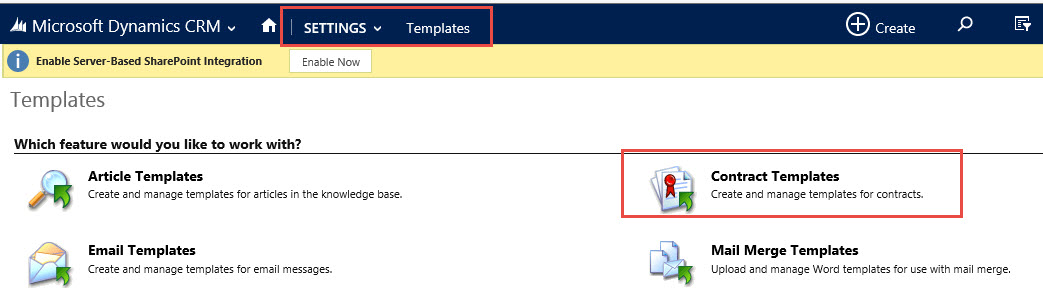
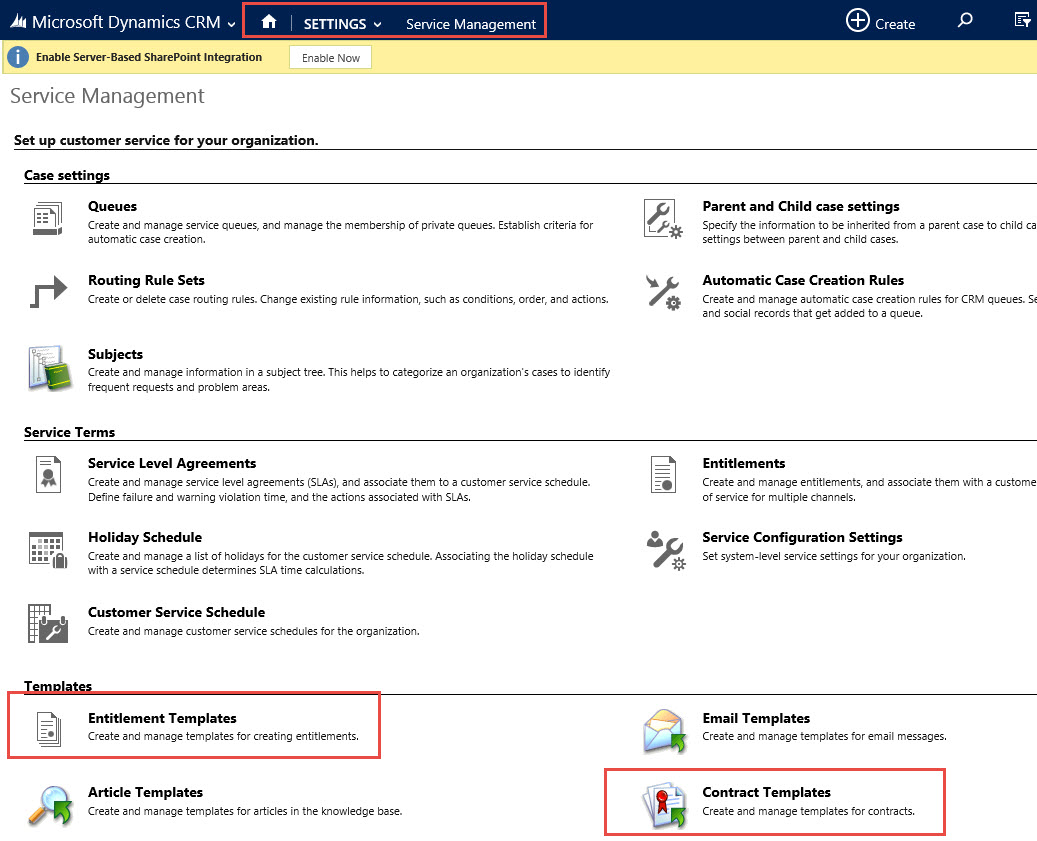
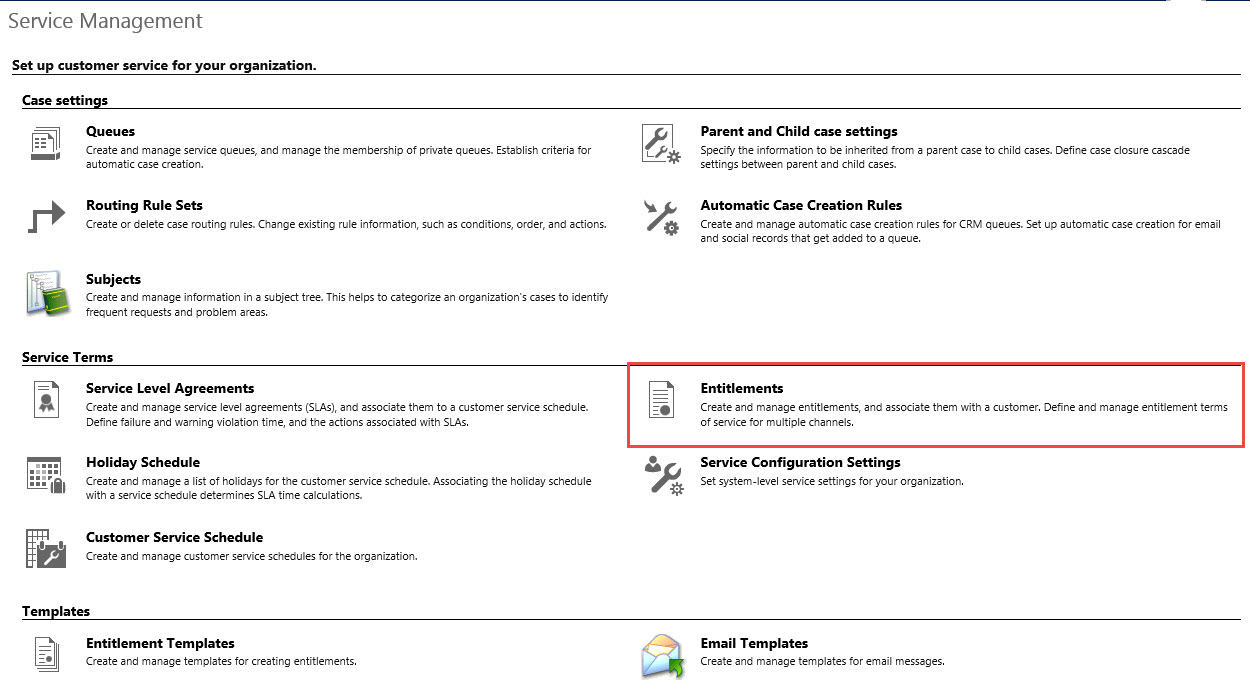
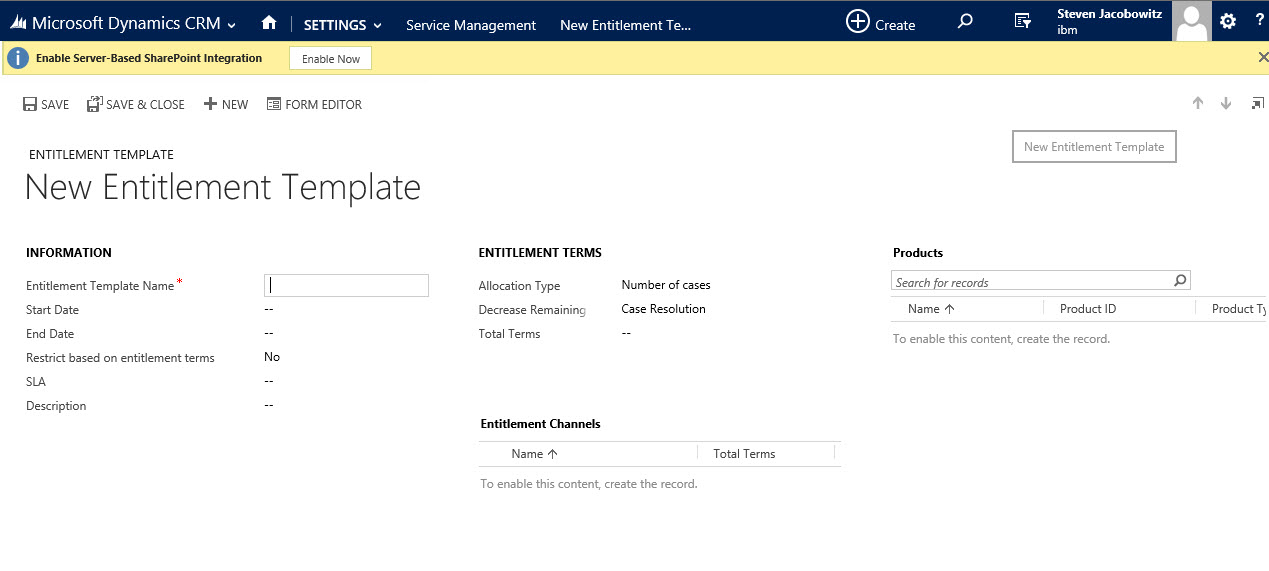
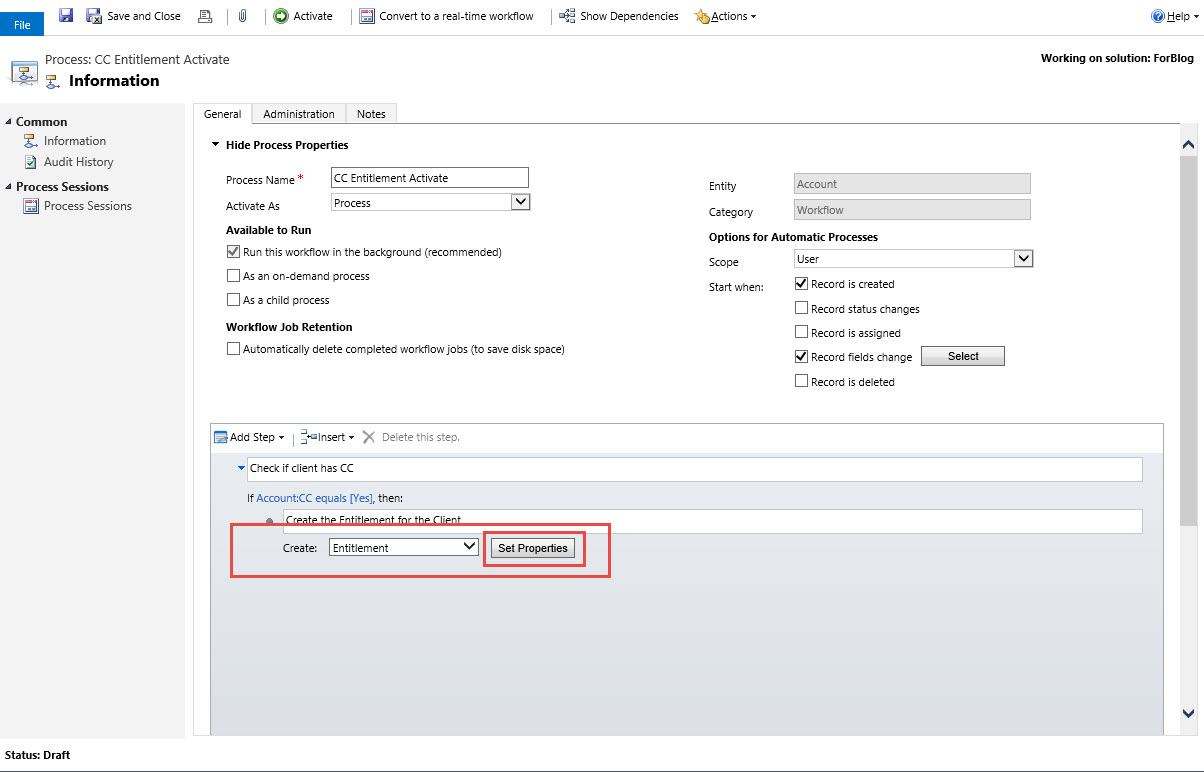
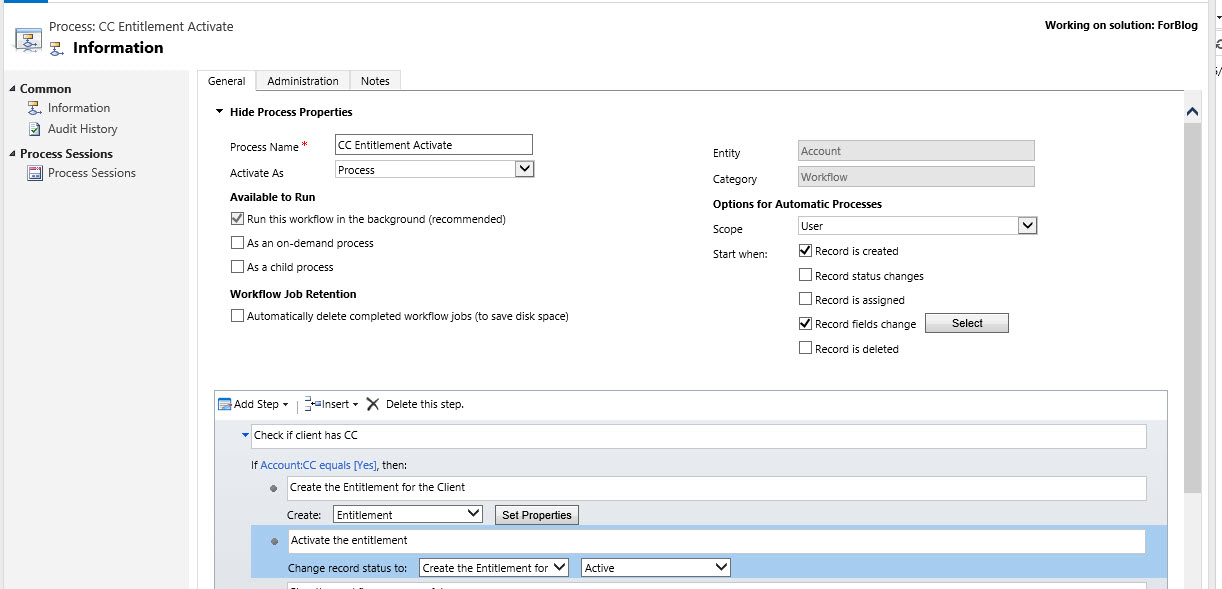
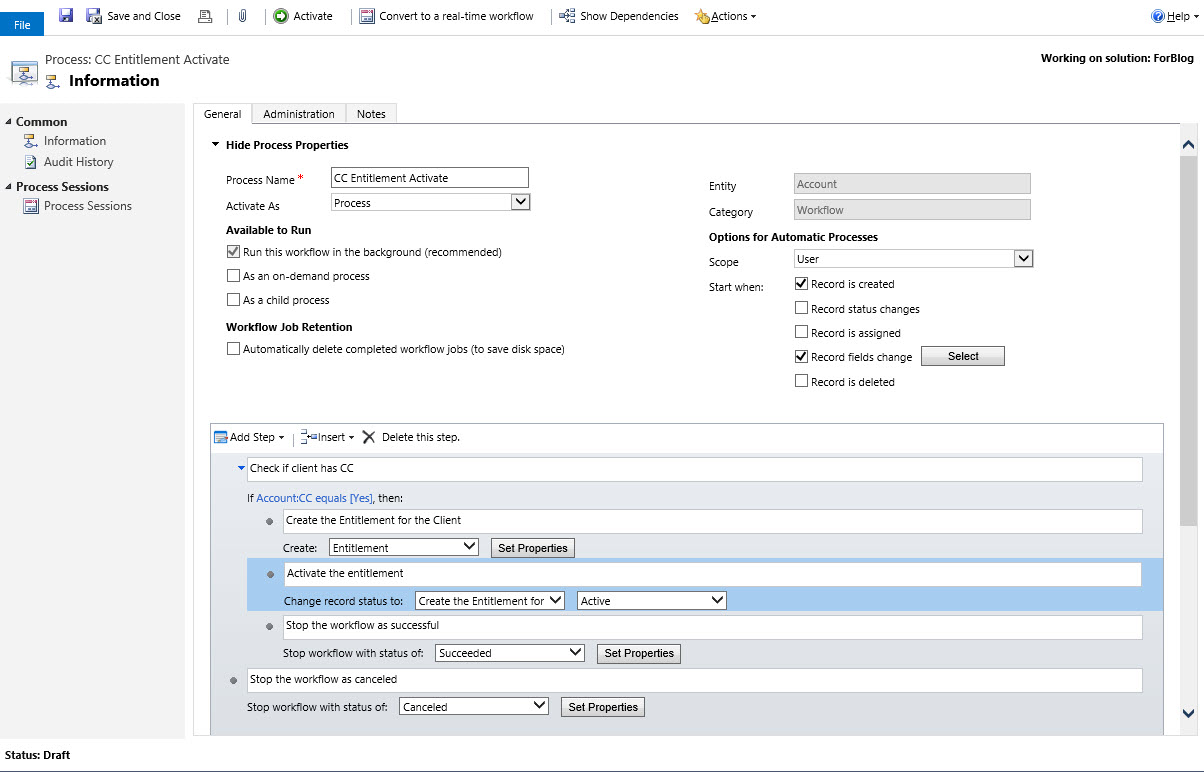
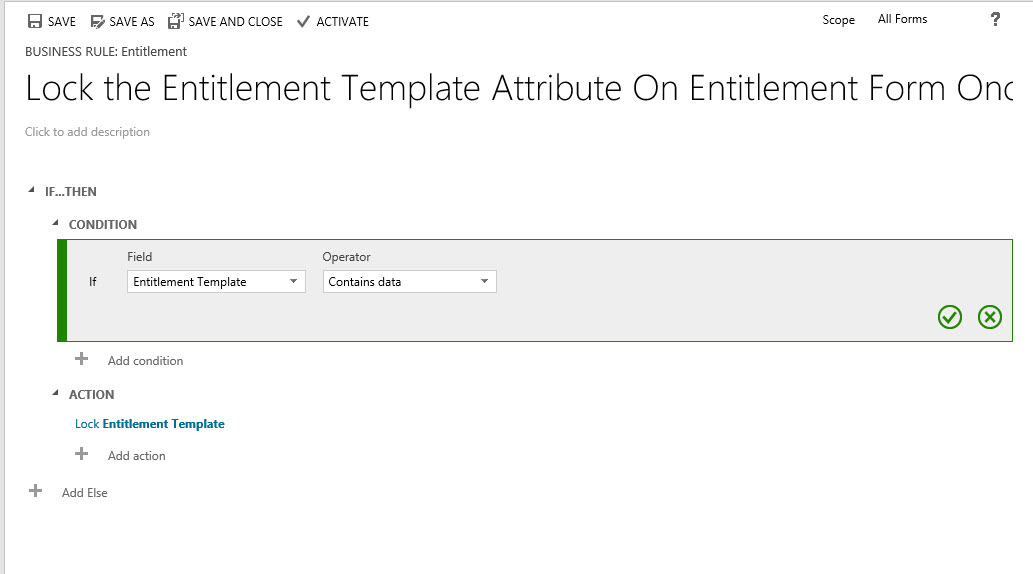
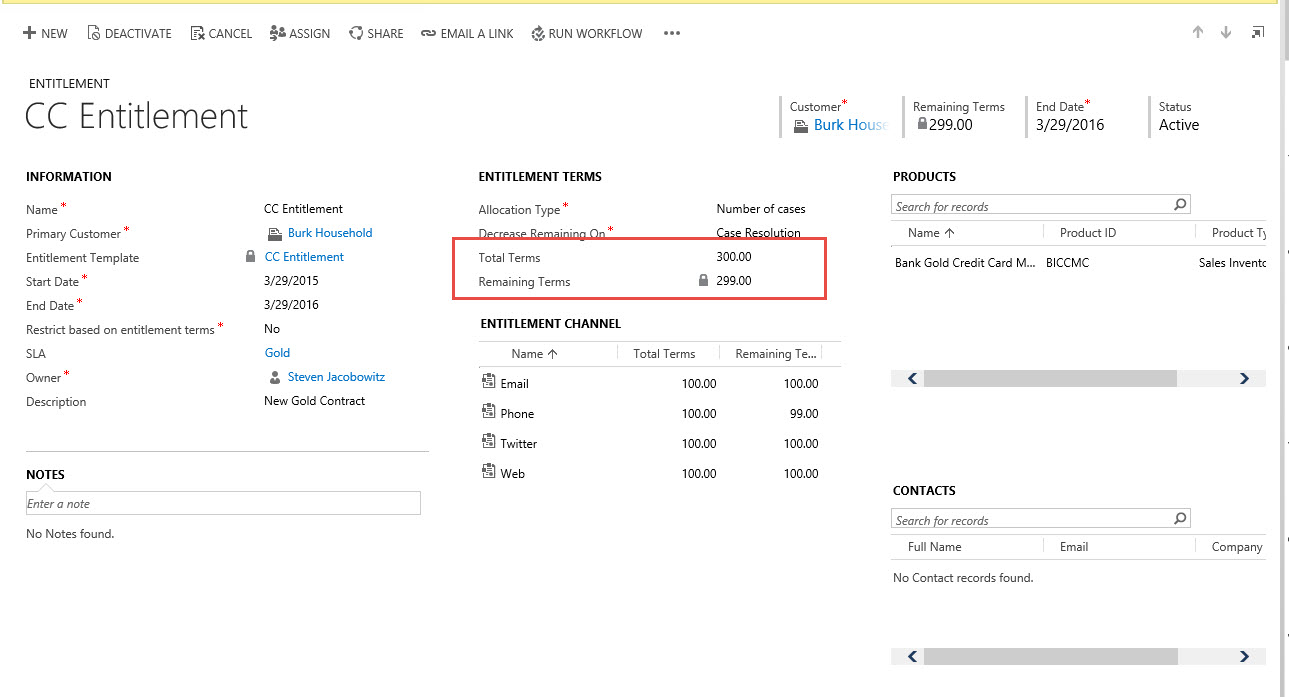
11. Speed up customer service with default entitlements

Customer service agents use entitlements to verify the type of support a customer is eligible for and to provide the right level of support. Now service managers or admins can set an entitlement as the default entitlement for a customer. When an agent creates a case, the default entitlement is automatically associated with the case, saving time for the agent.

For cases where service organizations do not want entitlement terms to be deducted (a faulty part is installed, for example), service agents can also credit back entitlement terms so the customer isn’t charged.

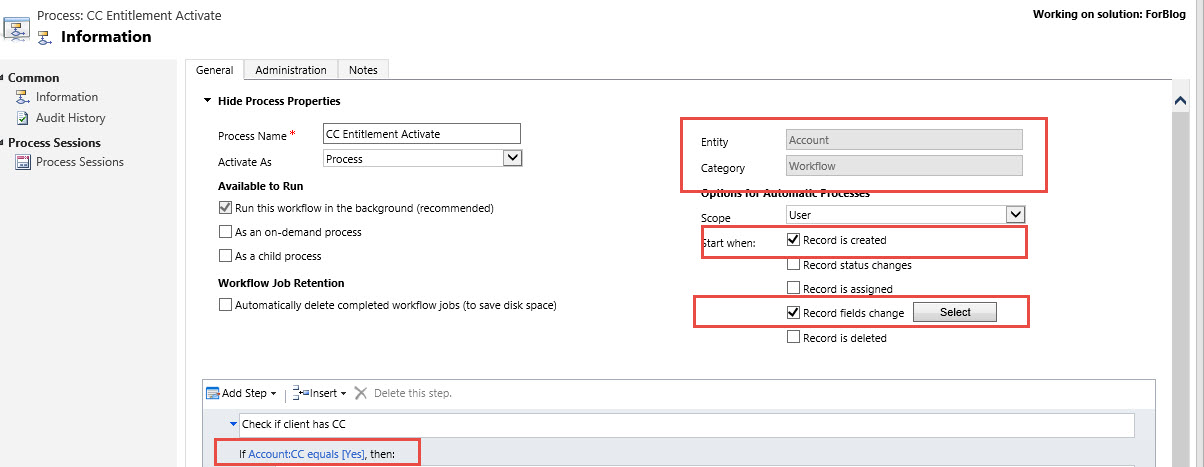
12. Define rules for creating or updating CRM records from incoming activities

In previous versions of Microsoft Dynamics CRM, Service Managers could set up rules to automatically create cases from incoming email or social channels. Now sales, marketing, and service teams can use these same rules to automatically create or update one or more records from any single incoming activity, such as an email, social, or custom activity.

13. Find and engage more qualified buyers with Insights for Microsoft Dynamics CRM

Boost your sales close rates with information that helps you find, understand, and engage more qualified buyers with Insights for Microsoft Dynamics CRM, powered by InsideView. The Insights pane (which is added to the Accounts, Contacts, Leads, and Opportunities forms), pulls in company, contact, and social data from thousands of constantly updated sources. More information: Insights for Microsoft Dynamics CRM – powered by InsideView.

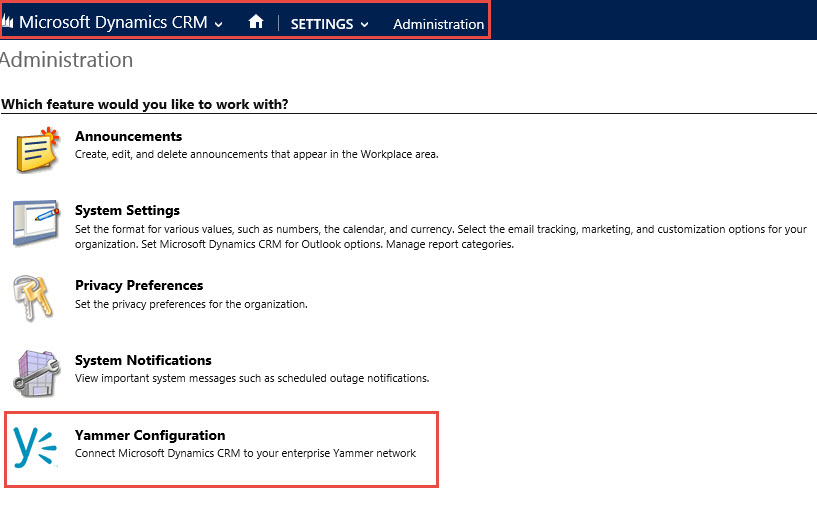
14. Create Office 365 Groups: Collaborate with team members who don’t have access to CRM Online with Office 365 Groups.

Office 365 users can use Groups to collaborate across Office products. A Group is a workspace that team members can use to share files, email messages, conversations, calendars, and Microsoft OneNote notes. Groups are a great way to collaborate with team members, even if they don’t have access to CRM Online. For example, create a group for your sales team, invite other Office 365 users to join the group, and then share documents, email, conversations, meeting information, and OneNote notes related to specific opportunities. More information: Tell me more about Groups in Office 365

For example, create a group for your sales team, invite other Office 365 users to join the group, and then share documents, email, OneNote notes, and more.

There are a great deal of new features surrounding CRM On-Line that will benefit your end user experience. Microsoft commitment to making CRM On-Line a more robust product is apparent. For those users of On Premise Microsoft will eventually catch you up, most likely, during the fall release so do not despair.

Really the menu changes more represent the menus found on Microsoft Dynamics Marketing and Microsoft Social Engagement, (formally Microsoft Social Listening). This feature alone is well worth the upgrade. No more scrolling to the right in order to see the full application.

This is a feature in and of itself a vast improvement and should be made available to the On-Premise users As Soon as Possible.

How about it Microsoft?

My best,

CAL-Part1-18

Posted in CRM 2015 New Features, CRM 2015 Spring Release On-Line, CRM On-Line | Tagged , , | Leave a comment

“What’s New” – Socializing Your Dynamics CRM On Line Implementation with Yammer

Good Day Folks –

At IBM we are using Yammer internally for social collaboration. I wanted to test the Integration between Microsoft Dynamics CRM 2015 and Yammer. This functionality has been available since the “Polaris” (2013) release of Microsoft CRM, although, I had never been focused enough to address this integration.

Since I am not an expert on Yammer, today I will focus over how to integrate CRM to Yammer as well as using the “what’s new” section of Microsoft Dynamics CRM. First I would like to concentrate on the what’s new section.

“what’s new?”

The live feed functionality was released during Microsoft Dynamics CRM 2011 as a solution set called Activity Feeds. The functionality was officially release with CRM 2013.

Activity Feeds allow you to monitor real-time updates in the activity feed to stay current with fast-moving sales, customer projects, and marketing campaigns at your organization.

You’ll find the activity feed on your dashboard under the heading what’s new.

The activity feed includes automatic updates about the work your colleagues are doing. You can also choose to “follow” updates for up to 1,000 of the contacts, colleagues, and customer records you care most about. (1)

Progressively, the functionality has been enhanced from the original solution set. Any record you own will automatically post to the what’s new section of the Activity Social Dashboard. You can also follow records you do not own in order to view any updates made by others collaborating or working on these records.

You will find the what’s new section under the Activity Social Dashboard although the feeds are also available on each of the Account, Contact, Opportunity, Case, etc. by default.

Yam_Pic5

Example at the Account Level:

Yam_Pic6

A few of the additional features of what’s new, include the ability to set and order advance find views to default for the user. Click on All records to view these options to order or add to the views you can click on the cog wheel on the lower right, (Options) to pop the system view window.

Yam_Pic7

Yam_Pic8

You also have the ability to filter the posts in what’s new by auto posts, (posts that are written to the database because of changes in records you are following or own a record),

Yam_Pic9

or user posts, (specific posts you make to the what’s new section window).

Yam_Pic10

To follow a specific record in the database, including User records navigate to the record and click on the ellipsis and select the Follow option.

Yam_Pic11

Integration with Yammer

Integration with Yammer will allow you to not only track changes occurring within the CRM database but will also allow you to link to your public or private Yammer account.

Turning on the integration is relatively straight forward.

Go to Settings->Administration -> Yammer Configuration

Yam_Pic1

Click on the continue button

Yam_Pic12

If your company has a Yammer account the account will automatically resolve to the correct Yammer Network.

Step 1 Click on the Authorize Microsoft dynamics CRM Online to Connect to Yammer

Yam_Pic2

Step 2 is to define the Group ID you wish to default too.

Yam_Pic3

Step 3 is to set the level of security for your Yammer activity stream messages

Yam_Pic4

Your Yammer Configuration is completed

Now browse out to the Sales Activity Social Dashboard

Click on Sign in with your Yammer account

Yam_Pic13

Notice my Yammer Account sign in is different from my Microsoft CRM sign in, therefore, we have to correct the issue.

Yam_Pic14

In order for the integration to work, either the primary email address or the Email 2 attribute has to be consistent with the Yammer Account sign in. Therefore, you can navigate to the User account and add the correct email address to the Email 2 address attribute.

Navigate to Settings -> Security -> click on the user.

Yam_Pic15

Open up the details of the user and add the correct email address to Email 2 attribute

Yam_Pic16

Save the record and then refresh your login into the system.

Navigate back to the Sales Activity Social Dashboard and click on the Yammer option, notice you are now viewing yammer posts.

Yam_Pic17

This is a two way integration, therefore you can post to Yammer from Microsoft CRM from this window

At IBM we currently have a very deep Yammer / BI practice headed by Ramin Mobasseri the focus is on your Company’s Internal Innovation. I am certain using Yammer everyone will participate in this new untapped internal potential. If you are interested in contacting Ramin for further information, please click on the link above and send him an email.

I hope you found this dive into this functionality useful.

My best,

CAL-Part1-18

Posted in Collaboration in Microsoft CRM, Configuration CRM 2015, CRM 2015 New Features, CRM Configuration, CRM Integration, Yammer, Yammer and Microsoft CRM | Tagged , , , , , , , | 1 Comment

Configuration of Entitlements in Microsoft CRM 2015

Good Day All-

Sorry for missing the last two weeks. Was at Convergence 2015 and it threw me out of schedule.

For those who haven’t been watching the transition, last year during the spring release of CRM 2013 Microsoft started a changeover in Microsoft CRM service module from support based on contracts to support based on entitlements.

Old Method Using Contracts:

Using the old model you could create new contracts based on contract templates. These define some information, such as allotment types, before you actually write a contract. You can create contracts only for existing accounts and contacts.

A contract has the status of draft until it is invoiced. Each new contract is assigned a unique ID that cannot be used for another contract, unless the contract is being renewed. When renewing a contract, the contract is saved as a draft with an ID that corresponds to the original contract. (1)

New Method Using Entitlements:

During the spring release of CRM 2013 Microsoft CRM moved from the Contract model to the Entitlement Model.

Entitlements like contracts define what kind of support your customers are eligible for by creating entitlements in Microsoft Dynamics CRM. With entitlements, you specify the support term based on number of hours or number of cases. The customer’s support level can vary based on the product or service that the customer has purchased. Customers who’ve purchased different products can be entitled to different support levels. This information helps the customer support agents verify what the customers are eligible for and accordingly create cases for them. (2)

The interesting difference between contracts and entitlements are in the later you can define Omni Channel support, for example, Email, Phone, Facebook, & Twitter.  In the former this is not available.  Also on entitlements you can also designate multiple company contacts that are allowed support, where as in the contract this is also not possible.

Inconsistencies for New Users of CRM:

There are a few inconsistencies on the user interface of a new Online CRM instance, for example:

If you go to Settings -> Templates the contract template option is still currently available on the window.

Ent_Pic1

I am sure this has been left on the CRM 2015 window for those who have been using contracts from 2013 back, although, because this was a new instance of CRM 2015 online I am not sure why this object still remains on the Template window. In Addition, the Entitlement Template is not currently available on this window, which you can access from the Settings->Service Management Tile.

Ent_Pic2

As you can see from above illustration, the Contract Template is also available on this form.

What is further confusing is if the business decided to use Contracts instead of Entitlements unless you are a developer and know how to put the contract tile on the menu, Out of the Box, the tile is not associated with the Account or the Contact.

Ent_Pic3

Ent_Pic4

At the Case Level Contracts are still available on the form itself.

Ent_Pic5

Don’t confuse my pointing this out these inconsistencies, the argument is if Microsoft is going to an Entitlement Model when a new implementation of CRM is created online for a new customer, the Case Management should not be available unless the client requires that paradigm which should be part of the initial set up of the application rather than what is current available.

Regarding Entitlements:

As previously articulated Entitlements define the type of support your customers are eligible from your support center in Microsoft Dynamics CRM. With Entitlements, you specify the support term based on number of hours or number of cases. The customer’s support level can vary based on the product or service that the customer has purchased. Customers who’ve purchased different products can be entitled to different support levels. This information helps the customer support agents verify what the customers are eligible for and accordingly create cases for them.

In addition, you can also specify the channels of support that are available within the Entitlement. For example, Phone, Email, Web, Facebook and Twitter. Within an entitlement template you must specific the total terms, (how many cases or how many hours) and you further can specify the number of cases or hours by each channel of communication.   Please note the total entitlement channel cases do not have to equal the total terms when creating an entitlement template.  A key difference is you can designate multiple company contacts permitted to initiate cases based on their allowable entitlements.

Scenario:

Our Bank Fraud Department wants to use Microsoft CRM 2015 for case management. They want to start by tracking client reported customer cases with respect to bank issued credit cards. The bank issues credit cards to customers and would like to attach a yearly entitlement sufficient to address any issues their client’s might have with respect to their card. They would like to use entitlements to track all issues related to the customer owned credit cards.

Execution:

You can begin by creating an Entitlement Template. Navigate to Settings->Service Management Tile

Click on Entitlement Templates

Ent_Pic6

Click on the + (New) Option

Ent_Pic7a

Now fill in all pertinent information into the form and click on save.

Ent_Pic7b

Since we require the entitlement to be associated to the client once a Credit Card has been issued we should modify a few additional items.

As soon as a credit card is issued to a client we should have a method to automatically assign the entitlement to the account record. In order to do that we have to create a trigger on the client record and a workflow to instantiate the trigger.

Our first step is to create a new attribute on the contact record to indicate a credit card has been issued to the client.   In this use case I am going to use two option attribute.

Ent_Pic7d

Save the form and then publish.

NOTE: Next step is to modify the entitlement form. The reason this is being pointed out; In order to use an entitlement template, you must have the ability to assign the entitlement template to a customer’s entitlement. Out of the box the entitlement template attribute has not been added to the entitlement form.

Until I stumbled upon this hidden attribute, I was under the impression you could only assign a template to an entitlement from the Setting->Service Management -> Entitlements Section. This was cumbersome because from this section you would have to search for the customer.

At the Account or Contact level -> Entitlement Tile you could not use the functionality of the template. Once you add the Entitlement Template attribute to the Entitlement form this limitation is eliminated.

Ent_Pic7e

Our next step is to create a workflow to automatically assign the entitlement to the customers who own our Bank Credit card.

First step is trigger of the CC attribute we created when the option is set to YES. We can do this two ways both on Create of the client record and also on the modification of the CC attribute.   We will then set the condition to instantiate if the CC is = “YES”

Ent_Pic7f

Next step would be to create the entitlement record automatically when “YES” option is set.

Ent_Pic7g

As you can view because we have the entitlement template attribute on the form we can set the proper template to be selected when the company record meets the trigger criteria.

Ent_Pic7h

Set the new entitlement to active

Ent_Pic7k

Create the actions to stop the workflow under both conditions.

Ent_Pic7i

Save and activate the workflow.

Finally there is one more step you might want to take in this process. Since we placed the entitlement attribute on the form and used it in creating the clients entitlement for the credit card we would want to lock out input once the attribute has been populated. we can accomplish this using the following business rule.

Ent_Pic7j

Activate the business rule once created.

Let’s test this new paradigm out. We just issued a credit card to the Burk Family. Our agent sets the Credit Card attribute from “No” to “Yes” on the Account Record.

Ent_Pic7l

As you can see our workflow fired off the trigger and created an entitlement for the Burk Family.

Ent_Pic7m

Susan Burk calls into Customer Service because she is having trouble activating her new card. Our agent can create a new case and automatically attach the entitlement to the case using the quick create form.

Our agent can then perform the customer service and first call resolution on the open case. Then Resolve the case.

Ent_Pic7n

Ent_Pic7o

If you go back to the customer’s entitlements you can view the entitlements remaining decremented from 300 to 299.

Ent_Pic7p

Ent_Pic7q

In conclusion, Entitlements can be deployed in lieu of Contracts starting in the spring release of CRM 2013 and CRM 2015 first release. One last challenge I wanted to mention, the Entitlement Templates are still not assessable under the Settings -> Template Tile, you can only access under the Settings -> Service Management Tile under Entitlement Templates.

This functionality will allow you to assign a number of cases a customer will be entitled to based on the origination channel and the timeframe allowable.

I hope you found this useful.

As always,

CAL-Part1-18

Posted in Configuration CRM 2015, CRM 2015 New Features, CRM Configuration, CRM Service, Entitlement Tracking in Microsoft CRM 2015 | Tagged , , , , , , | 2 Comments

Microsoft CRM 2015 How Do I Concatenate Two Fields In Microsoft CRM 2015? Revised

Good Day All-

May, 2012 I submitted a post called “How to concatenate two fields using workflow in Dynamics CRM 2011”. Click Here

Three years later this is still one of my most viewed posts on WordPress.  This method is still valid for CRM V3, V4, V2011 and V2013, although, it is much easier in CRM 2015.

A few months ago when covering the new features of Microsoft CRM 2015, I covered the calculated attribute functionality including the Concatenate features.   I decided today I was going to cover concatenation one more time using 2015 since the steps to accomplish this task are minimal compared to what we had to do in any of the prior versions of Microsoft CRM.

Scenario:

Our Manager would like to create a unique ID for each of the account records in the database.   She determined that a combination of the Account Name plus the main telephone number would be the optimal blend to create a Unique ID.  She asks her CRM Administrator to execute this request.

Execution:

Since this is a combination of the account name and the phone number our CRM Administrator decides this is a perfect opportunity to use the calculated attributes function found in CRM 2015.

  • She therefore will start off by opening a solution set and create a new attribute called ACCOUNT ID to retain the calculated information.

ConCat-Pic1

  • She defines the attribute as a single line of text.
  • The field type is defined as calculated.
  • The Format as Text
  • Click on Save
  • The click on the Edit button to the left of the field type

ConCat-Pic3

  •  This will open the calculated field dialog boxConCat-Pic2
  • Since this is straight forward implementation there is no reason to configure the condition, (in this case all records when created will require a unique ID).
  • Using the Concat() function in CRM Action section, she can define the formula.  Please note member attributes require a (,) comma to separate them within the function.  If you are going to add a literal then it must be defined with double (“) quotes.

For example: Concat(attribute1, “-“, attribute2)

Notice a comma separates each of the attributes or literal in the expression.

Our example the expression would look as follows:

 ConCat-Pic4

  • Click on the check icon in the lower right corner of the expression to check for accuracy, (if the function is incorrect the application will throw an error message).
  • Click on Save and close.

ConCat-Pic5

  • Save the attribute and close.
  • Place the attribute on the form
  • Click on save
  • Click on publish

ConCat-Pic6

  • Close the form.

She has completed the assignment.

She opens the record and the calculated field automatically renders based on the defined formula.

ConCat-Pic7

If you look at the methodology in my previous post from 2012 you will notice that this method is more efficient, and of course, codeless!

As always,

CAL-Part1-18

Posted in Calculated Fields, CRM 2015 New Features | Tagged | 3 Comments

The MSCRM Software CRM Compatibility Matrix

Good Afternoon!

This week I am going to switch it up a bit.

Instead of looking at configuration of Microsoft CRM 2015, I want to talk about upgrades and software requirements. Currently I am involved with an upgrade of Microsoft CRM Version 4 to Version 2015. Because there are a number of software compatibility technology requirements, I decided it was time to start consolidating all of those requirements on one spread sheet to use as sort of a cheat sheet for going forward. Please note I didn’t address Version 3 on this consolidation.

I am calling this The MSCRM Software CRM Compatibility Matrix.

Picture1

Picture10

Picture3

Picture4

Picture5

Picture6

Picture7

Picture8

Picture9

For additional supporting documentation, please refer to the links below:

Additional Information at Microsoft:

  1. Compatibility with Microsoft Dynamics CRM 4.0
  2. Compatibility with Microsoft Dynamics CRM 2011
  3. Compatibility with Microsoft Dynamics CRM 2013
  4. Compatibility with Microsoft Dynamics CRM 2015
  5. CRM for Tablets, CRM for Phones, and Tablet Browser support for Microsoft Dynamics CRM

Please if you notice any discrepancies let me know at the following location.

My hope is this helps in your current and future planning.

My Best,

CAL-Part1-18

Posted in CRM 2015 Requirements, CRM and SQL Server | Leave a comment

New Feature – Updates to Business Process Flows in Microsoft CRM 2015 – Part 2

Good Afternoon – Sorry for missing last week. I was attending Microsoft’s Industry Summit held in California and there just wasn’t enough time to focus on writing.

My last post focused on business process flows, there benefits, and why you would want to deploy to in your business solution. This week I would like to focus on some of the improvements to this capability now available in MSCRM 2015, including building out on the scenario we started in my last post.

Briefly – The feature will allow you to create an efficient consistent business processes on an entity (s) and is available in the sales, marketing, and service modules. This function is also available on all custom entities you create also.

Differences 2013 vs 2015:

Business process flows were introduced in CRM 2013. The functionality allowed you to provide a guided process to your end users. You had/have the ability to stage a process that is repeatable for your end users based on an optimal process defined within the organization.

In Version 2013:

You do have the opportunity to add multiple entities to one process:

BPR2-Pic2

The process had to be linear in execution, meaning, you could traverse through the process from 1 entity to the logical next entity as long as the entities were related. (1 Below)

BPR2-Pic1

You had the ability to kick off workflows based on input within the process flow as well as enabling security roles for the processes. (2 Above)

Each entity defined could be split into multiple stages with business required input (1) or suggested input included within each stage. As an offshoot to this functionality you could actually require an end user from moving to the next stage until input was captured by making the attribute capture business required, (called Stage Gating).

BPR2-Pic3

In addition, you had the ability to alter the prompts when defining the attributes on the process flow. The attributes you select to define each stage will take on the properties available on the form, for example, if you were using an option set within a stage, the input would be defined as the members you added when creating the option set originally. Finally all input from the process flows will automatically populate the attributes on the main form of the entity. In essence, using process flows you can force your users to enter minimal required data in order to proceed.

Limitations of 2013:

The two most glaring limitations are as follows:

You can define a process with up to 5 logical entities and once you traverse from one entity to the next you cannot return to an entity logically through the process.

BPR2-Pic4

You can only “Close the Process Cycle” if there is no more than 4 entities defined

BPR2-Pic5

Once you “Close the Process Cycle” for one of your entities the process, is automatically closed for all the remaining entities also.

In CRM 2015 Business Process Flows:

The most glaring improvement made to Business Process Flow functionality is the ability to deploy conditional logic within a defined process, (called branches).

BPR2-Pic9

By Defining a branch you now have the ability to create the next logical stage in the process. (Please note the condition can only be defined by the entity you are currently working with, for example, if you stage starts with the account entity, your branch can only be a function from one of the account entity attributes.

BPR2-Pic10

Conditions can be complex and each conditional statement can be evaluated based as an “And” or “Or”

BPR2-Pic11

Please note once you select an “And” or “Or” all subsequent conditions will follow the parent.

BPR2-Pic12

Once you add a stage to a condition you have the ability to further evaluate the input and create additional branches based on user responses.
BPR2-Pic13

Furthermore, you have the ability to create an “If Else” conditional scenario based on the original input.

BPR2-Pic14

Also please note above within each of the stages you have the ability to further define the “Stage Category” based on pick list entries of the global list “Stage” therefor you can add additional values from the global list. This will greatly enhance your reporting capabilities of your choice, i.e. counts on dashboards, Excel Spreadsheet integration or SSRS Reports.

BPR2-Pic15

The Similarities between CRM 2013 and 2015

In both cases you have the ability to define multiple process flows for a single entity

BPR2-Pic6

You can switch a process on an entity by selecting the ellipsis on the record and clicking on the switch process option.

BPR2-Pic7

By Default the process defined on the top of the list will automatically be assigned to a new record created, (please note you can have a process automatically selected based on input programmatically, beyond the scope of this discussion). You do have the ability to order the list of processes.

When traversing from one stage to the next if there is an entity switch the system will alert you to either create a new record or link an existing related record.

BPR2-Pic8

New Scenario:   (Please go back to the original scenario in Part 1 for a refresher)

If you remember our initial process flow was very basic one branch conditional logic as follows.

BPF-Pic-3

Our financial manager would like to build additional functionality onto this original process. If the Account Type = “CD” he would like to have additional information required for the business process branch to CD related to CD Term, Principal Value, Clients Email Address and eventually Rollover activity.

In addition if the Account Information is a CD, the financial manager would like to have a way to set a phone call automatically 30 days prior to the CD Maturity Date and a subsequent process to rollover the CD if the client agrees with the process starting from the beginning again.

Execution:

Our BA thought about this scenario and decided adding to the Business Process Flow functionality would be perfect for this requirement. In addition, the solution would require some additional screen design and a Workflow to manage the automated processing.

The first step was to update flowchart with the additional requirements to meet the objectives.

BPR2-Pic16

Our next step is to go to settings -> solutions open up our banking solution navigate to processes and deactivate the current process so he is able to modify.

BPR2-Pic17

Since we need workflow to help us with this process we need to determine what triggers we will require on the entities to fulfill the requirements. It appears we will need to add two additional attributes to the Phone Call Entity to trigger the workflow further for example we will require:

CD Renewal Agreed? Which would be defined as two options Yes or No and Months to Maturity input in order properly set the new maturity date if the client agrees to a renewal.   So we are going to add the Phone Call entity to our solution and make the necessary adjustments using the tool.   Save, Publish and Close the form.

BPR2-Pic18

The next step is to create a workflow to follow the process as stated on the flowchart. (Please note the logic on the illustration below and compare it to the flowchart.   Save the workflow and activate it.

BPR2-Pic19

We are ready to start Modifying the Business process flow to meet the stated requirements. Remember from flowchart 1 we used the following conditional logic, we will continue to use this logic and update the attributes we require on the CD information to correctly identify the initial CD when purchased.

BPR2-Pic20

Our next step is to define the Phone Call record created within the workflow once an Account Information -> Account Type = “CD” and set the Client Agreed to CD and New CD Maturity Term to Business Required.

BPR2-Pic21

In order to finish the process we are moving back to the old CD in the next step and requiring input into the Rolled Over? Status of the original Account Information record.

BPR2-Pic22

Lets Save the changes to the process and Activate the Business Process Flow.

BPR2-Pic23

One last item, our BA realizes he just modified the Phone Call entity with two attributes that might not make sense to other members of the banking team, so he decided to use business rules to set the visibility based on the topic of the phone call record.

BPR2-Pic24

Let’s view the solution in Action, if we open one of Susan’s CD’s.

BPR2-Pic25

You will view we extended out the CD Process to include the phone call record and the complete old CD stages.

BPR2-Pic26

If we click on the update phone call stage you can view the Client Agreed to CD and the New CD Maturity Term as business required attributes. Once completed we can close the phone call.

BPR2-Pic27

Then we can move to the next stage and close the CD and let the workflow handle the rest of the processing.

BPR2-Pic28

Finally if we view Susan’s account information we can confirm we have a new CD created today.

BPR2-Pic29

And when opening the record we can further confirm the new Maturity Dates and the workflow present to guide our Financial Advisor.

BPR2-Pic30

Business Process Flow is a powerful tool when combining with other capabilities as I just demonstrated. From the end user point of view there was very little input required in addition, guidance on what to do next.  From Management’s view point there is a great deal of information that is being collected that is consistent in process.  This valuable information can be analyzed for future direction with respect to sales and marketing functions in this use case.

Please keep in mind, not one line of code, and these processes can be changed just as quickly as they have been created.

Currently, this is my last post on new features in CRM 2015, and guess what? There is going to be a new spring release with additional new features as well as updates to some of the features I already posted on, though, I am sworn to secrecy at the present time so as soon as I can I will start up this series again.

In the meantime, if there is something you would like me to focus on next week, please reach out to me and suggest a topic . I will take all submissions into consideration going forward.

As always,

CAL-Part1-18

Posted in Business Process Flow, Configuration CRM 2015, CRM 2015 New Features, CRM Workflow | Tagged , , , , | 2 Comments

New Feature – Updates to Business Process Flows in Microsoft CRM 2015

Business Process Flow is a feature that was released with Microsoft CRM 2013. I will not dwell on the differences between the 2013 version and the 2015 version until my next post.

This week the focus is on:

  1. What business process flows are
  2. The benefits of using Business Process Flows in your solution
  3. How to configure a basic business process flow

What are Business Process Flows?

The feature will allow you to create an efficient consistent business processes on an entity (s) and is available in the sales, marketing, and service modules. This function is also available on all custom entities you create also.

When creating a new entity there is a control check box in the entity definition under the options section of the new entity form. Check the option “Business process flows”

BPF-Pic-1

The business process flow gives your users a visual representation of the business process by placing a graphic on top of the specific entity, guiding your business user through the process related to the entity or several entities. You also have the ability using this functionality to break the processes into stages and steps.

BPF-Pic-2

Keep in mind, the information you enter into the steps will automatically populate the attributes on the form. This will change your classic Form-Centric orientation to a Processes-Centric paradigm.

The benefits of using Business Process Flows in your solution:

There are many benefits when configuring Business Process Flows for your solution, for example:

  • Assists in Reinforcement Training – Users can follow the stages filling in the information required to become successful.
  • Consistency of Process – All users will be following the same process and adhere to company standards
  • Data Reliability – using the processes will assure information is recorded prior to moving on to the next stage of the process.
  • Data Uniformity – you can configure the processes to require attributes are “business required” and you can require stage completion prior to advancing to the next stage.
  • Visual Reminder of Next Action – If a user is working on a record and moves off to perform another task, when they come back to the original record, they will visually reminded of where they are in the process and can pick up where they left off.
  • Reporting – Stage categories can be used to link stages across process flows for reporting purposes.
  • Workflow – you can trigger an workflow process from the business process flow to run in the background when a field value of a record included in the process flow changes.

How to configure a basic business process flow

The scenario I am going to demonstrate below is very simplistic. I want to give you an initial overview of the functionality. My next post will drill into additional functionality.

Scenario:

Our financial managers department is growing. New accounts are continuing to be opened with missing information. As we demonstrated in previous posts there are also attribute differences required depending on the account opened.

Our financial manager discusses this situation with his Business Analyst and asks how he can make Microsoft CRM more intelligent and responsive to the types of accounts the Financial Specialist are opening.

Execution:

Our BA thought about this scenario and decided the Business Process Flow functionality would be perfect for this requirement.

Their first step was to create a simple flow chart of the process he would like to capture on the Account Information Entity.

BPF-Pic-3

Our Financial Manager approved of this pilot and gave the green light to proceed.

  • Navigate to Settings and our Solution.
  • Click down to Process References
  • Click on New

BPF-Pic-4

  • His next step is to define the process by name, category and entity.

BPF-Pic-5

  • Click Save
  • The next viewable Window is Business Process Flow Form

BPF-Pic-6

He will now define the following

  • Stage Name
  • Stage Category
  • Steps

BPF-Pic-7

  • Following the flowchart we are going to define the Account Type and whether it is an Asset or a liability and in addition whether any of the input is business required.

BPF-Pic-8

  • Our next step in the flowchart would be Initiate the next steps depending on the account opening. (This conditional branching feature is new to CRM 2015 and I will discuss this and additional differences in Part 2 of this post)
  • Our BA clicks on Add a Branch under the first stage and identifies the attribute(s) conditions to move to the proper next stage. In this case we need to define the Account Type Attribute.

BPF-Pic-9

As you can see you can select the options required for the top branch of the Flowchart.

  • Click on the Check Mark to save your work.
  • The Next Step is to click on the Insert Stage under the Conditional Branch

BPF-Pic-10

  • We can then define the information we require during this stage execution if the Account Type = “Bank Account” .OR. “Checking Account”

BPF-Pic-11

  • Our next step is to repeat the previous steps for the If/Else Condition. Insert a new stage.

BPF-Pic-12

  • As you can see the application will sense this is a conditional branch as illustrated with the Else IF prior to the condition.   Here the BA is defining this Branch’s condition as Account Type = “CD”
  • We then can enter a new stage under this condition, (the required attributes for the CD option).

BPF-Pic-13

  • Now that we fulfilled all the conditions on the flow chart we can save the Business Process Flow and activate it, (This is required).

BPF-Pic-14

  • Let’s look at our work.

One of our clients Jammie Jones wants to open a new account. She is sitting with the financial planner, she opens up Jammie’s record and navigates to the account Information reference.

BPF-Pic-15

Clicks on Add a new Account.

BPF-Pic-16

Notice on the top of the Account Information form we have our process above the form and showing Stage 1, Client Needs.

BPF-Pic-17

So Jaimmie is interested in opening a checking account. As you can view, we can enter the information right from the process window. (This information will also resolve to the corresponding attributes on the form).

BPF-Pic-18

Notice when we choose the Checking account option stage 2 renders automatically with the attributes required to open a checking account.

BPF-Pic-19

Let’s take a step back and change the account type = “CD”

BPF-Pic-20

Notice stage 2 now renders as CD Information and the corresponding attributes are rendering as the stage 2 attributes

BPF-Pic-21

I purposely kept this first example very simple step by step so you would have a reference to try this functionality out.

My next post will focus on the following:

  1. Differences between V2013 and V2015
  2. Additional Benefits
  3. The Limitations
  4. Another example which will be robust.

Also I would love to hear about your experiences using this new functionality, please feel free to contact me with comments to these posts.

As always,

CAL-Part1-18

Posted in Business Process Flow, Configuration CRM 2015, CRM 2015 New Features, CRM Workflow | Tagged , , , , , | 3 Comments

New Feature – Hierarchical Visualization in CRM Microsoft CRM 2015

Another feature present in CRM 2015 is the capability to present data visually in a hierarchical model. Microsoft CRM always had the capability to create hierarchies of related records using self-referential relationships.   A few obvious examples occur when configuring the sub-account or the sub-contact.

VH-Pic1

Historically we use the sub-account representation above when we are required to have a Parent Company and Related Branch offices. By adding the sub-account attribute to the account form we subsequently have the ability to link account records to one parent record.   Using this method required you to query records using Under and Not Under logic. The Under and Not Under hierarchical operators are exposed through Advanced Find and the workflow editor.   There was no easy way to visually view the hierarchies in past versions of CRM.

With Dynamics CRM 2015 you can now visualize these relationships and the hierarchically related data gaining a better understanding of your information. This feature gives you a view into your data using a hierarchical representation. This feature will work on system entities and custom entities by enabling the hierarchy setting now located on the relationship definition.

VH-Pic2

As viewed above when creating a new self-referential relationship you now have the ability to set the Hierarchical Option to yes activating the ability to visualize your information.

This new feature will allow users to:

  1. View the data in a tree view, which shows the entire hierarchy
  2. View the data in a tile view, which is a detailed view of a smaller portion of the hierarchy.

“You can explore a hierarchy by expanding and contracting a hierarchy tree. Also, you can compare the attributes between the records at multiple levels in a tree and perform actions on one or more records right from the tree view. Once defined, the hierarchy settings enable visualization in the CRM web application and in Microsoft Dynamics CRM for tablets, but, for the tablets, in a modified format suitable for the smaller form factor. Because these visualizations are solution components, they can be transported between organizations like any other customization. You can configure the attributes shown in the visualization by using the customization tools in the CRM Web application. There is no requirement to write code.” CRM Help File

Let’s configure an example of this new feature.

Scenario:

Our Financial Manager notices he is now tracking investments and accounts from related family members he would like to have a method to visualize this data in a format giving him the ability to view all assets and liabilities managed over the entire household.   He has an idea of how he would like to view this data and put together a family tree representation of a household and asked his Business Analyst if this would be possible using Microsoft Dynamics CRM 2015. See Below.

VH-Pic3

Execution:

Our Business Analyst decides this is a perfect fit for the use of the new Hierarchical Visualization feature available in Microsoft CRM Version 2015. He is now ready to execute based on this requirement from our Financial Manager.

His first step is to enable a hierarchy based on the Contact Entity. This will give him the ability to relate family members together under 1 household. (Open you solution, go to 1:N relationship reference and click new.

VH-Pic4

Now define the self-referential relationship.

VH-Pic2

Save your work.

Next step – Navigate to the Hierarchy Settings reference under the entity.

VH-Pic5

Highlight the relationship and click on Edit.

VH-Pic6

You can define the Default View from this screen or create a new form to use as the default.

VH-Pic7

Please note you can also define the form as “Null” forcing the Tree View only in the visualization.

Our BA completed the form he would like to use for the data view.

VH-Pic8

Clicks on Save then publish.

The next step is to relate the records together for the hierarchy.

Go to the head of the household then navigate to the family members reference.

VH-Pic9

Add the related family members that are existing or add them as new contacts.

VH-Pic10

Your BA is now ready to present the results to the Financial Manager.

As you can see from the All Account View you are now able to see the records that are related to a hierarchy.

VH-Pic11

You can launch the hierarchy view by clicking on the icon or by opening the contact record and click on the hierarchy from the Quick Access Toolbar.

VH-Pic12

As you can see we can view the hierarchy in two different formats. The tree view.

VH-Pic13

Notice you can launch a specific record by highlighting on the contact reference and clicking on the launch icon.

Our Tile View is our other option.

VH-Pic14

You can launch the records by highlighting the tile and clicking on the launch icon. Also notice on the right side of the tile representation you have the ability to view into the additional records related to the hierarchy by clicking on one of these navigation icons.

It is that simple to configure this new feature.

A few drawbacks with this functionality:

  1. In order to use this feature the hierarchy must be defined as a self-referential entity relationship
  2. From the Tile View you can only view up to 4 attributes on the quick view form.
  3. From the Tile View you can only view up to 3 records across
  4. From the Tile View you can only view up to 3 levels at the same time
  5. Each of the relationships can only allow 1 default view for the Tile View.

My next post will focus on the entity process flow updates.

I would love to hear about your experiences using this new functionality, please feel free to contact me with comments to these posts.

As always,

CAL-Part1-18

Posted in Configuration CRM 2015, CRM 2011 Reporting, CRM 2015 New Features, CRM Configuration | Tagged , , , , | Leave a comment