SDK Customization for Microsoft Dynamics Marketing

I am very pleased to re-blog this well thought out entry from Trapti Nagar, one of my colleague’s at IBM.   I am going to start focusing on the functional aspects of Microsoft Dynamics Marketing, but for you Coder’s I think you will enjoy a bit on how to manipulate the system through the SDK.

http://blogs.msdn.com/b/microsoft_dynamics_crm/archive/2014/09/08/customization-options-for-dynamics-marketing.aspx

My best,

1 - SignatureSteven

Posted in MDM, Microsoft Dynamics Marketing | Tagged , , , | Leave a comment

Microsoft CRM 2015 New Feature – Everything You Wanted to Know About the Timer Control in CRM 2015 – Part 2

Welcome back to Part 2 of this topic The Timer Control.

For those who were using this control since the spring release I would like to point out the differences in CRM 2015.

TC2-1

Version 2013 Control

TC2-1

Version 2015 Control

There are two new additional conditions available in the CRM 2015 Version of the Control:

  1. The Failure Condition – this option will Display as expired on the Timer Control if the Failure Condition is met.
  2. The Pause Condition – this option further improves the case management capabilities by allowing agents to pause and resume the SLA’s on the Timer Control for which the record was on-hold or waiting on client’s response to ensure SLA’s are met. The Pause Condition’s criteria must be met in order for the Timer to pause. In the case the condition is met, the Timer Control will display a Pause status on the face of the form.

TC2-3

Paused View of the Timer Control

Scenario Continued:

The last post we defined a scenario for the timer control. Let’s continue on till completion.

Scenario Revisited: Our Financial Firm is very pleased with the work done so far with the Account Information Entity. Our client financial managers are able to view their client’s and the accounts they currently hold with our institution.

Sales is requesting the client account managers get more proactive with their client base. There is a push currently to renew CD’s because we are offering a new program for early rollover commitments that would be an attractive, safe, and high yield investment alternative. We are currently tracking CD’s in our Account Information entity. In addition, our Sales manager has determined that there is a window of opportunity to renew a greater percentage of CD’s if the Client Financial Managers are talking to their clients between 30 to 45 days prior to CD maturity.

Requirements:

  1. 45 Days prior to maturity notifications to identified Client Financial Manager that a client’s CD is coming due for renewal.
    1. By Email
    2. A Timer set to Warning for the 15 Day Window and subsequently changed to critical after the 15 day threshold has been crossed.
  2. 30 days prior to renewal of the CD a timer is set to warning, indicating there is 1 month remaining until CD maturity. Completed Part 1
  3. At the Maturity date an indication that the threshold has passed Completed Part 1
  4. If the client does rollover the CD, there is an indication on the record that there was success. Completed Part 1
  5. If the client redeems or moves their funds, there will be an indication on the record that there was failure to renew.

Execution:

Requirement 5 is handled by defining the Timer Control’s failure condition.

  1. First we will add a new Option in CD Status to Redeemed.
  2. We will then add this option to the Timer Control’s failure condition.

TC2-4

Click OK, then Save and Publish

Note: When the CD passes the maturity date threshold the timer will turn red and start incrementing. If the CD is set to “Redeemed”, the Time Till Maturity Timer will display Expired.

TC2-5

Requirement 1 methodology:

It appears we are going to be required to add another timer to this form to account for the 15 Day Marketing Window.

We are looking to accomplish the following actions:

  1. We require the timer to display black until Maturity Date <= 45 Days (Prior to SLA threshold)
  2. We require the timer to go into Warning Condition between 45 Days and >=30 Days till maturity (Critical Time to Market the Rollover)
  3. We require the timer to cross the marketing threshold when Critical Time to Market is < 30 Days or at the Failure Time Field Interval.

As mentioned in Part 1, for every timer control at least two additional attributes are required. A time/date attribute to define the Failure Time Field and at least one option set or two option attributes to define the subsequent conditions.

We defined the Critical Time to Maturity to be between 45 days and 30 days till maturity, therefore we would like the timer to display Black until this timeframe and change to yellow during this timeframe.

Let’s create two attributes:

Critical Time Till Maturity as a Time/Date field and lets use the calculate option to 30 Days prior to Maturity. In effect we are setting up this failure to occur on the last day of the 15 Day Window. Your formula would be as follows:

SubtractDays(30, sjj_maturitydate) We are using the maturity date as the base and setting the failure at Day 30 of the Critical Time Till Maturity. This will address #3 above.

TC2-6

We will also create an Option Set attribute called Marketing Window with three entities Open, Warning and In Process

TC2-7

Now let’s create our Timer Control “Marketing For Rollover”

  1. Go to our solution
  2. Open the Account Information form
  3. Click on the Insert Tab
  4. Click on the Timer Control Option
  5. Enter in the Name
  6. Enter in the Label
  7. Our Failure Time Field will be defined as the “Critical Time Till Maturity” Time / Date attribute.
  8. For our Success Condition, we will use the Attribute CD Status Defined in Part 1 with the value of “Rolled Over”
  9. For our Failure Condition we will use the CD Status Defined with the value “Redeemed”
  10. For our Warning Condition we will use the Marketing Window Option Set with the value Set to “Warning”.
  11. For our Pause Condition we will use the Option Set Marketing Window with the value Set to “Open”
  12. We will not define the Cancel Condition

TC2-9

13.   Click OK
14.  Place the Timer Control on the Form

TC2-8

15.  Click on Save and Publish

Our last step is to create a Process to change the Conditions on the Timer Control to meet the criteria for Requirement 1

TC2-10

  1. Our Workflow will start as soon as a new Account Information Record where Account Type = “CD” is created.
  2. We are setting Marketing Window Attribute = “In Process”.
  3. We then time out the Workflow until the Critical Time till Maturity is 1 Month and 15 Days Prior to the Maturity Date.
  4. At that point we will change the Marketing Window Attribute = “Warning” which will change the Timer Controls Count Down Clock to Yellow, implying we are in the 15 day critical period.
  5. At this point we will send an email notification to the Client Financial Manager regarding the critical period to contact Client and provide financial counseling.
  6. The workflow at this point completes as successful.
  7. When we pass the Date on the Critical Time Maturity the Timer Control’s Failure Time Attribute will activate changing the Timer Control’s indicator to Red and subsequently start incrementing.

Below is the view of our Timer Control’s display when we have less than 30 Days to maturity on a client’s CD.

TC2-11

Although somewhat sophomoric, this is another example of understanding a client’s business process and thinking outside the box using all the features available in Microsoft CRM to create a configured solution, and without the use of code.   My intentions were to demonstrate that the timer control is useful in situations other than the case form.

I have included below a few items you should consider when configuring the Timer Control, which will assist in your Internal Governance.

Helpful Tips:

  1. The attributes you are using for status changes, always determine whether they should be configured as Read Only. That will prevent users of the system overriding the parameters identified within the conditions on the Timer Control, (the one exception would be the pause option)
  2. Use workflow whenever possible to automatically change the status attributes, affecting the Timer Control’s conditions.
  3. If you drive the Pause Option off an Option Set or a 2 Option Set, create an alert email workflow to the agents manager alerting them to this status change so SLA items will not fall through the cracks.

This concludes my Timer Control series. I am trying to determine the subject of the next post so you will be surprised next week.

Why don’t you try to include the Timer Control on one of your potential solutions?

Also I would love to hear about your experiences using this new functionality, please feel free to contact me with comments to these posts.

As always,

1 - SignatureSteven

Posted in Uncategorized | 1 Comment

Microsoft CRM 2015 New Feature – Everything You Wanted to Know About the Timer Control in CRM 2015 – Part 1.

Ok I wanted to do something novel in this entry and decided to use the control in CRM 2015 in my next scenario. More on the control first.

History:

The timer control was first introduced to Microsoft CRM 2013 during the days of Leo release, June, 2014. This control helped me win a very important deal with my last employer because we came into a customer service scenario with a way to view SLA’s on a CRM Record.

Timer Control Highlights:

The timer control functionality is to count down, (decrement) prior to an SLA Threshold then it count up, (increment) after it passes that same threshold. It give you a great visual on the case record. Actually it can be deployed on any entity form, (as I will demonstrate later), the trick is deploy it when the scenario presents itself.

Traditionally you would add the timer control to the case form to help customer service representatives gauge the amount of time they have to complete a task – typically associated with a service level agreement.

Typically when you configure the control on the form there are several data sources the user can identify such as failure time field, success condition, failure condition, warning condition, cancel condition and pause condition.

TC-1

The only attributes required are the Name, Label, Failure Time Field, and the Success Condition. All remaining attributes can be ignored. Deciding to ignore an attribute condition could impact the display on the control as we will later observe.

If all attributes are identified with conditions your expectations would be as follows, (see above picture):

If the task is completed within the time remaining, the control shows the word Succeeded.

If the task isn’t complete within the time remaining, the control shows the word Expired.

As the timer counts down, the color changes to yellow as the time remaining nears non-compliance. If the time remaining expires, the timer shows the word Expired.

Then the timer color changes to red and the timer starts counting up to show the elapsed time since the task should have been completed. This behavior is optional. (Note this condition will only occur if you DO NOT define the Failure condition on the control when configuring.)

If a condition causes the milestone to be canceled, the control shows the word Canceled. This behavior is optional. (Note this condition will only occur if you DO NOT define the Cancel condition on the control when configuring.)

You can cancel the timer count if you configure the Cancel Condition.

You can pause the timer count if you configure the Pause Condition.

Note: If either of the required fields in the Timer Control dialog box do not have a value in the record, the control shows the words Not Set.

Requirements to configure the Timer Control:

You must be a system admin or system customizer

For every timer control you will have to use two additional attributes:

An attribute defined as the type Time/Date, used for Failure Time Field on the control. This will instantiate the time remaining on the control “countdown”

An Option Set or a 2 Option Attribute for use for the definition of the Conditions on the Timer Control.

TC-2

To access the timer control open up a form in the configuration window. Navigate to the Insert Tab and click on the Tab Control Icon.

TC-3

Now it is a matter of identifying the time attribute you want to use for the Failure Time Field and your Condition(s) attributes. It is really that simple.

Let’s look at a real world scenario and create a solution using the Timer Control.

Scenario:

Our Financial Firm is very pleased with the work done so far with the Account Information Entity. Our client financial managers are able to view their client’s and the accounts they currently hold with our institution.

Sales is requesting the client account managers get more proactive with their client base. There is a push currently to renew CD’s because we are offering a new program for early rollover commitments that would be an attractive, safe, and high yield investment alternative. We are currently tracking CD’s in our Account Information entity. In addition, our Sales manager has determined that there is a window of opportunity to renew a greater percentage of CD’s if the Client Financial Managers are talking to their clients between 30 to 45 days prior to CD maturity.

Our business analyst has been asked to look into methodology of including this functionality into our CRM System with the following requirements:

  1. 45 Days prior to maturity notifications to identified Client Financial Manager that a client’s CD is coming due for renewal.
    1. By Email
    2. A Timer set to Warning for the 15 Day Window and subsequently changed to critical after the 15 day threshold has been crossed.
  2. 30 days prior to renewal of the CD a timer is set to warning, indicating there is 1 month remaining until CD maturity.
  3. At the Maturity date an indication that the threshold has passed
  4. If the client does rollover the CD, there is an indication on the record that there was success.
  5. If the client redeems or moves their funds, there will be an indication on the record that there was failure to renew.

Execution:

Let’s open the Account Information entity to a CD to assess where we are in the process.

TC-4

If you remember back to my second post on calculated fields we used the date functions to calculate the maturity date. Review Here

We actually can use this Maturity Date to define our Failure Time Field threshold on a Timer Control that we will call Time Till Maturity; meeting the requirement identified in # 3 above.

We also can use the CD Status Option Set to define the remaining conditions on the control we wish to configure.

Let’s start working.

Open your solution and go to the form editor of our account information form and client on the insert tab followed by clicking on the timer control icon.

TC-5

Start off by identifying the Controls:

  • Name
  • Label
  • Failure Time Field

View the options on the Failure Time, MSCRM Timer Control will only allow the user to include a Time/Date Attribute in this field. As we stated previously the maturity date would be the ideal attribute to use for this threshold

TC-6A

Your Timer Control should appear as follows:

TC-7A

Now we can define our conditions

Notice when we click on the combo box we are exposing all option set and 2 option attributes.

TC-8

As we discussed we will deploy the CD Status as the attribute and “Rolled Over” as the value in the success criteria.

TC-9

We can carry on with the same methodology for the rest of the Conditions.

TC-10

Notice I am leaving the failure condition empty, because I want the timer to turn read after it passes the threshold and start incrementing. If I used a value in this attribute, one it passes the threshold the timer would change to “Expired”

TC-11

The warning condition is set to the CD Status Value = “1 Month till Maturity” At this point the Timer Control Clock will change from Black to Yellow. We will need workflow to update the CD Status accordingly based on 30 Days before the Maturity Date.   At the same time we will send an alert email to the Client Financial Manager regarding the warning status on this particular CD’s Status.

TC-12

The next step is to click OK Button on the Timer Control. The control will automatically be placed on the form. You can drag it to the appropriate position on the form.

TC-13

Click Save, Publish and Close.

Let’s view some of the results thus far.

Notice we are outside of the 30 Day period and we are displaying the timer in black.

TC-14

When we are less than 30 days till maturity we have changed the CD Status from “In Process” to “1 Month Till Maturity” and the time turns orange.

TC-15

When we pass the maturity threshold our timer turns red and starts incrementing.

TC-16

If the client rolls over the CD notice our Timer Control displays “Succeeded”

TC-17

Let’s bring up our requirements to view exactly where we are.

  1. 45 Days prior to maturity notifications to identified Client Financial Manager that a client’s CD is coming due for renewal.
    1. By Email
    2. A Timer set to Warning for the 15 Day Window and subsequently changed to critical after the 15 day threshold has been crossed.
  2. 30 days prior to renewal of the CD a timer is set to warning, indicating there is 1 month remaining until CD maturity.
  3. At the Maturity date an indication that the threshold has passed
  4. If the client does rollover the CD, there is an indication on the record that there was success.
  5. If the client redeems or moves their funds, there will be an indication on the record that there was failure to renew.

Notice we haven’t not addressed Requirement 1 or Requirement 5.   Requirement 1 we are going to use the same methodology process as above. For Requirement 5 we are going to have to take a different approach.

I will cover both of these requirements in my next post next week. In the meantime I did want to point out a few challenges you will have with the deployment of this control.

A few deficiencies with this control:

  1. You can’t instantiate workflow from the timer control, there are other methods for meeting this objective which I will demonstrate in the scenario below.
  2. You cannot add the timer control on a view, therefore, you can only view it in real time when you open up record which tends to be a bit cumbersome if handling hundreds of records.

Why don’t you try to tackle one of the two open requirements during the week and get back to me with potential solutions?   Also I would love to hear about your experiences using this new functionality, please feel free to contact me with comments to these posts.

As always,

CAL-Part1-18

Posted in Configuration CRM 2015, CRM 2015 New Features, CRM Configuration, CRM Workflow | Tagged , , , , , | 1 Comment

Power BI for Office 365 and CRM 2015: Get CRM data to Excel with a click

I found this blog very helpful. Everyone should share in the knowledge.

Mandar Joshi's avatarcrm backlog

What is Power BI?

Power BI is a cloud-based service that works together with Excel to provide a complete self-service analytic solution. With both Excel to author reports and Power BI for Office 365 to share them, you can give everyone in your organization a powerful new way to work with data.

Power BI Excel graphic

In Excel, you can now discover, combine, model, analyze, and visualize data like never before.

With Power BI for Office 365 you can easily setup an online gallery for users to share insights, collaborate and access reports created in Excel, from anywhere on any device while asking questions in natural language to get live interactive answers through data visualizations.

Self-Service BI in Excel

Self-service BI features in Excel 2013 make discovering and visualizing data easy. These four features – Power Query, Power Pivot, Power View, and Power Map – work seamlessly together.

With Power…

View original post 420 more words

Posted in Uncategorized | Leave a comment

Microsoft CRM 2015 New Feature – Drilling into Calculated Fields- Advanced Calculations and Date Calculations – Part 3

As promised this will be the last post on the new calculation features available in Microsoft CRM Version 2015, released November, 2014. This functionality will help facilitate your solution development. Where once you had to depend on a developer writing code, using this functionality will allow you to configure your system quickly following your company’s business processes.

Since this is the first inclusion of this type of functionality, I believe Microsoft will continue to improve and add to these features in subsequent releases.

If you would like to catch up to the first two parts of this series.

  • Part 1 of series you can do so at this location.  (Focuses on Basics of Calculated fields)
  • Part 2 of series you can do so at this location.    (Focuses on the String Functions)

Today I will continue to work on the original Financial Manager scenarios, including new complex calculations and the use of the date functionality calculations.

Scenario: This is a continuation from the previous blog posts starting from the Roll-up functionality, therefore, if you need to review please feel free to do so).

Requirement 1: Our financial manager has now been asked to provide the calculated % of the holding for each account information record’s estimated value based on the total of the asset holdings for each of their customers.

Overview: Please go back to my post on roll-up fields for my methodology for calculating the total asset holdings for our clients. This is very important since this total will be the denominator to determine the % of each individual client’s holdings. At this location

Since we have this roll-up total available to us, we will only be required to focus on the account information record in order to provide the % of its asset value to the sum total of all assets.

Execution: First step is to create a new attribute at the account information level to hold the Accounts Percentage based on the Total Assets.

CAL2-Pic1

Click on the edit button, As you can see I am using the Estimated Value attribute as the nominator and the Total Asset Rollup field at the contact parent level as the denominator. So the formula is as follows  AccountInformation.sjj_estimatedvalue / Contact.sjj_networth.

CAL2-Pic2

Note if you are going to use a parent attribute in the calculation you have to use the relationship attribute used for the lookup into the parent hence sjj_clientaccountID Followed by a period. From that point Microsoft Intellisense will allow you to choose from all attributes at the parent level. Hence sjj_networth.

Click on the check mark on the bottom right of the Action section to save the formula.

CAL2-Pic3

Our next step is to create a condition where the calculation will only render if the Account Information record is defined as an “Asset” Record.

CAL2-Pic6

Save and Close the Calculated field formula

Place the Asset Percentage Attribute on the Account Information Form

CAL2-Pic4

Save the form and publish the changes

Start off by opening an account information record where the asset/liability = “Liability”

CAL2-Pic7

View above the Asset Percentage is left blank.

Now open an Account Information record where the Asset/Liability = “Asset”

CAL2-Pic5

Notice the Asset Percentage has been automatically Calculated.

Note: Remember as long as you correctly identify the related parent lookup attribute and follow it with a period Intellisense will automatically render all attributes at the parent level for use in calculation functions.

New Functionality Scenario: Our Financial Firms are now going to sell Certificates of Deposits and track them in the Account Information entity.

Requirement: Our financial manager has now been asked to provide an attribute to track Maturity in Months as well as the date of maturity for the CD purchased.

Execution: First step is to create a new attribute capture the CD Months to Maturity. Note: Our typical terms are between 0 – 60 months term duration.

CAL2-Pic8

Our next step would be to create a calculated attribute that will track the Maturity Date.

CAL2-Pic9

Notice we are defining the data type as Date and Time and the Field type is calculated.

Click on the edit option to render the formula definition window.

CAL2-Pic10

Formula Information: Notice in the formula above we are creating an initial calculation option that will AddMonths, (We are using the Maturity in Months attribute as the plug. We are going to increment the Createon date, (Our assumption is the CD will be tracked starting on the date the record is created).

Our next step is to create the condition on when we want the calculation to instantiate, i.e., if the Account Type = “CD”

CAL2-Pic11

Click on the Check on lower right of condition, your formula should resemble the picture below.

CAL2-Pic12

Save and Close

Place the two new attributes on the Account Information form, Save and Publish.

CAL2-Pic16

Save and publish your work

Bonus Functionality: Our Financial Manager wants to provide additional benefits to the Account Information form, therefore if the Account Type = CD the Months to Maturity Attribute should be defined as business Required, in addition, he feels the only time the Months to Maturity Attribute should be viewable on the form is if the Asset Type = CD.

He will execute these requirements by creating a business rule.

Go to Entity Account Information, Click on Business Rules and click on New.

Our first step is to identify the condition, Account Type = “CD”CAL2-Pic12

Our next step is to create an action that will change the CD Months to Maturity to Business Required status

CAL2-Pic13

Now let’s focus on the Hiding of the Months to Maturity Attribute by defining an Else If condition.

CAL2-Pic14

Notice we defined that if Account Type <> “CD”

Hide the CD Month to Maturity Attribute

CAL2-Pic15

Save and Close this rule then publish all changes.

Notice when you open up an account information record that has an account type <> “CD” the Months to Maturity is not rendered on the form.

CAL2-Pic17

Conversely when you open an account information record that has the account type – “CD” the Months to Maturity is on the form and business required.

CAL2-Pic18

Charting Information: As a result of this information and the calculated fields our financial manager can now look at a client and view all their holdings including the percentage of each holding to the total assets in one location.

CAL2-Pic1-cc

There are a few additional considerations you should take note of when using calculated fields: (Reprinted from the TechNet Document on Calculated Fields)

Calculated fields considerations:

You should be aware of certain conditions and limitations when working with calculated fields:

  • Saved queries, charts, and visualizations can have a maximum of 10 unique calculated fields.
  • The calculated field values are not displayed in the CRM Outlook Offline mode in the tile views or on entity main forms.
  • A maximum number of chained calculated fields is 5.
  • A calculated field can’t refer to itself or have cyclic chains.
  • If you change one of the condition operators in a multiple condition clause, all of the condition operators will update to that condition. For example, in the clause IF (x > 50) OR (y ==10) OR (z < 5), if you change the OR operator to the AND operator, then all OR operators in the clause will become AND operators.
  • You can access parental fields via the Lookup field to the parent entity, such as <LookupFieldName>.<FieldName>. This is not possible with multi-entity Lookup fields like Customer which can be Account or Contact. However, some entities have individual Lookup fields for a specific entity, such as ParentAccountid.<FieldName> or ParentContactid.<FieldName>.
  • Sorting is disabled on:
    • A calculated field that contains a field from a parent record.
    • A calculated field that contains a logical field (for example, address field).
    • A calculated field that contains another calculated field.
  • Calculated fields can span two entities only.
    • A calculated field can contain a field from another entity (spanning two entities – current entity and parent record).
    • A calculated field can’t contain a calculated field from another entity that also contains another field from a different entity (spanning three entities): (Current Entity) Calculated Field <- (Parent Record) Calculated Field 1 <- (Parent Record) Calculated Field 2.
  • You can’t trigger workflows or plugins on calculated fields.
  • You can’t change an existing simple field to a calculated field. If your current application is using JavaScript or plug-ins to calculate a field, you would not be able to use the calculated fields feature without creating a new field.

This post will conclude this series on calculated fields. My understanding has been enhanced by articulating the feature set and using real world scenarios to illustrate the power of this new CRM capability. Next week I am going to start to tackle the timer control and the changes now available in Microsoft CRM 2015.

I would love to hear about your experiences using this new functionality, please feel free to contact me with comments to these posts.

As always,

CAL-Part1-18

Posted in Calculated Fields, Configuration CRM 2015, CRM 2015 New Features, CRM 2015 Requirements, CRM Configuration, CRM Workflow, Rollup Fields in CRM 2015 | Tagged , , , , | Leave a comment

Microsoft CRM 2015 New Feature – Drilling into Calculated Fields- The String Functions – Part 2

Welcome to 2015.

My last post concentrated on the basics of new calculated field functionality available in Microsoft Dynamics CRM 2015. Today, I am going to continue with an additional example using the string function, while adding a bit of complexity with the use of additional calculation functions now available.

If you would like to view Part 1 of series you can do so at this location.

At the completion of the examples I am going to post a few items you should consider when using the string calculated field functions and a few tips, based on my own experience.

Keep in mind the primary benefit of using calculated fields in your solution will allow you to create business process without the need for writing code. Also please note these functions are the beginning of what I believe will be expanded functionality going forward.

Scenario 1 (This is a continuation from the previous blog posts starting from the Roll-up functionality, therefore, if you need to review please feel free to do so).

Requirement 1: Our financial manager would now like to add additional functionality to the Account Information entity. Our first task is to assign a unique ID for each of the client’s holdings.

Execution: We are going to use the String Functions available and concatenate a combination of the client’s last name, their address, and the name used to identify the account. Let’s go. Our first step is to create a new attribute of a text type that is calculated.

CAL2-Pic1-a

Click on the edit button, as you can see I am using a number of functions to calculate this Account Identifier field. First we want to concatenate the results of the 3 TrimRight Expressions.

CAL2-Pic1-b

Notice the first and second TrimRight expressions, here we are identifying the relationship lookup field sjj_clientaccountsid plus a period this will alert the system we want to use the one of the parent attributes. Intellisense will render all attributes at the parent level for you to choose from.

Note: Remember as long as you correctly identify the related parent lookup attribute and follow it with a period Intellisense will automatically render all attributes at the parent level for use in calculation functions.

Of course all Trim functions require the numeric position of where the trim should end being either from the right or the left position. In addition I am using literal separators throughout this formula. For example “-“.

All literals require the quote marks surrounding the text.   One important exception is if the literal contains a quotation mark you must precede each mark with the backslash (\) escape character, for example,:

“The Answer is:” literal would be included in the function as follows:

“\The Answer is:“\

This ensures that the quotation marks inside the string aren’t treated as special characters that separate the strings.

Limitation Identified: One item I did find that is problematic is the fact that the trim function will not respect the length of the attribute. It only respects the content of the attribute.

For example, if you only wanted to use the 3 most left characters of the last name in your identifier, normally you could look at the field length record it at 50 characters and then use the following function TrimRight(<<Attribute>>, 47).

Unfortunately this will not work unless you have 50 Characters filling the attribute. I believe this is something that will have to be worked out in the future with the Microsoft developers. Once this is completed we can click on the Check mark to save the function.

CAL2-Pic1-c

Click on Save and Close, then publish the changes. Now when you open any of the Account Information records you will notice we have captured a Unique Identifier.

CAL2-Pic1-d

Please take note: Three years ago, I put together a Blog on concatenation using workflow. This method is no longer required with the advent of the Concat function as I just demonstrated. In addition, you now have the ability to trim results from fields to create a powerful functional solution for the clients business.

What is even more impressive is the ability to nest the functions using multiple functions in one calculation.

Next week’s post will conclude this series on calculated fields.  My focus in that post will be on a complex cross entity requirement as well as an example using the date functions.

I would love to hear about your experiences using this new functionality, please feel free to contact me with comments to these posts.

As always,

CAL-Part1-18

Posted in Calculated Fields, Configuration CRM 2015, CRM 2015 New Features | Tagged , , , | 3 Comments

Microsoft CRM 2015 New Feature – Drilling into Calculated Fields – Part 1

Since this will be my last post for 2014, I wanted to start to concentrate on another new capability in Microsoft Dynamics CRM 2015, The Calculated Fields functionality. I plan on handling this the post as I did with the Roll-up functionality, in two parts.

The first section of this post will be a synapsis of the functionality taken from the Microsoft TechNet Help file. I will finish up the post with a simple example. Part 2 will be focused on a few more detailed examples along with so tips and tricks.

Benefits:

  • Using Calculated Fields you can automate manual calculations used in your business processes, (Yes you could do simple calculations using out of the box workflows, although, you would require several steps to complete in workflow processes).
  • You have the ability to create calculations based on conditional logic, using common if-then logic with the ability to nest else logic.

Mathematical Operators:

The calculated field functionality will allow the following common mathematical operators:

  • = (Equal)
  • + (Plus)
  • – (Minus)
  • / (Divide)
  • * (Multiply)

You can configure this functionality using the CRM 2015 user interface, Custom Code is not required.

Field Type Requirements: The following field types can be included or created as a calculated field.

Field Types allowed for calculations:

  • Single line of text
  • Option Set
  • Two Options
  • Whole Number
  • Decimal Number
  • Currency
  • Date and Time

Calculated Field Functions Syntax:  The following table contains information about the syntax for the functions provided in the ACTION section of the calculated field.

Function Syntax
Description
Return type

ADDDAYS (whole number, date and time)
Returns a new date and time that is equal to the given date and time, plus the specified number of days.
DateTime

ADDHOURS (whole number, date and time)
Returns a new date and time that is equal to the given date and time, plus the specified number of hours.
DateTime

ADDMONTHS (whole number, date and time)
Returns a new date and time that is equal to the given date and time, plus the specified number of months.
DateTime

ADDWEEKS (whole number, date and time)
Returns a new date and time that is equal to the given date and time, plus the specified number of weeks.
DateTime

ADDYEARS (whole number, date and time)
Returns a new date and time that is equal to the given date and time, plus the specified number of years.
DateTime

SUBTRACTDAYS (whole number, date and time)
Returns a new date and time that is equal to the given date and time, minus the specified number of days.
DateTime

SUBTRACTHOURS (whole number, date and time)
Returns a new date and time that is equal to the given date and time, minus the specified number of hours.
DateTime

SUBTRACTMONTHS (whole number, date and time)
Returns a new date and time that is equal to the given date and time, minus the specified number of months.
DateTime

SUBTRACTWEEKS (whole number, date and time)
Returns a new date and time that is equal to the given date and time, minus the specified number of weeks.
DateTime

SUBTRACTYEARS (whole number, date and time)
Returns a new date and time that is equal to the given date and time, minus the specified number of years.
DateTime

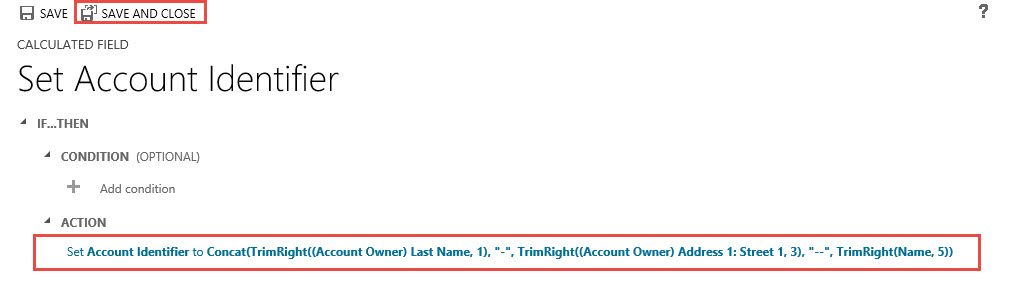
CONCAT (single line of text, single line of text, … single line of text)
Returns a string that is the result of concatenating two or more strings.
String

TRIMLEFT (single line of text, whole number)
Returns a string that contains a copy of a specified string without the first N-characters.
String

TRIMRIGHT (single line of text, whole number)
Returns a string that contains a copy of a specified string without the last N-characters.
String

String Functions Further Defined:

In the CONCAT function, you can use literal strings as single lines of text, entity fields that contain a single line of text, or a combination of both. For example: CONCAT (FirstName, LastName, “is a manager.”). If a literal string contains quotation marks, precede each mark with the backslash (\) escape character, like this: “This string contains the \”quotation marks.\”” This ensures that the quotation marks inside the string aren’t treated as special characters that separate the strings.

The following examples show how to use the TRIMLEFT and TRIMRIGHT functions. They contain the initial strings and the resulting strings, returned by the TRIMLEFT and TRIMRIGHT functions:

TRIMLEFT (“RXX10-3456789”, 3), returns the string “10-3456789”
TRIMRIGHT (“20-3456789RXX”, 3), returns the string “20-3456789”

Scenario 1

Requirements:  Our financial manager from the previous scenarios would like to add additional functionality for their groups Dynamics CRM implementation.  Since the financial firm underwrites mortgages and track customers liabilities, He would like to track all liabilities for each customer calculate a True Net Worth for each of their clients (Total Assets – Total Liabilities).   For those readers picking up on this scenario in order to get caught up please view the following pervious post’s scenarios.  Post 1 and Post 2

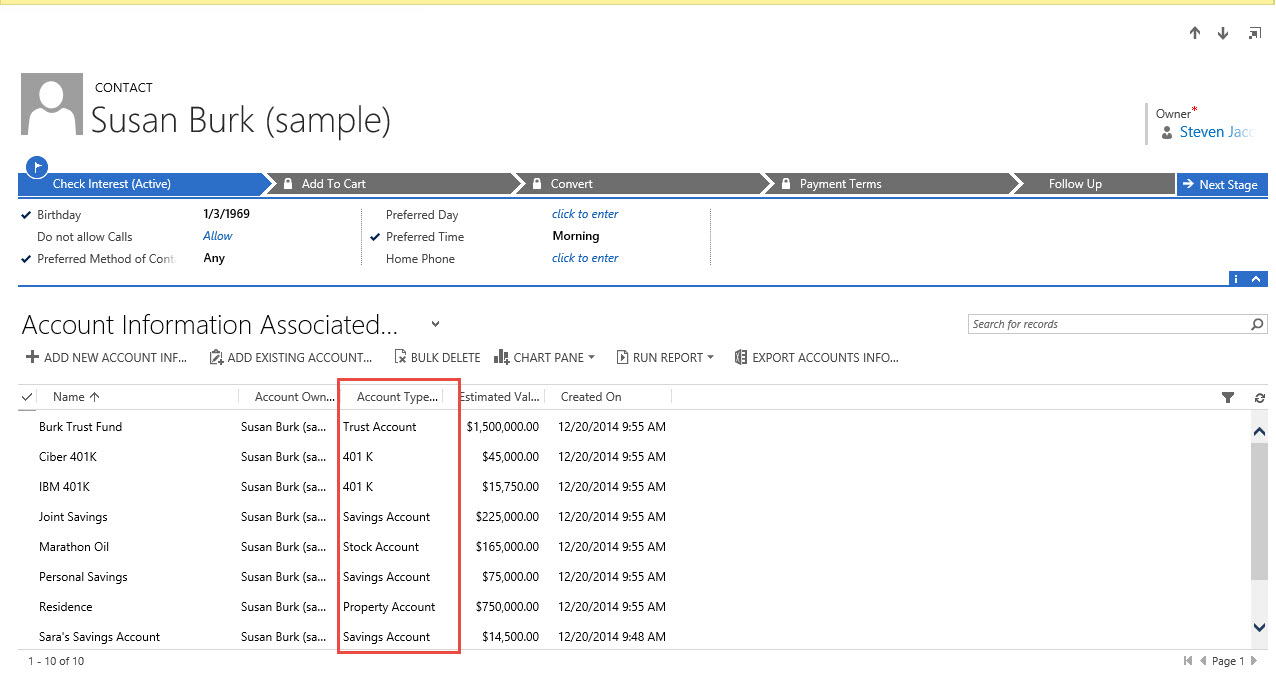
Execution: Since we haven’t tracked liabilities in the previous examples that will be our first step to create a rollup attribute that will capture liabilities at the Account Information level of each contact.

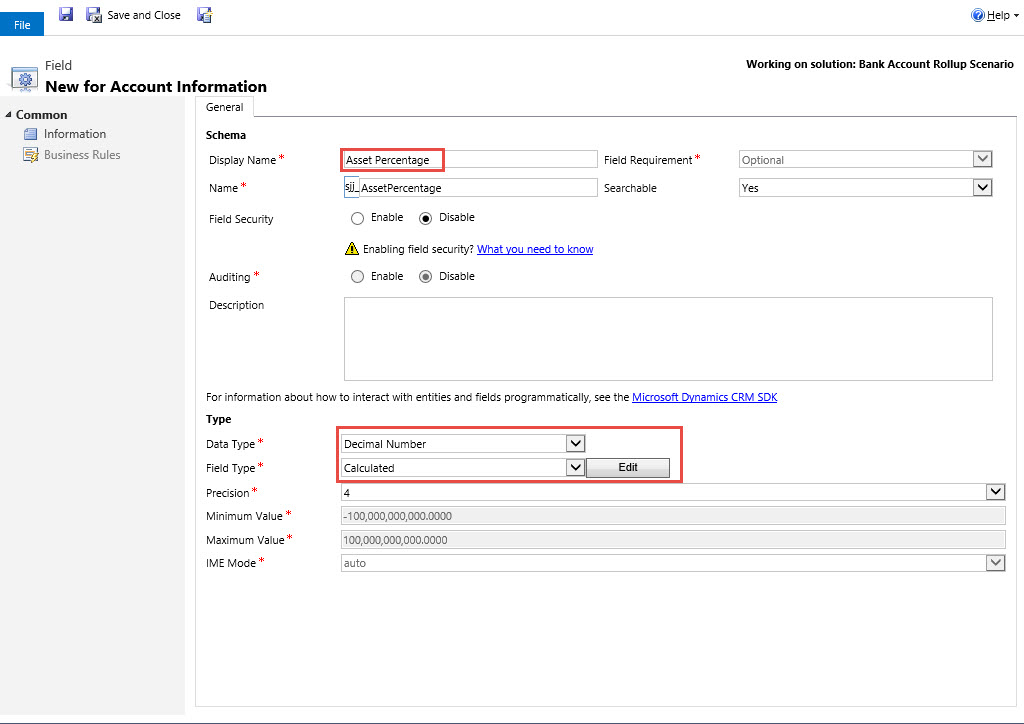
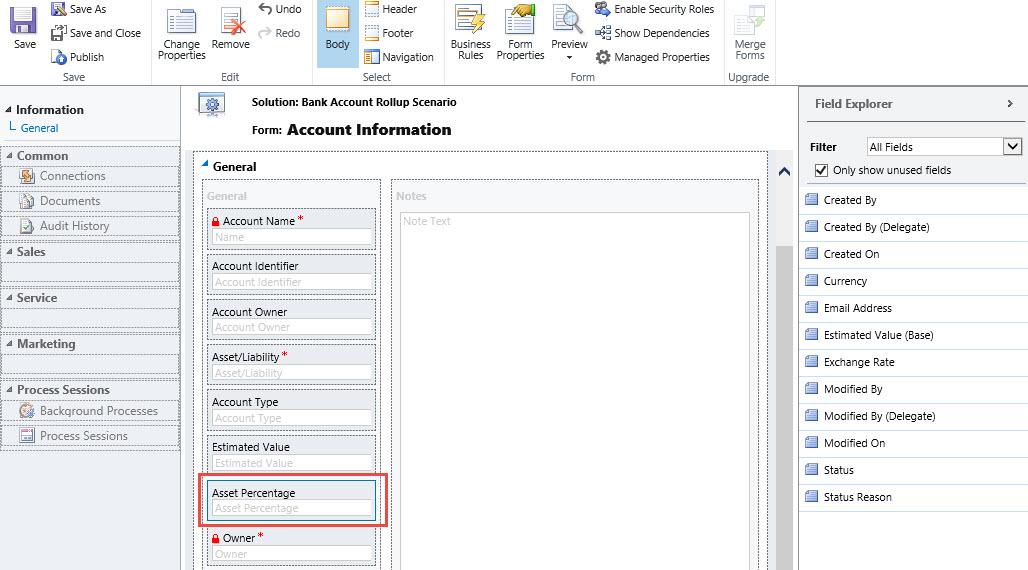
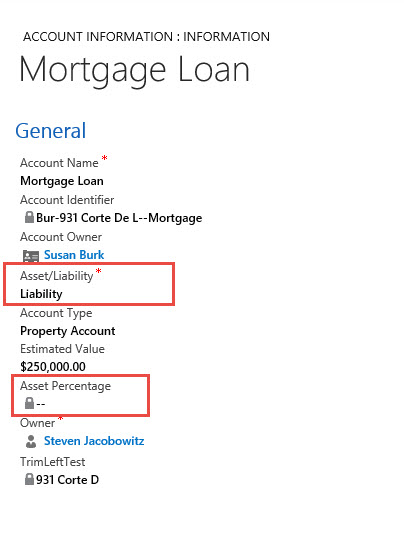
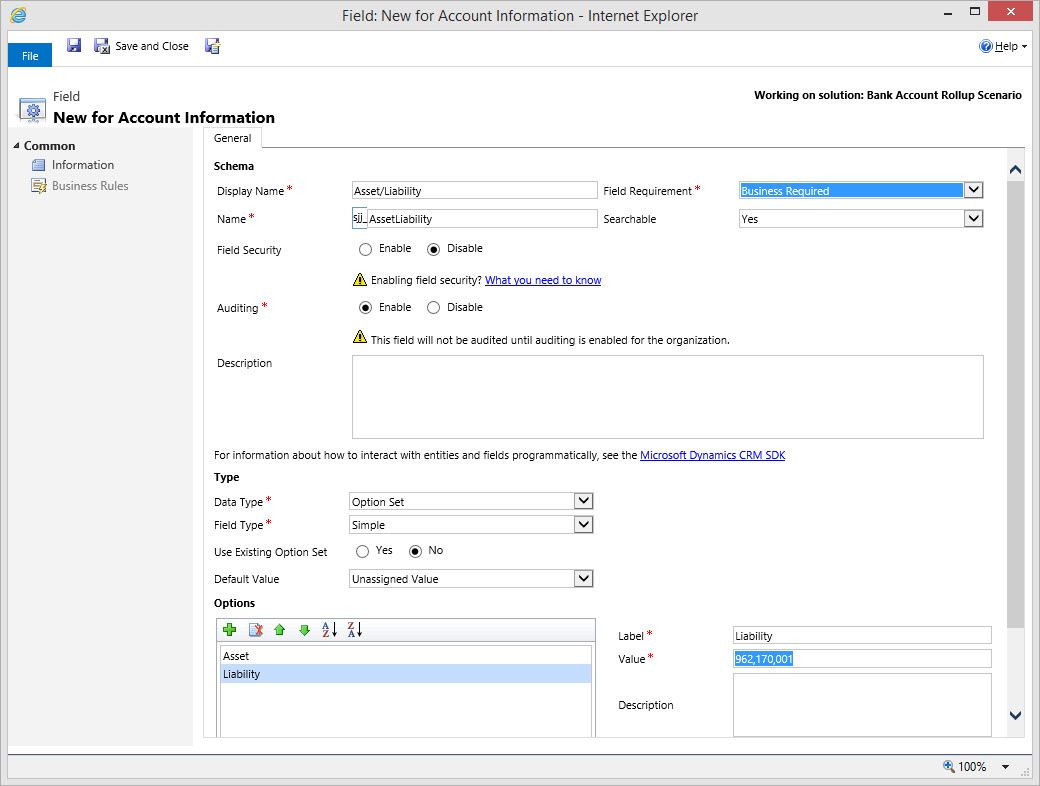
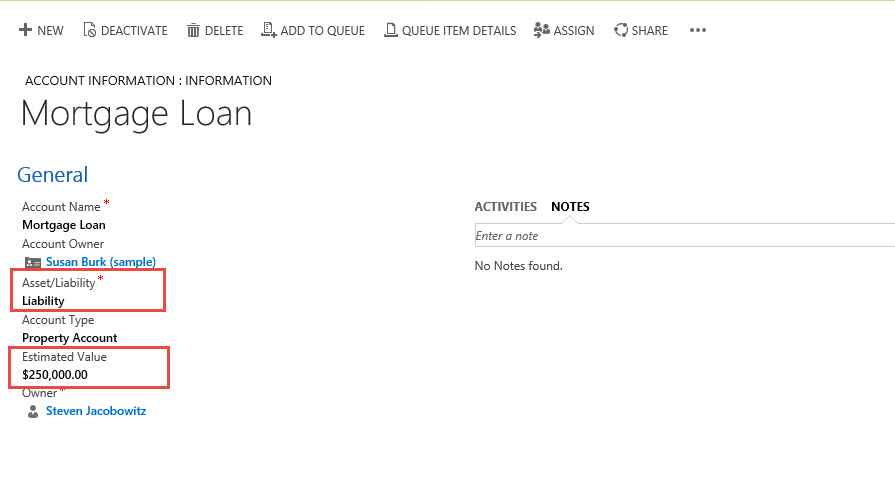
Our first step will be to create a new attribute to place on the Account Information form to identify whether each record is either an asset or a liability.

CAL-Part1-1

Our next step is to include this attribute on the form.  (Note: we are adding this attribute so we can filter the estimated values by Assets and Liabilities on the subsequent Rollup fields at the Contact level).

CAL-Part1-2

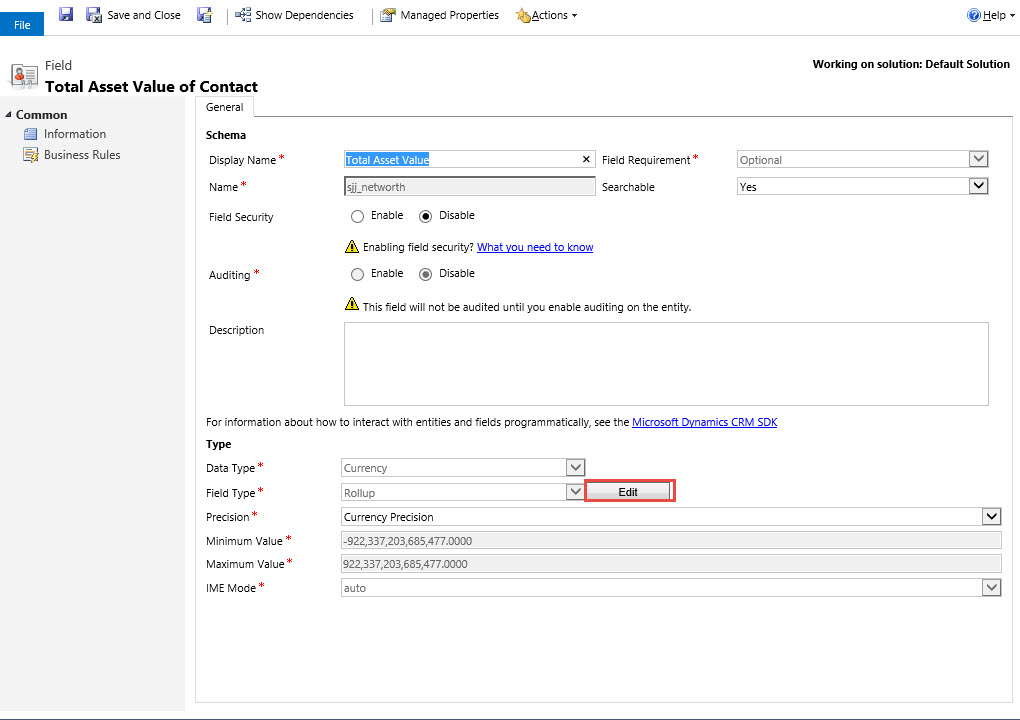
Since we already are tracking assets at the account level we will need to modify our filter on the Total Asset Value rollup to include the Financial Information Records that = “Assets”.  Navigate to settings customizations contacts -> fields open up the Total Asset Value attribute and click on the edit button next to the calculation Option.

CAL-Part1-3

Add the Asset/Liability = “Asset”

CAL-Part1-4

Save and Close than Publish the changes.  (Of course since we just included the attribute on the Account Information Form we will need to update all the current Asset Records using the mass edit feature).
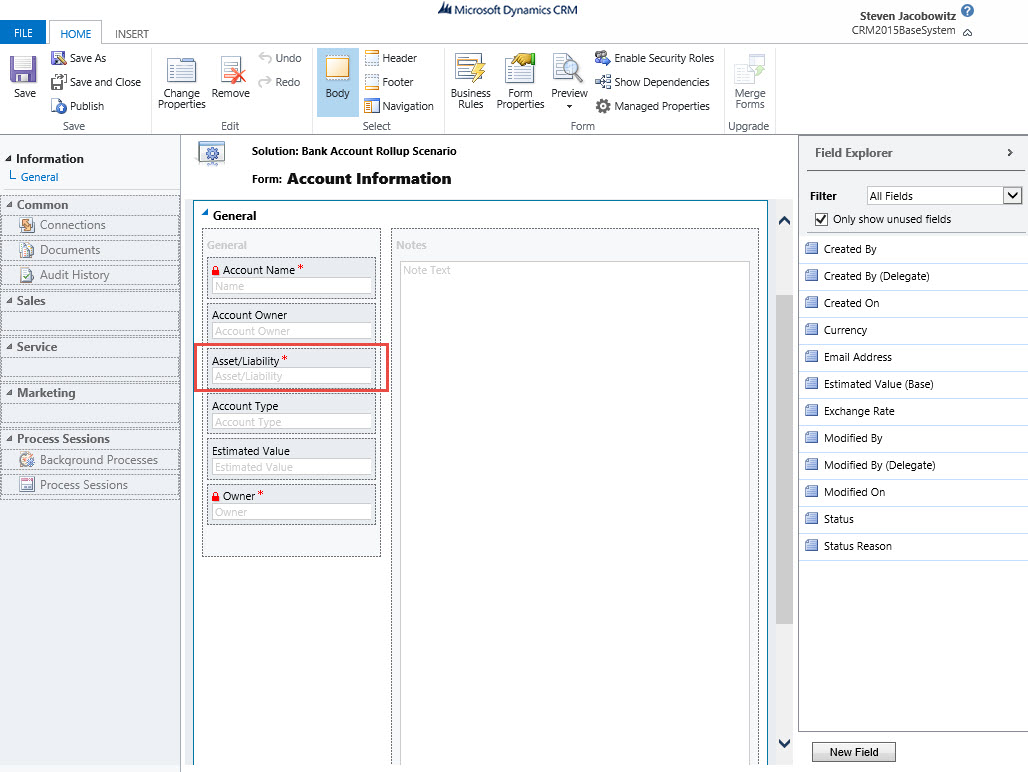
Navigate to the Account Information Tab Highlight all records that are assets and click on the edit button.

CAL-Part1-5

Click on the Asset / Liability Attribute and change the option to Asset. Then click on the Change Button.   (This will update all of your Asset records)

CAL-Part1-6

Our next step is to add a new rollup attribute for Total Liabilities.

CAL-Part1-7

Click on the edit Button next to the calculate.

  • Related Entity = Account Information
  • Filter = Account/Liability = “Liability and
  • Status = “Active”
  • Aggregation Method = Sum of Estimated Value where the filter is true.
    Save and close your work.  Than Publish

CAL-Part1-8

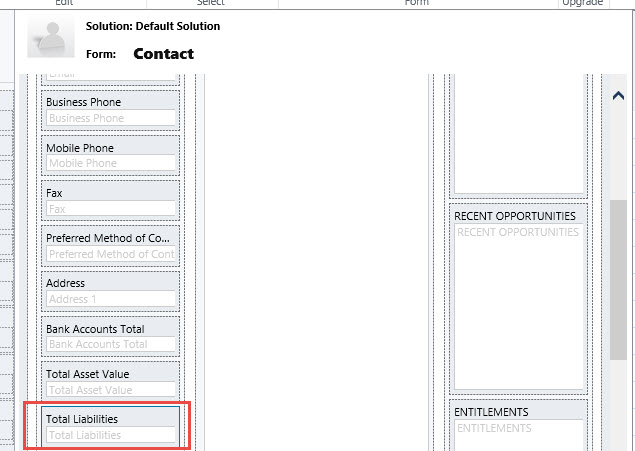
Next place the Total Liability Attribute on the Contact form.  Save and close your work.  Than Publish

CAL-Part1-9

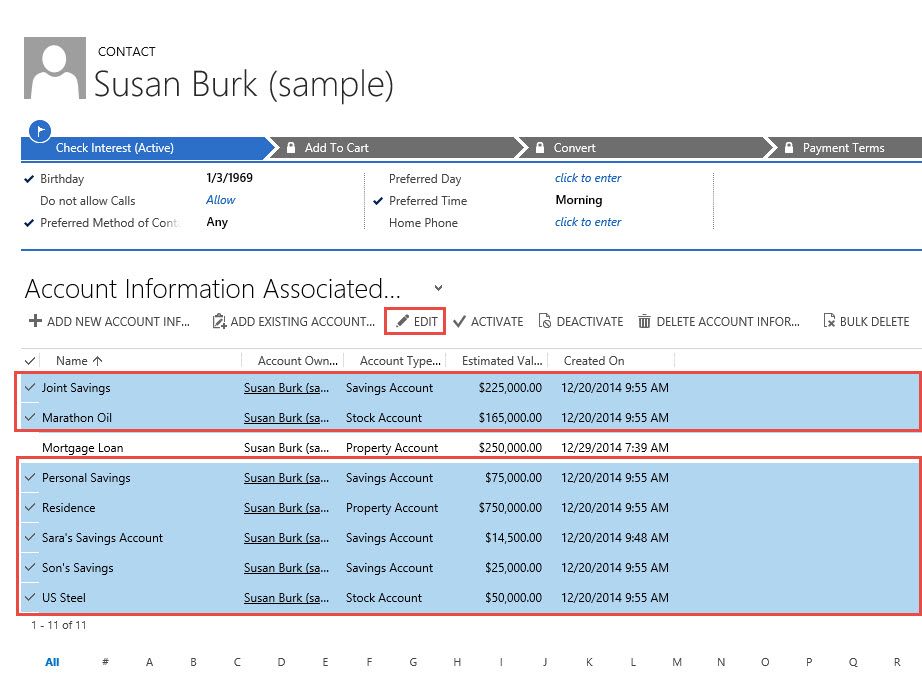
Test your work by adding a new Account Information record identified as a Liability, than manually recalculate the rollup attribute on the contact form.

CAL-Part1-10

CAL-Part1-11

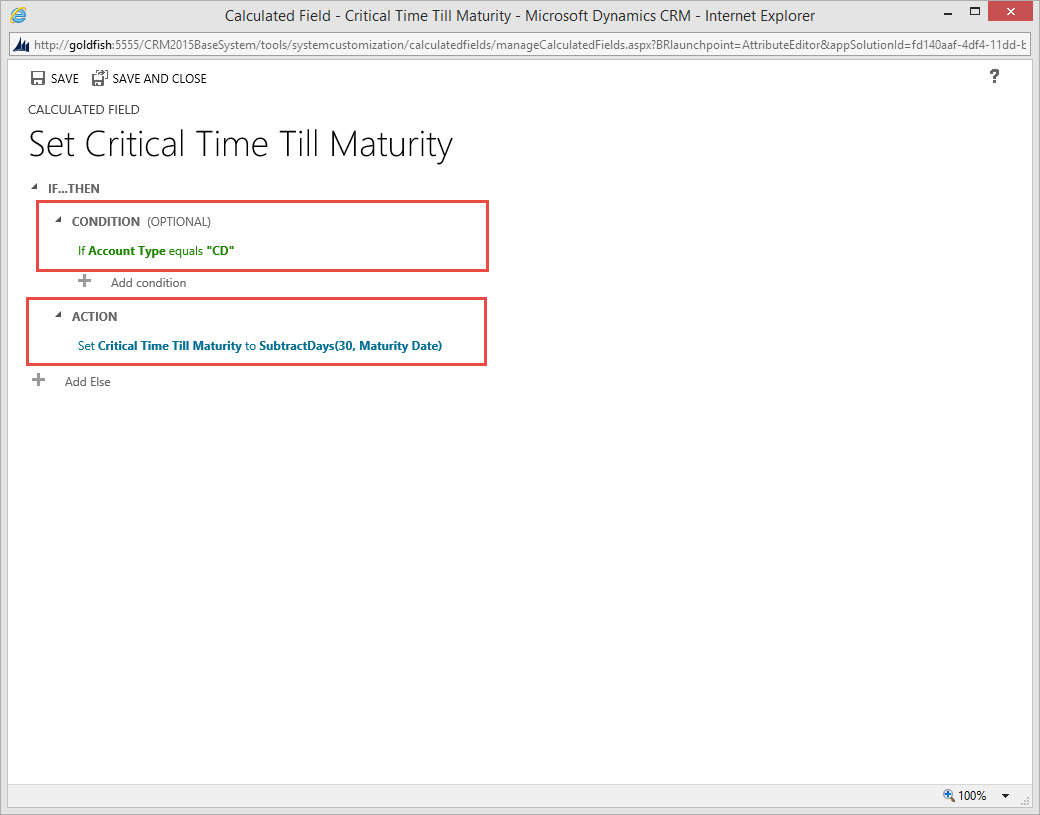
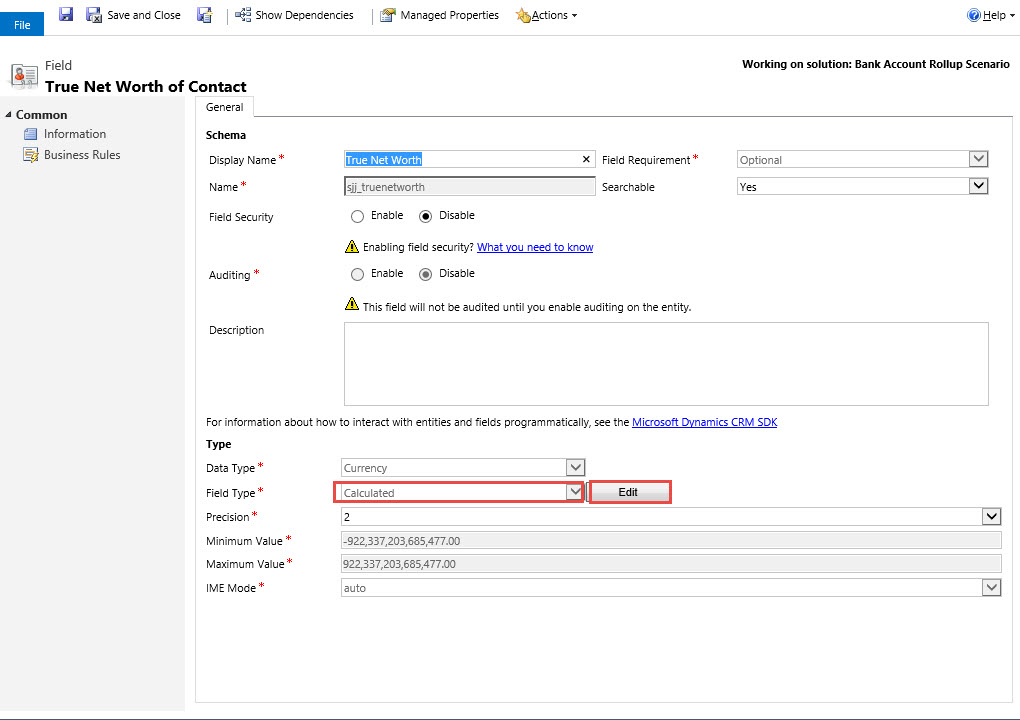
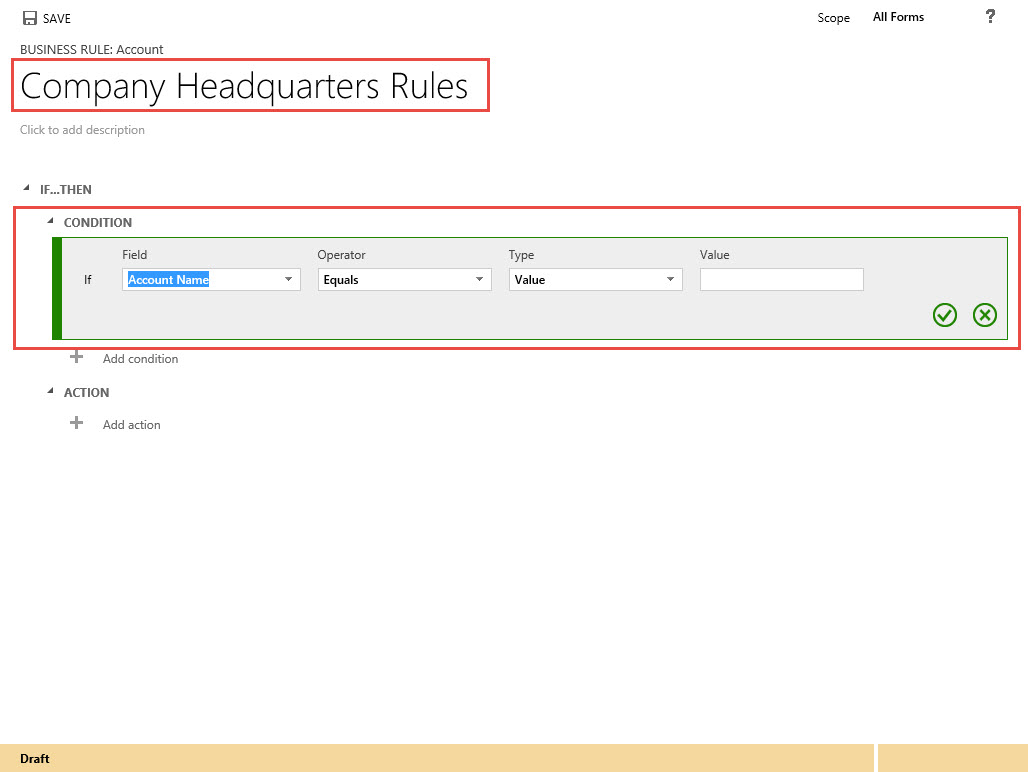
Our next step is to create a new Calculated Field Called True Net Worth.  Navigate to the settings – > customizations -> contact entity -> fields and click on new.
Create the new attribute and change the Field Type to Calculated, then click on the edit button.

CAL-Part1-12

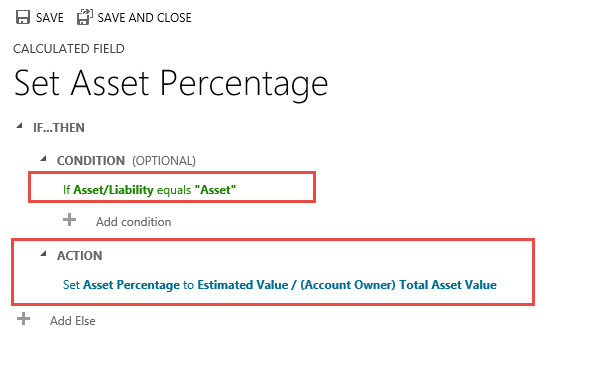
Since this is a very simple example under all conditions I want the True Net Worth calculated therefor I am not going to define a condition.  I will click on the Action Section and identify the attributes, (rollup fields) I want to use in this calculation, (notice when you start typing the attribute name Intellisense will automatically create a dropdown with suggested attributes.

CAL-Part1-13

I only require the “-“ Operator between the two fields.  Your final formula should appears as below.  Click the check mark, than save and close.

CAL-Part1-14

CAL-Part1-15

Place the attribute on the Contact form. Save and Publish.

CAL-Part1-16

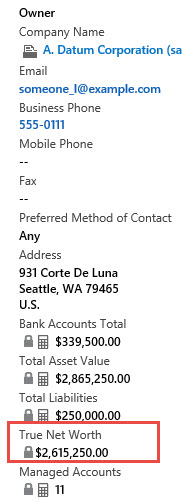
Close the form designer.  Please note one interesting item I discovered, they form will not render the true results of the formula until you refresh the page.  This is also true of updates to the corresponding account information records.  Therefore you will have to refresh the page by either hitting F5 or the refresh button.   Your final results should appear as below.

CAL-Part1-17

It really is that simple!

According to all the documentation I read Microsoft is stating this is for simple formulas although I did try one enclosed in Double (( and the formula appeared to render properly. This is something I will include in my next Post Part 2. I will also call out all the limitations Microsoft suggest on the TechNet Document.

I really love this feature because quite frankly I wouldn’t even understand how to write code to produce the same functionality. This was a relatively simple example which used to take a developer and code to accomplish prior to Dynamics CRM 2015. I think this example took me 10 minutes in total to put it into action.   The fact is, I spent way more time creating this post then creating the example. Think about the productivity gains you can also obtain!

Have a very Happy and Healthy New Year! See you all in 2015.

CAL-Part1-18
 

Posted in Configuration CRM 2015, CRM 2015 New Features, CRM Configuration | Tagged , , | 5 Comments

Microsoft CRM 2015 New Feature – Boiling Down Rollup Fields – Part 2

My last post focused on the basics of the new Roll-Up feature in Microsoft Dynamics CRM 2015. Today I would like to discuss maintenance of the systems jobs, and build on the scenario started in the previous post. Finally, I will outline and demonstrate an additional business use case using the COUNT Aggregation Function.

Continuation from last posted scenario:

I would like to start by enhance the Investing scenario we started in the last post because our manager was so impressed with being able to view their contact’s total combined dollar value in their bank accounts.

He now requires to view the combined total dollar amount of all assets owned by the contact, rendered on the contact’s record.

Execution:

Remember we previously created a new entity called Account Information and subsequently created a 1:N relationship between the Contact entity and the Account Information entity, (this is a requirement in order to configure roll-up functionality).  We can view all the records associated with Susan Burk’s record below.

RU2-Picture1

Since we have the information and the relationship captured we will use the same methodology to create the rollup total of all assets field.

First we will create a new attribute called Net Worth and define it as a Currency Field with the Field Type Rollup. Then Click on the Edit button

RU2-Picture2

  1. Next we will define the Source Entity, (Account Information)
  2. The Filter All Account Types that Contain Data and are Active.
  3. And the Aggregation Function – Sum of Estimated Value

RU2-Picture3

Save and Close our Work.

The next step is to place the attribute on the form, (Notice again when we created the attribute the three related attributes are also created in conjunction with the first.

  1. The Net Worth Base Attribute
  2. The Net Worth Last Updated On Attribute
  3. The Net Worth State Attribute

RU2-Picture4

Double click or drag the attribute “Bank Account Total” on the Contact form.

RU2-Picture5

We will then Save and Close then Publish. Let’s hover over the attribute to view the message (automatically rendered)

RU2-Picture6

Remember the Mass Update will occur 12 Hours after the last modification to the attribute and once it has processed will reset for 10 years.

Let’s manually click the refresh button on the side of the attribute to render the correct Asset Total.

RU2-Picture7

As before we can also view when the last processing occurred by hovering over the attribute.

RU2-Picture8

Notice the last update was recorded as 12/21/2014 at 10:31 PM. Remember after the initial Mass Rollup Job has been completed the Calculate Rollup Field Job will reoccur based on the options you select.

System Jobs – Demonstration

To access the System Jobs Go to Settings -> System Jobs

RU2-Picture9

Change the view to Recurring System Jobs

RU2-Picture10

Notice you can view the 2 Mass Calculate Jobs including created (One for each of the attributes created). Also notice the date for refresh is set automatically for 10 years from the creation date + 12 Hours.

RU2-Picture11

If we double click on one of these jobs and click on Actions you can modify the job by resuming, postponing or pausing.

RU2-Picture12

Close this window and view the System Job Window, notice on the bottom there is a Calculate Rollup Field Job for the contact entity with a date set for Today at 7:30 AM.

RU2-Picture13

If we double click on one of these jobs and click on Actions, notice there is one additional menu option called Modify Recurrence besides the Resuming, Postponing or Pausing.

RU2-Picture14

It is at this location you can change the update the schedule recurrence interval. Let’s click on this option.

RU2-Picture15

Notice it is defaulted to every (1) hour. Which is the maximum update interval.

RU2-Picture16

Notice there is the option to set the schedule to daily with the maximum date at every (7) days or greater.

RU2-Picture17

After you complete setting up the schedule click ok and your next scheduled update will initiate based on your selection.

It is that simple to maintain the .

Scenario 2 Practice using the Count Function:

Our Manager of the Investment Firm would like to understand how many individual active client asset accounts are owned by the customer and managed by the firm.

Execution:

By now we can utilize the same steps as in the prior examples.

  1. Create the new field
  2. Set the data type to whole Number
  3. Set the Field Type to Rollup
  4. Make sure you modify the Minimum Value to anything >= 0
  5. Then Click on the Edit Button

RU2-Picture18

  1. Set up your Rollup Field Capture Profile
  2. Select the Account Information
  3. Select your Filter Criteria
  4. Select your Aggregation Function, (This time we are going to use the COUNT function because we are only interested in a record count if the record meets the Filter Criteria.

RU2-Picture19

Your Rollup Field Capture Profile should look similar to below.

RU2-Picture20

Save and close the Profile then open up the form you wish to locate the field on. (Notice the associated related attributes created automatically with the Managed Account field).

RU2-Picture21

Let’s save this and publish the work.   Now let’s navigate to the system jobs. Please notice the new Mass Calculate Job was created with the new Attribute and the Update is for 8:02 PM, (which is 12 hours after the creation of the attribute).

RU2-Picture22

Finally let’s go to Susan Burk’s record and manually recalculate the Managed Account Attribute just to make sure we captured the proper number of Asset Accounts

RU2-Picture23

Although all the examples were rather sophomoric I hope my readers will agree this new feature can be very powerful. Again I must emphasize there is no code being written in the background to meet these requirements. All the work is configurable through the interface.

I hope you all have similar success using this new feature!

My next post will focus on another new feature in CRM 2015 – The Calculated Fields.

Have a happy holiday and a healthy New Year!

1 - SignatureSteven

Posted in Rollup Fields in CRM 2015 | Tagged , , , | 1 Comment

Microsoft CRM 2015 New Feature – Boiling Down Rollup Fields – Part 1

I wanted to research this topic so I could fully understand this functionality before I attempted to put it into a real world scenario format for your viewing.

I went to Microsoft’s TechNet help file for further clarification. The more I read the more fascinated I was with how deeply the Publisher went into the implementation of this new Rollup feature in CRM 2015, therefore, as always rather than recreate the wheel I am going to first boil down that document and then go into practical application in this great new functionality’s use.

To view the Help Document on Microsoft’s TechNet site click here

The Capabilities of Rollup Fields:

  • This is a configurable feature and is available once you create and define a new field during configuration.
  • Rollups will aggregate over a 1:N relationships and the following functions are available.
    • Sum
    • Count
    • MIN
    • MAX
  • You can filter the aggregations blocking items you do not wish to include in the counts
  • Rollup fields are available for Forms, Views, Charts and Reports
  • The can be part of a solution components therefore you can move them from deployment to deployment using the export, import functionality native in CRM
  • Rollup fields can be deployed with Calculated fields, (My next blog) making your solution even more powerful.

Down Deep into the Technology:

When you define a Rollup field the following occurs.

    • The attribute is created
    • Two corresponding attributes are created with the following attributes:
      • <AttributeName_date> – Date / Time
      • <AttributeName_state> – Numeric with the following values
        • 0 Not Calculated
        • 1 Calculated
        • 2 Overflow Error
        • 3 Other Error
        • 4 Retry Limit Exceeded
        • 5 Hierarchical Recursion Error
        • 6 Loop Detected
      • Rollups are calculated by scheduled system jobs that run asynchronously in the background.
        • You must be a system admin to view the jobs
        • You can find the system jobs running by navigating to Settings-System Jobs->View->Recurring System Jobs
        • There are two types of System Jobs that will run on this field
          • Mass Calculated Rollup Field – is a recurring job that is created per a rollup field
            • It will run once you create or update a rollup field 12 hours after the create or update of the attribute
            • After it runs the next scheduled processing time will be set to 10 years.
            • You can adjust the start time of the Mass Calculation to run during non-operational hours to optimize processing time.
          • Calculate Rollup Field – is a recurring job that will perform calculations of all rollup fields in the existing record for a specified entity.
            • There is only one Calculated Rollup Field Job per entity
            • While running over an entity’s rollup fields the job will update or delete all changes to the child records since the last Mass or Calculated Rollup Field Job
            • The default maximum recurrence setting is 1 hour
            • The job is automatically created for an entity once the first rollup field is created for that entity
          • There is also a Manual Online Rollup Calculation available if you hover over the rollup field on the form. You can see the time of the last rollup and refresh the rollup value by choosing the refresh Icon.
            • In order to use the manual recalculations you must consider the following:
              • You have to have write privileges on the entity and write access rights on the source records for which you are requesting the recalculation
              • This option is only available in the online mode
              • The maximum number of records during a rollup refresh is limited to 50,000 records. In the case of the hierarchical rollup this applies to the related records across the hierarchy. (This record limit will not be enforced for system recalculation jobs. )
              • The maximum hierarchy depth is limited to 10 levels for the source records. (this limit is not enforced when the rollup is automatically recalculated by the system jobs)
                • Finally a system admin can modify the rollup job recurrence pattern by postponing, pausing or resuming the job. However, you cannot cancel or delete the rollup job.
                • Access by Settings > System Jobs. In View, select Recurring System Jobs. On the navigation bar, choose Actions and select the action you require.

Rollup Field Conditions and Restrictions

  • Rollup fields are limited to 100 per organization
  • Rollup fields are limited to 10 per entity
  • A workflow cannot be triggered by the rollup field updates
  • A workflow wait condition cannot use a rollup field
  • A rollup over a rollup field is not supported
  • A rollup field cannot reference a complex calculated field that uses the fields of the related entities in the formula
  • The rollup can only apply filters to the source entity or related entities, simple fields or non-complex calculated fields.
  • A rollup can be done only over related entities with the 1:N relationship. A rollup can’t be done over the N:N relationships.
  • A rollup can’t be done over the 1:N relationship for the Activity entity or the Activity Party entity.
  • The business rules, workflows or calculated fields always use the last calculated value of the rollup field.
  • A rollup field is aggregated under the system user context.
  • If the precision of the aggregated field is greater than the precision of the rollup field, the aggregated field precision is rounded down to the precision of the rollup field

Real World Scenario, (Putting it all together)

Let’s have some fun and put this use of a rollup into action.

Scenario: You are the manager of an investment firm, managing high wealth clients. You would like to view a roll up total of all bank accounts owned by your company’s clients.

Execution Steps:

Our first step is to create an entity to capture contact’s assets, let’s call it Account Information.

RU1-Picture1

The next step is to create a 1:N Relationship between the Contact Record and the Account Information record.

RU2-Picture2

Our next step is to create a new rollup field at the contact level to total all the contact’s Bank Accounts

RU3-Picture3

Notice above once you define a field as rollup you will render the edit button on the right hand side of the field type.

Net step is to click on the edit button and define the rollup criteria. Start with defining the related entity, (remember you will only have entities available where there is a 1:N Relationship to the Contact entity). From here we can define the criteria to execute the rollup for the example below, we want all Account Information Records where the Account Type = Savings Account.

RU4-Picture4

Finally we also want only Bank Accounts that have a Status = Active

RU1-Picture5

Our next step is to define the aggregation method. (Remember our Aggregation Function choices are Sum, MIN, MAX or Count). In this case we are going to use the Sum Function.

RU1-Picture6

Finally we can view the entire Rollup statement below

RU1-Picture7

Now we want to put the new Rollup Field on the Contact form. (Please note when we create the new attribute the two corresponding additional attributes were created automatically, <Name_lastupdated> and <Name_State>

RU1-Picture8

Place field on form save and publish.

RU1-Picture9

Now close the forms tool then let’s browse out to a record.

RU1-Picture10

Notice you can hover over the field and the popup will tell alert you to the present status of the field. Also notice on the far right of the field there is the manual calculate option.

RU1-Picture11

We will now open a contact record to view all open Account Information:

RU1-Picture12

Let’s go back to the main account form and manually calculate all the bank account totals.

RU1-Picture13

Notice when you hover over the Rollup Field you can view the present status

RU1-Picture14

My objective today was to alert my readers of this new feature and demonstrate a very simple use of this functionality using a real world scenario.

Please note prior to CRM 2015 this type of customization would require a developer to write code. This entire demonstration was executed using the tool to configure the functionality. You do not need to be a programmer to add value to your CRM system.

My next post will focus on expanding this scenario, as well as include another example of a real world scenario from start to completion. Finally I will concentrate on the related system jobs including how to modify through the tool.

Please if you have any comments about utility let me know.

Have a good weekend!

Steven

Posted in Configuration CRM 2015 | Tagged , , | 6 Comments

New Features in Microsoft Dynamics CRM 2015 – Expanded Business Rule Logic.

Microsoft first introduced business logic rules in CRM 2013. Business logic allowed non programmer’s the ability to create simple rules based on client input into a record to further enhance the applications usability. For example, based on input in one field the ability to lock or unlock that field or any other field on the form.

Typically these simple business rules had to be customized with Jscript by developers. The first release had a few limitations one being the actions allowed, (Please see picture 1).


Picture1BR

The more limiting feature was the inability to evaluate more than one condition / Action clause within a business rule.

Picture2BR


Therefore if you were creating a business rule on an option set that required different actions depending on the value of the option selected, the person configuring the system would have to create a separate rule for each option.

In this release, in addition to the AND operator, you can use OR and If-Else to build more complex and rich business rule logic with less effort. Now creating a commonly used branching logic, becomes a simpler task. The business process flow branching capability is built on the new If-Else logic.

Let’s take a look at this new functionality:

Scenario – Contoso sells Business to Business. In a number of accounts there is a Parent, (Corporate Office) and several Subsidiary offices. The Vice President of Sales requires that if a company is designated as the Headquarters, the Parent attribute should be removed from the form. Furthermore, if the record is created for a subsidiary the Parent Attribute should be visible, business required and once the parent is linked, the Parent Attribute should be locked.

The Solution-First we will navigate to the solution set by clicking on Dynamics CRM -> Settings and then the Solutions tile.


Picture3BR

Picture4BR

We will then open the Business Rules Editor Solution.

Picture5BR

Since this scenario focuses on the Account Entity we will add it to our solution. Our first step is to create a new attribute called “Is Headquarters?” as an option set with the following options:

  1. Parent Company (Headquarters)
  2. Subsidiary Notice we left the default value set to “Unassigned Value”, meaning a new record will have this attribute as blank. Picture 6We will then Save and Close the new Attribute. Our next step is to include this attribute on the to the Main Account form.

Picture6BR

Save and Publish.

Now we can start to configure the business rules. I always try to start out with the Conditional logic required for example based on the above scenario I have the three following Options:

1. Is Headquarters? Attribute is “Null”

2. Is Headquarters? Attribute = “Parent Company”

3. Is Headquarters? Attribute = “Subsidiary”

From these three conditions I can determine the appropriate logic Actions. For example,

a. If 1 above Is Headquarters Attribute is Business Required and Parent Company Attribute is Hidden.

b. If 2 above Is Headquarters is changed to Read Only and Parent Company Attribute is Hidden

c. If 3 above Is Headquarters is changed to Read Only and Parent Company Attribute is exposed for Input and business required.

d. Once C is completed Parent Company Attribute is set to Read Only.

To access business rules stay on the account entity and click down to business rules, click on the new button to bring up the business rule editor.           

Picture8BR

Picture9BR

Start off by naming your rule: “Company Headquarters Rules”

Click on the add condition + Sign

Picture10BR

Let’s fill in Rule 1

Picture11BR

At this point you could enter another condition to this first rule by clicking on the + underneath the first rule, (Please note in MSCRM 2013 when you added multiple conditions under one If…Then they were evaluated as .AND. conditions, meaning all the conditions must be true in order for the action to fire.

New in MSCRM 2015 you know have the ability to use the .OR. As well as the .AND. clause. (See Pictures 13 & 14)

Picture13BR


Picture14BRNotice the additional new feature in CRM 2015,  the ability in include an ADD ELSE Condition / Action

Picture12BR

Now add an action please note that there is a new “Set Default Value” Action in CRM 2015.


Picture15BR


Your first Condition and Action should appear as below.

Picture21BR

Notice once you add the action another section will render called Add Else. The Add Else will allow you to configure .OR. Logic onto the Business Rule, (This is new in CRM 2015)

Let’s now complete the final two conditions and actions.  Your Business Rule should look like this.

Picture16BR

Click on the Save Button and then the Activate Button on top of the form.

Let’s take a look at our work.

When we open up a record we can view the new “Is Headquarters Attribute?” is blank and required. (We are requiring input prior to saving the record from our data entry people).


Picture17BR

When we change the “Is Headquarters?” field to Parent Company, the Required Input is removed.

Picture18BR

When we change the “Is Headquarters?” attribute to Subsidiary the parent account lookup field is exposed and changed to Business Required Input.


Picture19BR

Once we add the Parent Account name to the Parent Account attribute the field is changed to Read Only

Picture20BR

This was a very simple scenario example at how powerful this feature of Microsoft CRM 2015 can be configured, and WITHOUT code. Microsoft is concentrating on adding additional functions to this facility in order to continue to make this application more sustainable.

I hope you will try this feature out or try the new features identified as improvements to the 2015 edition of the program.

As always,

Steven

Posted in CRM 2015 New Features, CRM Configuration | Tagged , , , , | Leave a comment