New Hierarchy security In Microsoft Dynamics CRM 2015

Hello All-

I wish I could say I am going to be 100% creative with this post but that isn’t the case.  While going through my new install of CRM 2015 I was testing out the help files and found that anything I was going to say about this topic about Hierarchy Security was already covered by Microsoft.  So I decided to reprint the help file below that Microsoft created to explain this important new feature.

Hierarchy Security is a new feature in Microsoft Dynamics CRM 2015.

“The hierarchy security model is an extension to the existing Microsoft Dynamics CRM security models that use business units, security roles, sharing, and teams. It can be used in conjunction with all other existing security models. The hierarchy security offers a more granular access to records for an organization and helps to bring the maintenance costs down.

For example, in complex scenarios, you can start with creating several business units and then add the hierarchy security. This will achieve a more granular access to data with far less maintenance costs that a large number of business units may require.  Manager hierarchy and Position hierarchy security models”

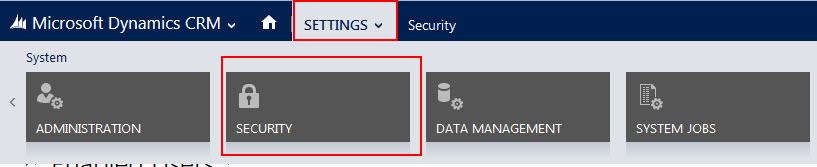
To Access this new feature go to Settings -> New Security Navigation Tab:

10SecuritySettingsWith this new feature you can actually model your organizations security paradigm either position based or named base.  (Please look to the end of this blog for additional results on visualization)  For now I am going to allow Microsoft’s Help file explain how it works.

The Hierarchy Security Model applies to CRM 2015 On-Premise and CRM On-Line

Manager hierarchy and Position hierarchy security models:

Two security models can be used for hierarchies, the Manager hierarchy and the Position hierarchy. With the Manager hierarchy, a manager must be within the same business unit as the report, or in the parent business unit of the report’s business unit, to have access to the report’s data. The Position hierarchy allows data access across business units. If you are a financial organization, you may prefer the Manager hierarchy model, to prevent managers’ accessing data outside of their business units. However, if you are a part of a customer service organization and want the managers to access service cases handled in different business units, the Position hierarchy may work better for you.
Note
While the hierarchy security model provides a certain level of access to data, additional access can be obtained by using other forms of security, such as security roles.

Manager hierarchy
The Manager Hierarchy security model is based on the management chain or direct reporting structure, where the manager’s and the report’s relationship is established by using the Manager field on the system user entity. With this security model, the managers are able to access the data that their reports have access to. They are able to perform work on behalf of their direct reports or access information that needs approval.
Note
With the Manager hierarchy security model, a manager has access to the records owned by the user or by the team that a user is a member of, and to the records that are directly shared with the user or the team that a user is a member of.

In addition to the Manager hierarchy security model, a manager must have at least the user level Read privilege on an entity, to see the reports’ data. For example, if a manager doesn’t have the Read access to the Case entity, the manager won’t be able to see the cases that their reports have access to.
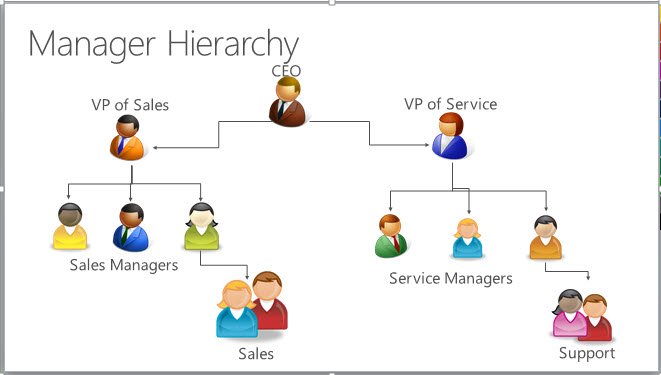
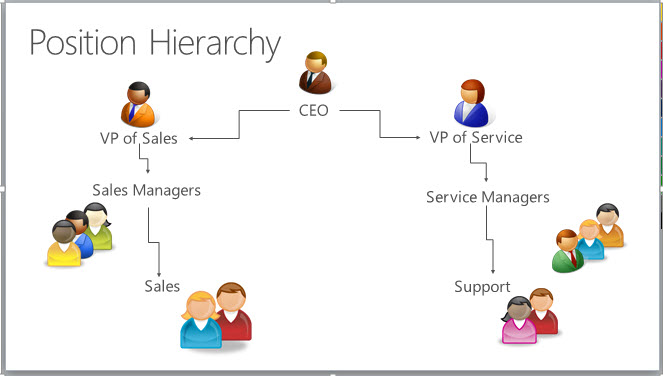
For a non-direct report, a manager has the Read-only access to the report’s data. For a direct report, the manager has the Read, Write, Update, Append, AppendTo access to the report’s data. To illustrate the Manager Hierarchy security model, let’s take a look at the diagram below. The CEO can read or update the VP of Sales data and the VP of Service data. However, the CEO can only read the Sales Manager data and the Service Manager data, as well as the Sales and Support data. You can further limit the amount of data accessible by a manager with “Depth”. Depth is used to limit how many levels deep a manager has Read-only access to the data of their reports. For example, if the depth is set to 2, the CEO can see the data of the VP of Sales, VP of Service and Sales and Service Managers. However, the CEO doesn’t see the Sales data or the Support data.

1ManagerHierachy

Position hierarchy
The Position hierarchy is not based on the direct reporting structure, like the Manager hierarchy. A user doesn’t have to be an actual manager of another user to access user’s data. As an administrator, you will define various job positions in the organization and arrange them in the Position hierarchy. Then, you add users to any given position, or, as we also say, “tag” a user with a particular position. A user can be tagged only with one position in a given hierarchy, however, a position can be used for multiple users. Users at the higher positions in the hierarchy have access to the data of the users at the lower positions, in the direct ancestor path. The direct higher positions have Read, Write, Update, Append, AppendTo access to the lower positions’ data in the direct ancestor path. The non-direct higher positions, have Read-only access to the lower positions’ data in the direct ancestor path.
To illustrate the concept of the direct ancestor path, let’s look at the diagram below. The Sales Manager position has access to the Sales data, however, it doesn’t have access to the Support data, which is in the different ancestor path. The same is true for the Service Manager position. It doesn’t have access to the Sales data, which is in the Sales path. Like in the Manager hierarchy, you can limit the amount of data accessible by higher positions with “Depth”. The depth will limit how many levels deep a higher position has a Read-only access, to the data of the lower positions in the direct ancestor path. For example, if the depth is set to 3, the CEO position can see the data all the way down from the VP of Sales and VP of Service positions, to the Sales and Support positions.

2PositionHierachy

Note
With the Position hierarchy security, a user at a higher position has access to the records owned by a lower position user or by the team that a user is a member of, and to the records that are directly shared to the user or the team that a user is a member of.
In addition to the Position hierarchy security model, the users at a higher level must have at least the user level Read privilege on an entity to see the records that the users at the lower positions have access to. For example, if a user at a higher level doesn’t have the Read access to the Case entity, that user won’t be able to see the cases that the users at a lower positions have access to.
Set up hierarchy security
To set up the security hierarchy, you must have an Administrator security role.
The hierarchy security is disabled by default. To enable, go to Microsoft Dynamics CRM > Settings > Security > Hierarchy security and select Enable Hierarchy Modeling.
Important
To make any changes in Hierarchy security, you must have the Change Hierarchy Security Settings privilege.
After you have enabled the hierarchy modeling, choose the specific model by selecting the Manager Hierarchy or Custom Position Hierarchy. All system entities are enabled for hierarchy security out-of-the-box, but, you can exclude selective entities from the hierarchy. The Hierarchy Security window shown below:

3HierachySecurity

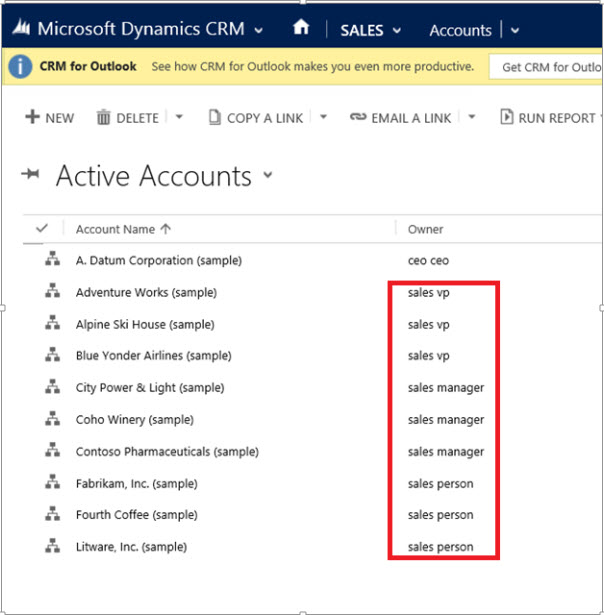
Set the Depth to a desired value to limit how many levels deep a manager has a Read-only access to the data of their reports. For example, if the depth equals to 2, a manager can only access his accounts and the accounts of the reports two levels deep. In our example, if you log in into CRM not as an Administrator, who can see all accounts, but, as the VP of Sales, you’ll only be able to see the active accounts of the users shown in the red rectangle, as illustrated below:

4ActiveAccounts

Note
While, the hierarchy security grants the VP of Sales access to the records in the red rectangle, additional access can be available based on the security role that the VP of Sales has.
Set up Manager and Position hierarchies
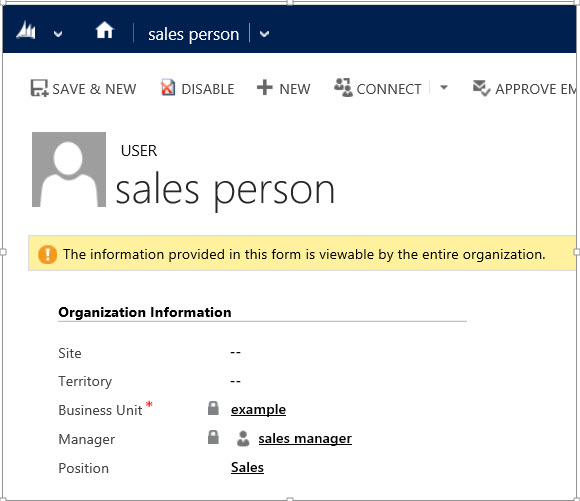
The Manager hierarchy is easily created by using the manager relationship on the system user record. You use the Manager (ParentsystemuserID) lookup field to specify the manager of the user. If you have already created the Position hierarchy, you can also tag the user with a particular position in the Position hierarchy. In the following example, the sales person reports to the sales manager in the Manager hierarchy and also has the Sales position in the Position hierarchy:

5SalesPerson

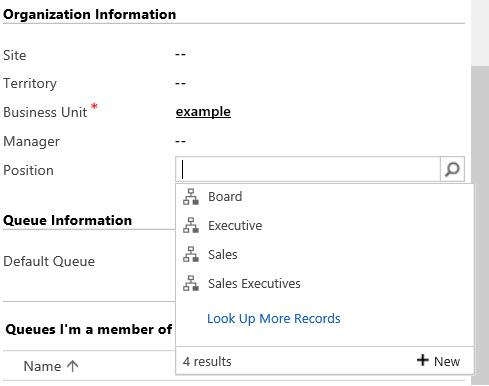
To add a user to a particular position in the Position hierarchy, use the lookup field called Position on the user record’s form, as show below:
Important
To add a user to a position or change the user’s position, you must have the Assign position for a user privilege.

6OrganizationalInformation

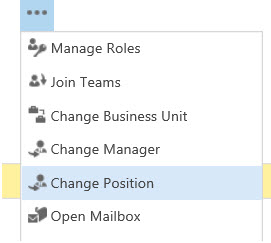
To change the position on the user record’s form, on the navigation bar, choose More (…) and choose a different position, as shown below:

7ManageRoles

To create a Position hierarchy, go to Microsoft Dynamics CRM > Settings > Security > Positions. For each position, provide the name of the position, the parent of the position, and the description. Add users to this position by using the lookup field called Users in this position. Below is the example of Position hierarchy with the active positions.

8ActivePostion

The example of the enabled users with their corresponding positions is shown below:

9EnabledUsers

Performance considerations

To boost the performance, Microsoft recommends:

• Keep the effective hierarchy security to 50 users or less under a manager/position. Your hierarchy may have more than 50 users under a manager/position, but you can use the Depth setting to reduce the number of levels for Read-only access and with this limit the effective number of users under a manager/position to 50 users or less.

• Use hierarchy security models in conjunction with other existing security models for more complex scenarios. Avoid creating a large number of business units, instead, create fewer business units and add hierarchy security.

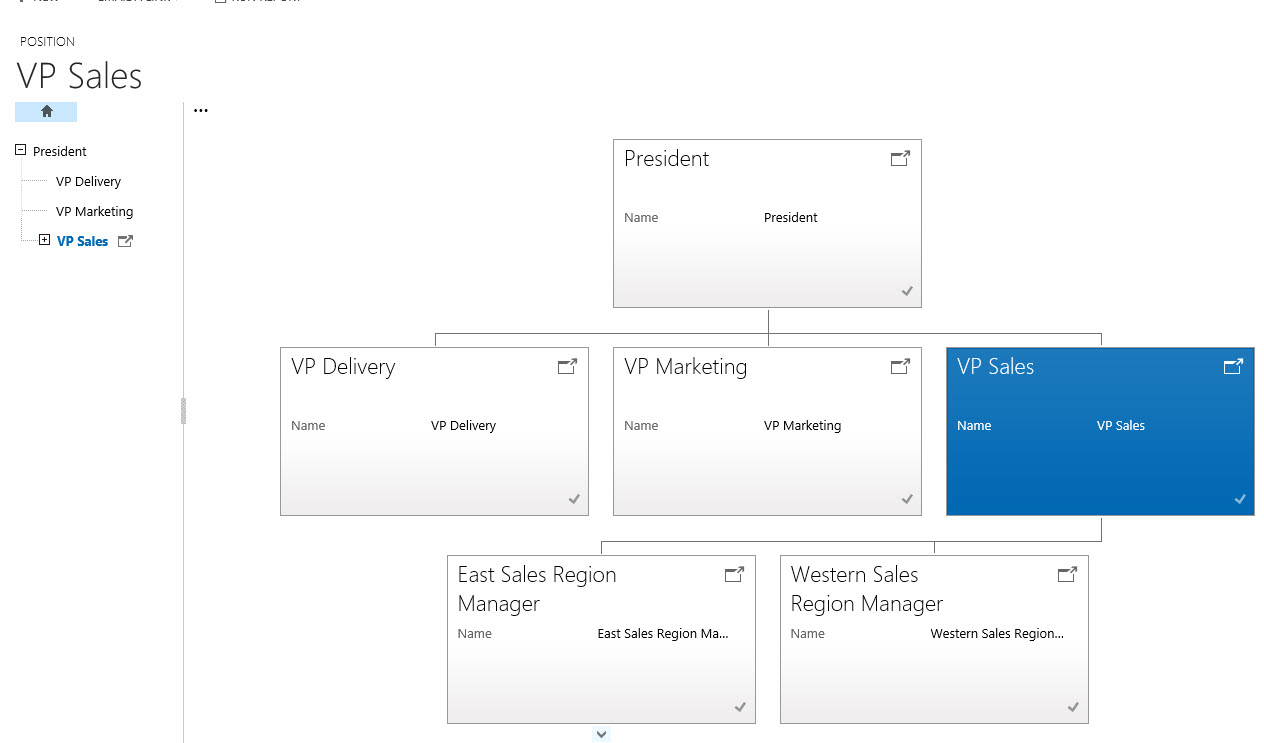
Another feature of this new functionality is the ability to view the Hierarchy you have developed with the ability to drill down into the native records to view the names assigned to each position. For example see the image below.

13-SalesPersonView


14-SalesPersonView

With this new feature in Microsoft CRM 2015 you can further refine your present security model and record access.

Steven

Posted in CRM 2015 New Features, CRM Configuration | Tagged , , , | Leave a comment

Further Improvements Uncovered In CRM 2015 – The Search Feature

In case you haven’t discovered it yet.  There have been additional improvements to the search feature in CRM including quick access to make your day more productive.  When you first open the application please look to the right of the navigation bar.  (See picture below)

OpeningScreen

To do more sophisticated searches, click the new Advanced Find icon, which is now on the navigation bar. To only see matches for a certain type of record, on the search results page, you can select a filter from the drop-down list. Click a search result to open it, same features as in previous versions of MSCRM. ( See picture Below)

Screen2.0AdvancedFindWindow

Improvements to quick search make it faster and easier to find customer records. Improved search capabilities provide a quick way to find and navigate to records by letting you enter keywords in the search box on the navigation bar. The search box supports using an asterisk (*) as a wildcard character, and allows the user to search across record types and get a full list of matching search results.  (This is why I call it a Global Search).  It will also allow pattern search, for example typing in a string of letters, the search feature will look for that specific pattern and render the results.

Lets take a look.  Click on the magnified glass icon on the navigation bar above.

Screen2NewSearchWindow

Type the string into the search box and click on the magnified glass to the right.   

Screen4ResultsScreenAs you can see from above the rendered results are quite impressive.  Any found “and” will render in the results window.  Hence “And”ersen.  What will equally impressive is the ability to limit the results by entity found to the right of the search box. 

Finally, for every entity rendered your users will have the ability to augment creation of a new record in the particular entity using the Quick Create Functionality. 

Let’s put this feature into perspective. You take a call from a potential lead, you open the global search feature because you are not sure if this persons record is already in the database.  You can accomplish the search in one location, and subsequently add the lead from the same window.  Equally important if you find the lead from the results you only have to click on the reference from the above window to open the lead’s record. 

Something this simple and useful can add to user’s productivity. 

I hope you find this new feature useful. 

Steven


Posted in CRM 2015 New Features | Tagged , , , | Leave a comment

How do I add new users in CRM 2015? The New Security Section

Note:  This addresses both On Premise and On Line

Microsoft released Dynamics CRM 2015 on Wednesday November 26, 2014, both the On-Premise and the On-Line Versions.   For the next few posts I will concentrate on some of the things I had to find by trial and error.

My first was how do I add a new user?  When I went to the Administrative Section under settings I noticed the user link was missing.  After some hunting I found it under a new navigation section called Security.

Security Section Access in CRM 2015

Security Section Access in CRM 2015

As you can see below some of the featurs from Administration section has been moved to Security.  Including, Users, Security Roles, Teams and Business Units.

These features work exactly as before, they are just located in this new section.

Security Section Features

Security Section Features

In addition, there are several new CRM 2015 features located on the security tab:

Field Security Profiles

Postions

Hierachy Security

Access Team Templates

Access Templates Administration

Access Templates Administration

About Access Team Templates:

There are two types of teams that you can work with: owner and access.

  • An owner team owns records and has security roles assigned to the team. The team’s privileges are defined by these security roles. In addition to privileges provided by the team’s security roles, users have the privileges defined by their individual security roles and by the roles from other teams in which they are members. A team has full access rights on the records that the team owns.
  • An access team doesn’t own records and doesn’t have security roles assigned to the team. The users have privileges defined by their individual security roles and by the roles from other teams in which they are members. The records are shared with an access team and the team members are granted access rights on the records, such as Read, Write, or Append.

An access team can be created manually (user-created) or automatically (system-managed). You can share multiple records with a user-created access team. A system-managed team is created for a specific record and other records can’t be shared with this team. For system-managed teams, you have to provide a team template that the system uses to create a team. In this template, you define the entity type and the access rights on the record that are granted to the team members when the team is created. A team template is displayed on all record forms for the specified entity as a list.

More about Access Team Templates at the following location:

I will cover Field Security Profiles, Postions and Hierachy Security in subsequent posts.

Thanks!

Steven


Posted in CRM 2015 New Features, CRM 2015 Requirements | Tagged | Leave a comment

Software Readiness for MSCRM 2015 On-Premise

Microsoft CRM 2015, code name Vega, alias The Fall Release, is just around the corner. Microsoft is promoting this new release heavily on their online site. I will eventually discuss new features in subsequent posts, at the present time,  I will focus on the changes required to the software platform in order to upgrade or install this new on premise version of MSCRM 2015.

In order to run the fall release, a number of the supported technologies currently supported in MSCRM 2013 will be depreciated. Rather than list what is being depreciated I will list what is supported for an on premise implementation of MSCRM 2015.

Windows Operating Systems:

The following Windows Server versions are not supported for installing and running Microsoft Dynamics CRM Server 2015:

  • Windows Server 2012 Foundation
  • Windows Server 2012 Essentials
  • Microsoft Windows Small Business Server editions
  • The Windows Server 2008 family of operating systems

Supported Windows Server 2012 editions

The following editions of the Windows Server 2012 operating system are supported for installing and running Microsoft Dynamics CRM Server 2015:

  • Windows Server 2012 R2 Datacenter
  • Windows Server 2012 R2 Standard
  • Windows Server 2012 Standard
  • Windows Server 2012 Developer

Server Virtualization:

Microsoft Dynamics CRM servers can be deployed in a virtualized environment by using Windows Server 2008 or Windows Server 2012 with Hyper-V or virtualization solutions from vendors who participate in the Microsoft Windows Server Virtualization Validation Program (SVVP). You must understand the limitations and best practices of server virtualization before you try to virtualize your installation of Microsoft Dynamics CRM. For information about Hyper-V, see the Microsoft Virtualization website.

Internet Information Services (IIS)

Microsoft Dynamics CRM Server 2015 supports Internet Information Services (IIS) versions 8.0 and 8.5.

It is recommend that you install and run IIS in Native Mode before you install Microsoft Dynamics CRM Server. However, if IIS is not installed and it is required for a Microsoft Dynamics CRM server role, Microsoft Dynamics CRM Server Setup will install it.

SQL Server editions

Any one of the following Microsoft SQL Server editions is required and must be installed on Windows Server 2008 (SP2 or R2) 64-bit-based versions or Windows Server 2012 (RTM or R2) 64-bit-based computers, running, and available for Microsoft Dynamics CRM:

  • Microsoft SQL Server 2012, Enterprise, 64-bit SP1
  • Microsoft SQL Server 2012, Business Intelligence, 64-bit SP1
  • Microsoft SQL Server 2012, Standard, 64-bit SP1

Important Notes:

  • 32-bit versions of Microsoft SQL Server database engine are not supported for this version of Microsoft Dynamics CRM.
  • SQL Server Compact or Microsoft SQL Server Express editions are not supported for use with Microsoft Dynamics CRM Server 2015.
  • Microsoft SQL Server 2008 versions are not supported for use with Microsoft Dynamics CRM Server 2015.

Software component prerequisites

The following SQL Server components must be installed and running on the computer that is running SQL Server before you install Microsoft Dynamics CRM Server 2015:

  • SQL word breakers This is only required for some Microsoft Dynamics CRM language editions. For more information about word breaker versions for languages supported by SQL Server see Configure and Manage Word Breakers and Stemmers for Search.
  • SQL Server Agent service
  • SQL Server full-text indexing

The following components must be installed and running on the computer where Microsoft Dynamics CRM Server 2015 will be installed:

  • Services
    • Indexing Service To install this service, see the Windows Server documentation.
    • IIS Admin
    • World Wide Web Publishing
  • Windows Data Access Components (MDAC)
  • Microsoft ASP.NET (Must be registered, but does not have to be running.)

SQL Server Reporting Services

Microsoft SQL Server Reporting Services is required for reporting features in Microsoft Dynamics CRM.

The following Microsoft SQL Server editions can be used for Microsoft Dynamics CRM reporting and must be installed on a Windows Server 2012 (x64 RTM or R2) 64-bit-based computer, running and available for Microsoft Dynamics CRM:

  • Microsoft SQL Server 2012, Enterprise, 64-bit SP1
  • Microsoft SQL Server 2012, Business Intelligence, 64-bit SP1
  • Microsoft SQL Server 2012, Standard, 64-bit SP1

Important Notes:

  • 32-bit versions of Microsoft SQL Server 2012 Reporting Services are not supported for this version of Microsoft Dynamics CRM.
  • SQL Server Compact or Microsoft SQL Server Express editions are not supported for use with Microsoft Dynamics CRM Server.
  • Microsoft SQL Server 2008 versions are not supported for use with Microsoft Dynamics CRM Server 2015.
  • Using a Microsoft SQL Server 2012 Reporting Services server running in SharePoint mode is not supported with Microsoft Dynamics CRM. For more information about Microsoft SQL Server 2012 Reporting Services SharePoint mode, see Install Reporting Services SharePoint Mode.

Microsoft Dynamics CRM Reporting Extensions requirements

The Microsoft Dynamics CRM Reporting Extensions component has the following requirements:

  • You must complete Microsoft Dynamics CRM Server Setup before you run Microsoft Dynamics CRM Reporting Extensions Setup.
  • You can install and run Microsoft Dynamics CRM Reporting Extensions on only one instance of Microsoft SQL Server Reporting Services on a computer.
  • The identity account running the instance of Microsoft SQL Server Reporting Services where the Microsoft Dynamics CRM Reporting Extensions are running can’t be the local system or a virtual account. This is required for Microsoft Dynamics CRM reporting to work because the identity account must be added to the PrivReportingGroup Active Directory security group that is used by Microsoft Dynamics CRM.
  • Separate deployments of Microsoft Dynamics CRM cannot share one Microsoft SQL Server Reporting Services server. However, a single deployment of Microsoft Dynamics CRM that has multiple organizations can use the same Microsoft SQL Server Reporting Services server.
  • You must run the Microsoft Dynamics CRM Reporting Extensions Setup on a computer that has a supported version of Microsoft SQL Server Reporting Services installed. More information: SQL Server Reporting Services
  • For smaller data sets and fewer users, you can use a single-server deployment or a multiple-server deployment. With larger datasets or more users, performance decreases quickly when complex reports are run. Use a multi-server deployment with one computer that is running SQL Server for Microsoft Dynamics CRM, and another server for Microsoft SQL Server Reporting Services.

Microsoft Dynamics CRM Reporting Authoring Extension Requirements

Microsoft Dynamics CRM Report Authoring Extension is required to author fetch-based reports by using SQL Server Data Tools.

You must install the Microsoft Dynamics CRM Report Authoring Extension on a PC that has the following software.

  • SQL Server Data Tools (SSDT) installed with either Microsoft Visual Studio 2012 or Microsoft Visual Studio 2010. More information: Install SQL Server Data Tools
  • If your organization uses Microsoft Office 365, make sure that the computer on which the Microsoft Dynamics CRM Report Authoring Extension is installed also has the Microsoft Online Services Sign-in Assistant installed on it. If Microsoft Online Services Sign-in Assistant is already installed, check the registry key SOFTWARE\Microsoft\MSOIdentityCRL and make sure that the TargetDir registry key in MSOIdentityCRL contains msoidcli.dll.

I will supplement this post soon with additional requirements for:

Sharepoint and Microsoft Office

My best,

Steven

Posted in CRM 2015 New Features, CRM 2015 Requirements | Leave a comment

How to concatenate two fields using workflow in Dynamics CRM 2011:

Topics to write about that will provide value seem to elude me at times.  In trying to provide value to my readers without the use of custom code in Microsoft CRM can sometime provide trying.  Here is a tip that I have found most do not know if possible using workflow.

Ever have two fields in a record and want to have both values automatically fill into a third field?  Did you know that was possible using CRM 2011 Workflow, (actually this is something you could have accomplished using CRM V4.0 or V3.0 also).

Let’s look at the business process first.

Scenario – You are a consultant for XYZ Company and your client would like to combine the last name field along with the business phone of the contact in order produce a  unique customer number.  How would you proceed?

Solution – Use workflow to complete the task.  One possible no code solution is represented below.

A bit of housekeeping; first let’s create the CustomerID field in CRM.  Go to Settings, Customizations; Customize the System, Entities, Contact, Fields, and click on the New Field button.  Since this is going to be a combination of Characters and Numbers we will use the single line of text option for the field type.

We will then add the field to the form.  Save and Publish.

Open your CRM Organization.  Go to settings, processes and click on the new button.

Name the process.  Since we are working with the Contact entity, chose it from the dropdown entity list, and classify this process category as workflow.  Click the ok button.

I always like to make all process on demand until I have debugged it.  In addition, since this process is going to be used by everyone in the company I will change the scope to organization.  Finally for the sake of this example, I will only use the trigger when a new record is created option.  (We can actually use the when record fields change option also in a more complex situation, for example, if there is no business phone number on create of the new record and eventually one is added we might want to generate the unique ID at that point of time.)  Now it is time to start adding steps to this process.

Our first step is to modify the CustomerID field with the Last name of the Contact.  So we will use the update step and choose the Contact Entity to update. We will plug the CustomerID with the last name.

Click on OK; your modify step should look as follows.  Click on save and close.

Next we will add another modify entity step and again choose the Contact entity.  This time we are going to use the operator called Append With.  (Using the Append With will add to any value already present in the field.)  For this example we want a “-“ in between the last name and phone number so we will add it to the CustomerID field.  In the form assistant we will choose the Business phone and click on ok.

The second update step should look as follows, (notice above the CustomerID field the “Append With” tag is present.

Note – In my example I wanted to make sure the customer ID process workflow would only update the CustomerID field under the following conditions; there is an entry in both the Last Name and Business Phone fields, in addition, if there is already a value in the CustomerID field I do not want the process to complete successfully.  (These steps are optional.) 

My workflow looks as follows prior to activation:

Now I want to manually test the workflow using the on demand option, or the Run workflow button from the contact record.

We can monitor the progress by clicking on the Workflow Tab under processes from the left navigation Window.

When the process completes as succeeded we can refresh the contact record, (either by clicking on F5 or close the record and reopen), to view the final results.

Our update and append works properly!

At this point there are a few items of housekeeping I usually want to accomplish.  Since this is a unique value I usually do not want anyone changing that value once it is generated.  The easiest way to accomplish this it to make the attribute CustomerID read only after the workflow has been created.  Please note – If you change the attribute properties to “Read Only” prior to completing the workflow you will not be able to use the attribute within the update process.  Therefor Rules Of Thumb, create the workflow, test, and then make the attribute “Read Only” after the testing is complete.

Finally I would un-publish the workflow and take away the on demand option as well as adding steps to stop the workflow after each “IF” statement as unsuccessful or successful if the workflow completes as expected.

From this point I would republish the workflow.

At this point I am sure to hear from all the developers a laugh, “I can do the same thing easier with Jscript on the attributes”.

Sure you can, and there are other methods in addition for accomplishing this same task.  This article was written for the business users who do not know how to write code and would like to configure CRM to suit their needs.

I hope this helps that audience.

Happy CRM’ing!

Steven

Posted in CRM Configuration, CRM Workflow | 10 Comments

Using the Microsoft Demo Hub and Demo Builder

Overview: Building demos historically has been a drain on resources due to the level of effort required in order to meet the stated goals of the prospect in order to win the subsequent business.  In order to close the gap between the uncertainties of winning the business and building a focused demo for the prospect Microsoft started releasing Demo images of the CRM Environment during Version 3.0.

At first the Demo Environment ran on VM Ware and was basic.  The value to the pre-sales effort was apparent; in such you no longer had to stand up a system, you could spin up the VM Ware image and start developing the demo on it.  In addition, the early images included Visual Studio, Exchange and the Email Router.  This provided a significant amount of time savings since the installation processes were circumnavigated by spinning up another copy of the image every time you needed a new demo.

CRM 2011 provided a few new challenges; structurally the VM Image was no long relevant since CRM 2011 required a 64 bit Operating System.  Microsoft moved the image to HyperV as a starting point.  In addition components necessary were included in later versions of the images, for example, Portal Integration, relevant Demo Data, SharePoint and SharePoint integration.

The presales effort benefited again because in most cases standing up this environment saved about 80% of the effort in the remaining presales activities.  The downside was apparent; you now had to invest in hardware in order to run HyperV in order to spin up the environment.  Microsoft estimates in order to build one complete HyperV Image with the CRM components cost approximately 300 hours in development time.

In addition to this investment, Rollups were now being released periodically, as well as Bi-annual Enhancement Releases.  In my efforts as a presales engineer, as each rollup was released I had to update each image in order to benefit from the enhancements.  In an effort to systematize the process I found myself creating a Golden Image that not only was updated as rollups were released, but also had standard tools I would use for every demo.  A good example is Microsoft’s Site Map Accelerator.

It is obvious the resource expenditure could easily get out of control very quickly for such a risky proposition, a presales demo to a prospect; especially since you weren’t guaranteed you were going to win the business.

In an effort to close this development cycle further and still provide the 80% boost during the presales effort Microsoft released a new tool called The Demo Hub.  The demo hub is a wizard based web application being developed in an iterative process focused on closing the gap in the presales development risk.  In its present format setting up a new development environment requires approximately 10 minutes of human interaction; you can then walk away from the configuration.

The wizard will configure, the CRM Organization, (you do have to set the organization up at CRM Live prior to starting the wizard), including all demo data, a SharePoint site and integration on Office 365 and Portals for Customers and Employees on Windows Azure.  When the configuration is completed an email is sent to your Live ID email account and within an hour you will receive an email alerting you; the configuration has been completed.

Example of the Email Sent from Demo Builder

Value Proposition: 

  1. Reduce demo set up time addresses the 80% Rule
  2. Allows Infosys to align with Microsoft’s Cloud Technologies
  3. Utilizes Microsoft CRM 2011, Windows Azure, and Office 365
  4. Ready to use demo scenarios complete with Demo Scripts and Demo Videos
  5. Complete demo data utilized including localization and language options
  6. New Microsoft tools automatically installed:
    1. A new Visual Ribbon Editor
    2. InsideView – Social Media Integration
    3. Montage Solution – Social Mash Up Enhancement
    4. Microsoft Demo Ager
    5. Partner Portal
  7. Configuration time requires approximately 10 minutes addressing the wizard criteria, Illustrated below, with the remainder of the configuration completed unattended
  8. Automatic email with all logins configured and links to each demo location, including login persona to these demo sites

Future Value:

  1. Focused on Enhancements, committed to an iterative process with greater flexibility
  2. Vertical outlook using Microsoft’s Industry Accelerators, (the ability to stand up a demo environment 80% ready for the Vertical Market you are presenting too)
  3. Component Focused Demo Configuration, for example, configuration centered around PowerView only.

Present Drawbacks:

  1. Horizontal focused, based on a software reseller scenario, therefore, the the base system will still need development geared to Vertical focus
  2. Development limitations inherent within CRM Live
  3. User is required to stand up a CRM Live instance independent of the Wizard prior to starting the process.

The Demo Hub is located at: http://demobuilder.cloudapp.net/unauthenticated-home/

Illustration: Creating your first demo Instance

Browse to the Demo Hub Area:http://demobuilder.cloudapp.net/unauthenticated-home/Log in with your Windows Live ID 
Click on Run Demo Builder
First time use Click on CRM Base Demo

Note:
if you start a demo and fail to complete when you enter the site again you have the option to resume previous demo configuration by selecting the appropriate button below.
Complete the form with the name of the prospect, region and scope of the demo

Note:
Prospect Region will determine the localization of   the subsequent configuration.
Name your Azure Portal
Identification of your CRM Live instance requires you to login using the Windows Live ID used to create your CRM instance
Logging into CRM Live Site
Choose the CRM organization you wish to configure
 Name your SharePoint Site
 Click Next
Your Demo will be configured unattended, duration approximately 45-65 minutes.
Demo Video located at the following location:https://demobuilderstorage.blob.core.windows.net/demos/BaseDemo/BaseDemo_Video.mp4

I can only say wow!

This is a great first step by Microsoft.  The value going forward is unlimited in helping me perform my job efficiently.   WELL DONE!

Happy CRM’ing,

Steven

Posted in CRM Announcements, CRM Configuration, CRM ISV Product Reviews | Leave a comment

Customizing the Sitemap Using Microsoft’s Site Map Editor:

Undoubtedly one of the first requests I receive with when assisting a new client is to downsize the MSCRM application to include only the “items” they need.   A number of times this includes removing items from the left navigation window or “Site Map”.

In order to modify the Site Map In CRM 2011 click on settings, customization, solutions, and create a new solution.  Save it so it becomes active.

Click on add existing button, and choose the Site Map option from the menu list.

Now you can save your solution, close it, and then export it.  At this point the only other requirement is the ability to modify XML in order to make the necessary changes you require. When finished you can import the solution back, and publish.

There is another method for modifying the Site Map.  During January, 2012 Microsoft Dynamics Labs published the Microsoft Dynamics CRM Site Map Editor utility that obviates the need write code in order to make these customizations.

You can download this very helpful utility at this location.

All documentation can be found at the following location.

The Microsoft Dynamics CRM Site Map Editor provides a quick and easy way for users to update the site map through a user interface within Microsoft Dynamics Users can use the Microsoft Dynamics CRM Site Map Editor to edit the different elements of a site map XML and their corresponding attributes without the use of code. There is also a drag-and-drop capability which allows the user to select a node and its sub-nodes and move it to a different location in the site map.

Let’s see how this useful utility works.

First step is to download the SiteMapEditormanaged.zip.cab file from the download site.   After downloaded, open you’re Microsoft Dynamics CRM Organization; go to settings, customizations and then solutions.  Click on the import button.

Browse to the SiteMapEditormanaged.zip.cab downloaded. Select the file, click on next, and next to import the file into your organization.

After the import is completed click Publish All Customizations button from the Solutions Window.

Shut down your CRM Organization then reopen go to settings, customization and then solutions you will see the Site Map Editor in the solutions window.

To open, double Click the solution. You will be presented with a visual representation of the Site Map.

This application is intuitive and very easy to use as will be demonstrated. As you can see you now have a visual representation of the site map along with the controls needed to manipulate the site map

You can add references (+)

Create Child References (Child)

Remove References (X)

Let’s try it out:

Scenario – Our client would like to display Goals within the My Work section of the Workplace.

Expand Workplace, Expand My Work, Click on My Work, Click on the add Child button.

To configure this New_Element do the following: 

  1. In ID change to New_Goals
  2. In Entity add the schema name goal, (you will need to know the exact underlying schema names in order to add navigation elements to the sitemap.)
  3. You now have the option to make these changes available for offline clients, check this box.

After you are completed you can click on the save button on the bottom.  You will get a dialog box asking you if you want to save all changes.  Now click on the save button.

The utility will automatically upload all changes to the sitemap to the server.  When the process is completed click on the close button.

Publish all customizations.

Click on Workplace and My Work, notice Goals are now on the Sitemap.

Wait a minute your client has just asked you to make sure Goals Just below the What’s New Section.

Click on settings, customizations, solutions, double click on the Sitemap utility, and expand Workplace then My Work.  Click on the Goals element and drag it up underneath What’s New.  Repeat the save procedures and then publish the changes.

Notice the Goals Reference is now located underneath What’s New, simply by dragging and dropping.

Of course this was a very simple example using this application.  I have found I have been able to put this to use many times over in my support of my clients.  My hope is you can see the benefit of using this application when customizing the Site Map, and can agree this will save the need for having to write code.

Happy CRM’ing

Steven

Posted in CRM Configuration, CRM ISV Product Reviews | Leave a comment

Microsoft SQL Server 2012 and Microsoft Dynamics CRM, Why Wait?

As is always the case with me, I have been dying to install SQL Server 2012 to get “acquainted” with the new features and functions and how it will impact Microsoft CRM 2011.  I had been holding off because for some reason I was under the mistaken belief I couldn’t upgrade SQL and use it with the current Rollup of CRM 2011.  I thought I would have to wait until Rollup 8 was released.  I was absolutely wrong!

After doing some research, I discovered as long as you are running Rollup 6 or greater for CRM 2011 you can upgrade your SQL Server instance to 2012.  By the way, if you are still using CRM Version 4.0 don’t worry, as long as you are running Rollup 21 or greater you can update your instance of SQL Server to 2012 also.

One last note after you upgrade your SQL Server instance and the 2012 Reporting Services you will have to install or re-install the Reporting Connector for Version 4.0 or the Reporting Extensions for 2011.

I happened across a few helpful resources to get you started:

–        To download a trial copy of SQL Server 2012 Click Here

–        More information on CRM 2011 and SQL Server 2012 Click Here

–        For Support of Microsoft Dynamics CRM and SQL Server 2012 Click Here

–        For a compatibility matrix of Microsoft CRM and Related Technologies Click Here

Happy CRMing!

Steven

Posted in CRM 2011 Reporting, CRM and SQL Server, CRM Announcements | Leave a comment

Using the Dashboard Reporting Control for Microsoft Dynamics CRM 2011

Recently I noticed a post on the Microsoft Forums regarding the how to render a report through a dashboard using Microsoft CRM.  Microsoft Dynamics Labs actually has a free solution published on the Marketplace called the Dashboard Reporting Control for Microsoft Dynamics CRM 2011 .

I have used this solution several times for clients and find it very valuable for clients who want to combine the power of SQL Server Reporting Services with the Dashboard function of CRM.

The references are a bit spotty; therefore I am going to attempt in this post to elaborate on this post how to use this tool.

First you must download the solution, please referrer to the link above, sign into the marketplace and save the solution locally.

Open your copy of Microsoft CRM 2011, (On line or On Premise the solution works on both).  Go to settings, customizations, solutions and click on the import button.

Browse to the Downloaded file called ReportcontrolforDashboard10man.zip.cab and select it. Click on Next, Next and import the solution into your copy of CRM 2011.

Click on Publish All Customizations.  When complete you are ready to use this tool.  To make sure this control is functioning properly go back to My Work, Dashboards click on the View Selector by Dashboards and choose the My Won, Lost and Open Opportunities.  Make sure the control is rendering the solutions’ built in report.

OK let’s create a new dashboard report component for ourselves.  I am going to for the sake of this example use one of the out of the box reports for this exercise.  Go to My Work, Reports, and highlight the User Summary Report, Click on the Edit button on the Ribbon.

Bring up the Edit Dialog box and hit the F11 Key on your Keyboard.  At this point you want to copy the GUID associated with this report, (Please see the illustration below). Very Important: Hint you want everything to the left of the Right of the %7B and the left of the %7B. 

Ok let’s install the report.  Go to Settings, Customizations, Customize the System, Dashboards.

Click on New.  Choose the Layout you wish to deploy and click on the Create button.

Name your new Dashboard, and then click on the Web Resource button.

When you installed the Dashboard solution you installed a control a Web Resource which actually mimics as Report Control for Dashboard. This control is called msdyn_ReportControl.  Browse for this control at the Add Web Resource Dialog Box.


Click ok fill in the Name and Label on the Webpage Dialog, in the Custom Parameter (data) paste the GUID you copied from above

Size and position the dashboard element on your new Dashboard. Save and then publish.

Go back to My Work, Dashboards and browse for your New Dashboard on the View Selector.  Your new element will render automatically.

Using the dashboard functions in CRM 2011 offers a great deal of power of reporting information from the database.  There are sometimes where the dashboard controls will not pick up exactly the information you require or you need to include sub-report functions in order to “Pull” the correct data from the database or you might want to use a graph element not available in the current feature set that you can use through a custom report.  Using the Reporting Control will allow you the added features available in SSRS for reporting while allowing your end users the ability to view these components in their dashboards.  It is just another option for your Configuration Tool Kit.

Below is an actual solution we produced for a client using this control and the dashboard functionality inherent in SSRS.

Happy CRMing!

Steven

Posted in CRM 2011 Dashboards, CRM 2011 Reporting, CRM Configuration, CRM ISV Product Reviews | 7 Comments

Lotus Notes Customers can Use Microsoft CRM Also!

Recently I was involved with a prospect who was interested in moving their client data into Microsoft CRM 2011.  They were primarily interested in the xRM capabilities, namely the ability to configure the system down to a few very specific functions as a phase one deployment.   In addition, they also wanted to continue to use Lotus Notes for their email functions.  I was my responsibility to provide a solution that would meet their needs.

Upon research of Notes integration to Microsoft CRM I found two ISV applications that would provide the necessary combination required to meet the prospect’s needs and provide value.  The whole idea was not to radically disrupt the end users workflow during phase one of the project while providing the stakeholders the rapid development platform and services available in Microsoft CRM.

After careful consideration we selected LinkPoint360 to integrate the prospects email to CRM 2011.  We made this decision because we felt the enhancements provided by LinkPont360 would meet our objectives of maintaining the end users productivity along with CRM’s flexibility to expand as the prospect’s needs expand in the future.

We were able to enhance the prospects experience in the following ways:

  • LinkPoint’s ability to record inbound/Outbound emails to Microsoft CRM with one click
  • The creation of Tasks or Appointments when recording Emails
  • The ability to jump right to a record in Microsoft CRM from your email
  • A function to drag and drop to create contacts or leads in Microsoft CRM
  • Create new records in Microsoft CRM from Lotus Notes
  • LinkPoint360 Integrates with Google Maps so you can get driving directions to your contacts with one button push

It all starts with the Vue Panel: 

 LinkPoint360 automatically resolves from emails received into Lotus notes.  As soon as I click on an email we can look at the corresponding contact information from CRM in the Vue panel.

From this panel I can view pertinent information about the contact for example all upcoming appointments.

Notice there an abundance of powerful features associated with this Vue Screen, for example:

  1. #1 Will open the corresponding contact record in Microsoft CRM
  2. #2 Will automatically record the email from Lotus Notes to Microsoft CRM
  3. #3 Will automatically open Google Maps and provide you with driving directions based on the contact location.
  4. #4 Will automatically open the related activity, (in this case the appointment) in Microsoft CRM.
  5. #5 Will allow the user to create additional activities from the view screen which will be recorded both on the local Notes Client and in Microsoft CRM.

If you want a condensed view of the contact record you only need to double click on the contact name in the view screen to be provided with some very useful information.

Note to developers– if you want to integrate custom entities to the Vue application you can do so using XML and the LInkpoint360 API.  For our example since we were dealing with a banking prospect we were able to demonstrate the ability to view all open bank accounts from one of the Vue tabs. 

There is one feature I forgot to mention.  Suppose you receive an email from a potential prospect and you would like to automatically create a CRM Record; what should you do?

They thought of that at LinkPoint360!  Notice my Vue window when I click on the email from JJ.  It tells me that there is no contact in CRM for JJ.  Also notice I have JJ’s signature on the bottom of the email.  Also notice at the very bottom of the Vue window I have the ability to highlight the signature line and drag the information over to the contact or lead creation and LinkPoint360 will automatically create a new contact in Microsoft CRM.

“I am worried because I might forget to push a link button and not record information into CRM from Lotus Notes.  What should I do?”

LinkPoint360 has automated Synchronization capabilities built in therefore you can Sync all contact and activities created in Notes automatically to Microsoft CRM 2011.

In addition, the product has granular configuration options.


In conclusion, we lead with LinkPoint360 and Microsoft CRM since we were able to meet the prospects objectives efficiently and provide a value proposition that was very hard to dispute and at a very affordable cost.

Happy CRM’ing,

Steven

Posted in CRM ISV Product Reviews | Leave a comment